Avoid placing your watch near devices generating strong magnetic field.
Avoid any impact that might damage your watch or effect its timekeeping.
Avoid exposing your watch to extreme changes in temperature.
Avoid direct contact with solvents, detergents, perfumes, chemicals, as they may damage your watch's components.
External Cleaning
Use soapy water and a soft brush to clean your watch (except leather and fabric straps).
Use a soft tissue dipped in soapy water to clean the case and crystal.
Rinse with clean water to eliminate washing residue. Never use cleaning agents. Wipe down with a soft cloth.
Always rinse your watch in lukewarm water after use in a saline or chlorinated environment (salt water, swimming pool).
Do not clean a leather strap with anything other than clean water.
Do not dry the strap on a hot surface or directly in the sun as the rapid evaporation of water could damage its shape and quality.
Battery
It is recommended that a retailer or jeweller replace the battery. Never change the battery yourself as you may damage the seals that ensure water resistance.
Battery type is on watch back.
Battery life may vary depending on actual usage. Never leave run-down batteries inside watches as they could leak, damaging the movement.
DO NOT DISPOSE OF BATTERY IN FIRE. DO NOT RECHARGE. KEEP LOOSE BATTERIES AWAY FROM CHILDREN.
Disposal
To help protect the environment and human health, your watch must not be disposed of with domestic waste but taken to an authorized collection point.
Water Resistance
The level of water resistance is indicated on the case back after the letters "WR":
Rating
Activity
3 ATM / 30 m / 100 ft
Splash / Light Rain / Showering / Washing Car
5 ATM / 50 m / 165 ft
Swimming
10 ATM / 100 m / 330 ft
Snorkeling (shallow water only)
Watch is water-resistant only as long as lens, push buttons and case remain intact.
Watch is not a diver watch and should not be used for diving.
Rinse watch with fresh water after exposure to salt water and dry completely.
Water resistance is not permanent. In the course of time, the gaskets of the case may become worn and reduce the water resistance of your watch.
Genuine Leather Straps
Genuine leather straps are subject to variations in both colour and texture due to the natural material from which each strap is made and will wear and change over time.
Solar Powered Watches
Expose the watch in direct sunlight, sunlight through a window, or artificial (indoor) lighting to charge the battery prior to use. When fully charged, the watch can function without additional charging for up to 4 months.
Store watch where it will be exposed to light or the battery will run down and require a full charge.
Adjust Your Strap
It is recommended that a retailer or jeweller adjust your strap.
Adjust a Bracelet
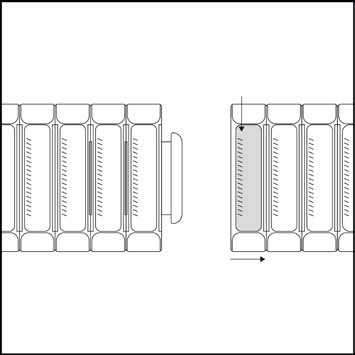
Open locking plate.
Move clasp to desired bracelet length.
Exert pressure while holding locking plate and slide clasp back and forth until it engages in groves on underside of bracelet.
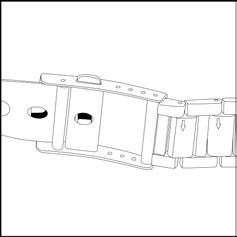
Press locking plate down until it snaps closed. Clasp can be damaged if excessive force is used.
Foldover Clasp Bracelet
fig. 1fig. 2fig. 3
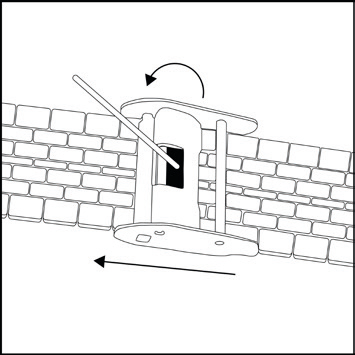
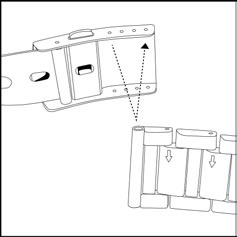
Find spring bar that connects bracelet to clasp.
Using a pointed tool, push in spring bar and gently twist bracelet to disengage.
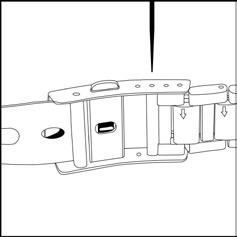
Determine wrist size, then insert spring bar in correct bottom hole.
Push down on spring bar, align with top hole and release to lock in place.
Size a Link Strap
Removing Links
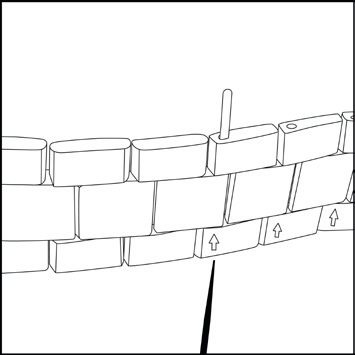
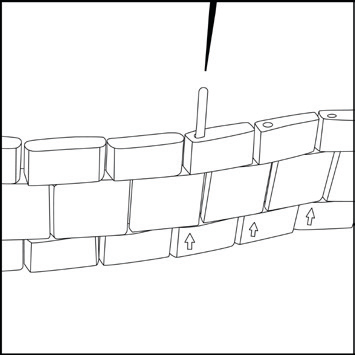
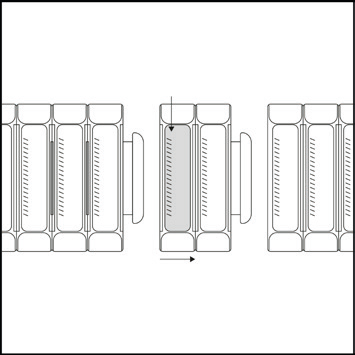
Place bracelet upright and insert pointed tool in opening of link.
Push pin forcefully in direction of arrow until link is detached (pins are designed to be difficult to remove).
Repeat until desired number of links are removed.
Re-Assembly
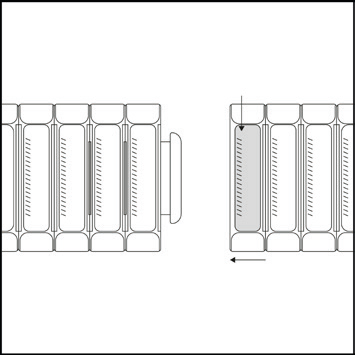
Re-join bracelet parts.
Push pin back into link in opposite direction of arrow.
Press pin down securely into bracelet until it is flush.
Size a Link Strap with Perfect Fit Expansion Band
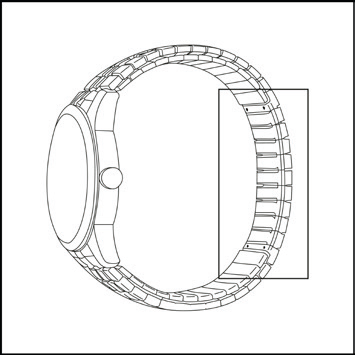
No tool, no jeweler required
Determine how many links you need to remove from your watch band.
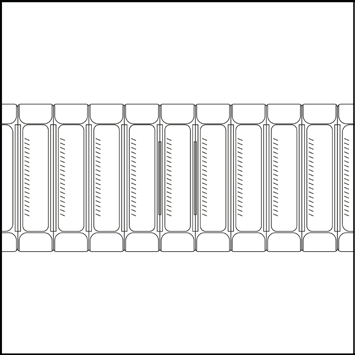
Squeeze the textured part of link opposite the link you want to remove and pull the band apart while still pressing down on the link.
Count the links you need removed and follow the same process to remove the appropriate section of link.
Squeeze down again on the textured part of the link and insert the opposite end of the band into the opening. The band is correctly adjusted when it hears a "click" when the links are slid back together.
Set Your Watch: Analog
Setting the Time
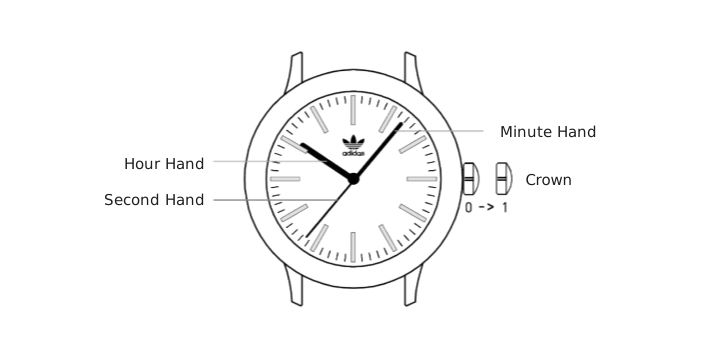
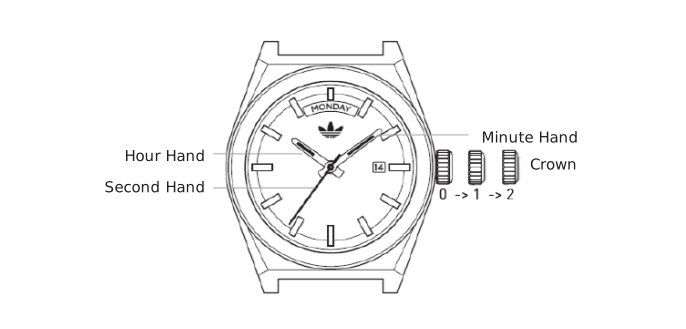
Pull the crown out to position 1.
Turn the crown to set the hour and minute hands. When setting the minute hand, advance it 4 to 5 minutes ahead of the desired time and then turn it back to the exact time.
Push the crown back to the normal position.
Setting the Time
Code Five
Pull the crown out to position 2.
Turn the crown to set the hour and minute hands. When setting the minute hand, advance it 4 to 5 minutes ahead of the desired time and then turn it back to the exact time.
Push the crown back to the normal position.
Setting the Date and the Day of the Week
Pull crown to position 1.
Turn crown counter clockwise to correct date.
Turn crown clockwise to correct the day of the week.
Push crown to position 0.
Set Your Watch: Chronograph
Features
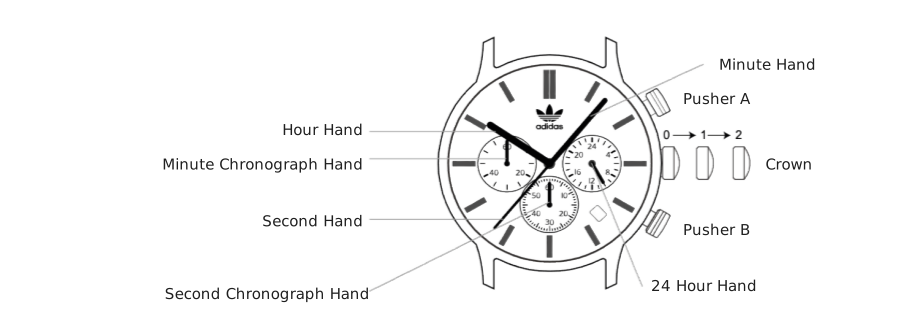
This watch has three functions: TIME, CALENDAR, CHRONOGRAPH.
Setting the Time
Pull crown to position 2.
Turn crown clockwise / counter clockwise to correct time.
Push crown to position 0.
Setting the Calendar
Pull crown to position 1.
Turn crown clockwise to correct calendar.
Push crown to position 0.
Using the Chronograph
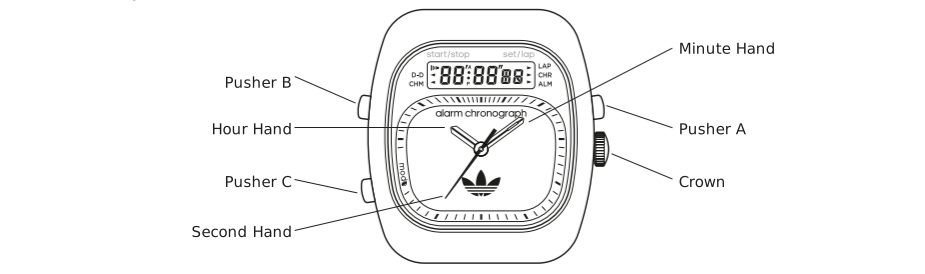
Before each time measurement operation, make sure that the chronograph counters are set to zero (pusher B).
Standard Measurement
Press pusher A to start timing.
Press pusher A to stop timing.
Press pusher B to reset.
Accumulated Elapsed Time Measurement
Press pusher A to start timing.
Press pusher A to stop timing.
Press pusher A to restart timing.
Press pusher A to stop 2nd timing.
Press pusher B to reset.
Split Time Measurement
Example of using split time measurement for two runners.
Press pusher A to start the timing of the first runner.
Press pusher B to stop and record the timing of the first runner (Once pusher B is activated, even though the stopwatch 1/20 sec. hand and the stopwatch sec. hand stop on the dial, the stopwatch still continues to time internally).
Press pusher B to start the timing of the second runner. The stopwatch sec. hand will jump to show internal accumulated time and to carry on timing of the second runner.
Press pusher A to stop the timing of the second runner and record the time.
Press pusher B for third time to reset, all stopwatch hands will return to 12 o'clock position.
Features
Retro Wave Two Chrono
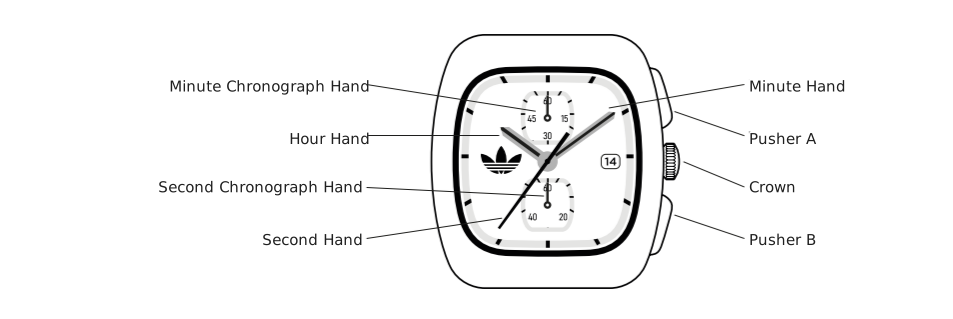
This watch has three functions: TIME, CALENDAR, CHRONOGRAPH.
Setting the Time
Pull crown to position 2.
Turn crown clockwise / counter clockwise to correct time.
Push crown to position 0.
Setting the Calendar
Pull crown to position 1.
Turn crown clockwise to correct calendar.
Push crown to position 0.
How to Set "0" Position
Pull crown to position 2.
Press pusher A for 2 seconds. Minute chronograph hand turns a full round and can now be set to correct "0" position.
Press pusher B repeatedly to set it to "0" position.
Press pusher A for 2 seconds. 1/5 second chronograph hand turns a full round and can now be set to correct "0" position.
Press pusher B repeatedly to set it to "0" position.
Push crown to position 0.
Using the Chronograph
Before each time measurement operation, make sure that the chronograph counters are set to zero (pusher B).
Standard Measurement
Press pusher A to start timing.
Press pusher A to stop timing.
Press pusher B to reset.
Accumulated Elapsed Time Measurement
Press pusher A to start timing.
Press pusher A to stop timing.
Press pusher A to restart timing.
Press pusher A to stop 2nd timing.
Press pusher B to reset.
Split Time Measurement
Example of using split time measurement for two runners.
Press pusher A to start the timing of the first runner.
Press pusher B to stop and record the timing of the first runner (Once pusher B is activated, even though the stopwatch 1/20 sec. hand and the stopwatch sec. hand stop on the dial, the stopwatch still continues to time internally).
Press pusher B to start the timing of the second runner. The stopwatch sec. hand will jump to show internal accumulated time and to carry on timing of the second runner.
Press pusher A to stop the timing of the second runner and record the time.
Press pusher B for third time to reset, all stopwatch hands will return to 12 o'clock position.
Features
Master Originals One Chrono
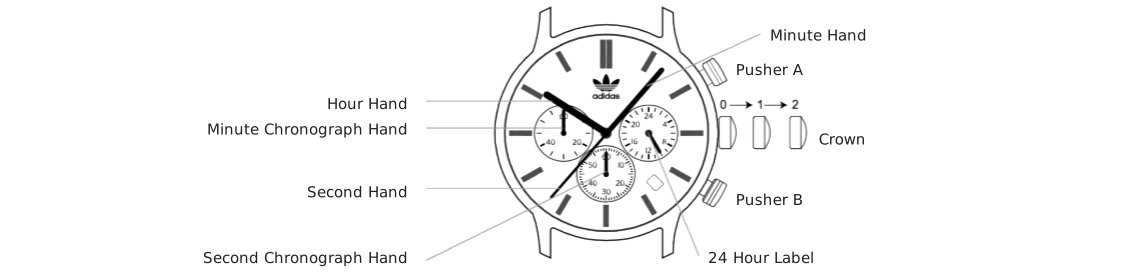
This watch has three functions: TIME, CALENDAR, CHRONOGRAPH.
Setting the Time
Pull crown to position 2.
Turn crown clockwise / counter clockwise to correct time.
Push crown to position 0.
Setting the Calendar
Pull crown to position 1.
Turn crown clockwise to correct calendar.
Push crown to position 0.
Using the Chronograph
Before each time measurement operation, make sure that the chronograph counters are set to zero (pusher B).
Standard Measurement
Press pusher A to start timing.
Press pusher A to stop timing.
Press pusher B to reset.
Accumulated Elapsed Time Measurement
Press pusher A to start timing.
Press pusher A to stop timing.
Press pusher A to restart timing.
Press pusher A to stop 2nd timing.
Press pusher B to reset.
Split Time Measurement
Press pusher A to start the timing.
Press pusher B to stop and record the split time.
Press pusher B to release the split time (Measurement and release of split time can be repeated by pressing pusher B).
Press pusher A to stop the timing.
Press pusher B for third time to reset, all stopwatch hands will return to 12 o'clock position.
Measurement of Two Competitors
Press pusher A to start the timing of the first runner.
Press pusher B to stop and record the timing of the first runner.
Press pusher A to start the timing of the second runner. The stopwatch sec. hand will jump to show internal accumulated time and to carry on timing of the second runner.
Press pusher B to stop the timing of the second runner and record the time.
Press pusher B for third time to reset, all stopwatch hands will return to 12 o'clock position.
Features
This watch has three functions: TIME, CALENDAR, CHRONOGRAPH.
Setting the Time
Pull crown to position 2.
Turn crown clockwise / counter clockwise to correct time.
Push crown to position 0.
Setting the Calendar
Pull crown to position 1.
Turn crown clockwise to correct calendar.
Push crown to position 0.
Using the Chronograph
Before each time measurement operation, make sure that the chronograph counters are set to zero (pusher B).
Standard Measurement
Press pusher A to start timing.
Press pusher A to stop timing.
Press pusher B to reset.
Accumulated Elapsed Time Measurement
Press pusher A to start timing.
Press pusher A to stop timing.
Press pusher A to restart timing.
Press pusher A to stop 2nd timing.
Press pusher B to reset.
Split Time Measurement
Example of using split time measurement for two runners.
Press pusher A to start the timing of the first runner.
Press pusher B to stop and record the timing of the first runner (Once pusher B is activated, even though the stopwatch 1/20 sec. hand and the big stopwatch sec. hand stop on the dial, the stopwatch still continues to time internally).
Press pusher B to start the timing of the second runner. The stopwatch sec. hand will jump to show internal accumulated time and to carry on timing of the second runner.
Press pusher A to stop the timing of the second runner and record the time.
Press pusher B for third time to reset, all stopwatch hands will return to 12 o'clock position.
Set Your Watch: Digital
Features
Digital Two
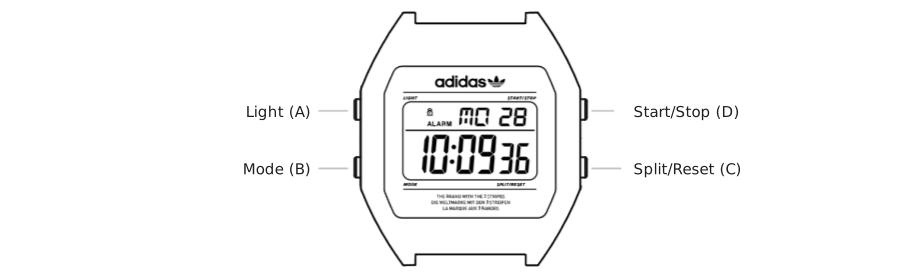
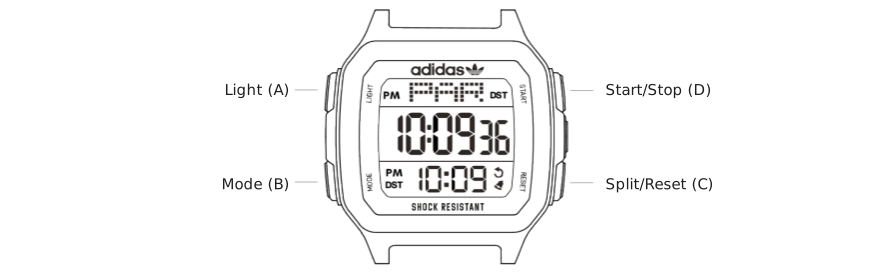
Press (A) for EL backlight. Remains on for 3 seconds in any Mode.
Press pusher B to advance through the modes in the following sequence: TIME OF THE DAY, ALARM, CHRONOGRAPH, COUNTDOWN.
Time of the Day (TOD) Mode
In TOD mode, press (C) to switch week/month. Press (C) key for 2 seconds to turn Chime On/Off.
Press (D) to toggle between 12Hr/24Hr time.
Set Time & Date
In TOD mode, press (C) for 3 seconds to enter time set mode. "Seconds" will flash.
Press (B) to change setting item flash.
Press (D) to adjust "seconds".
Press (D) to adjust, hold (D) to adjust quickly.
Press (C) to confirm and return to TOD mode.
If no button is pressed watch automatically return to TOD mode after 1 minute.
Alarm Mode
In Alarm mode, press (D) to turn Chime On/Off.
Set Alarm
In Alarm mode, press (C) for 3 seconds to enter Alarm set mode, "Time" will flash, press (B) to switch between hours or minutes.
Press (D) to adjust hour or minutes.
Press (C) to confirm and return to Alarm mode.
If no button is pressed, watch automatically returns to Alarm mode after 1 minute.
1/100 second resolution chronograph up to 1 hour, one second resolution up to 99:59.59 hours.
Optional Hourly chime and button beep.
3 seconds EL backlight and Night-Light function.
Time of the Day (TOD) Mode
Mode (B) can select different functions: Chronograph, Countdown, Alarm, Secondary Time.
Set Time & Date
In TOD mode, press (A) for 3 seconds to enter time set mode. Time Zone will flash.
Press Mode (B) to change setting item as the sequence: Hour – Minute – Second – Month – Day – Year – Hour Format – Date Format – Hourly Chime – Button Beep.
Press (B) to change setting item flash.
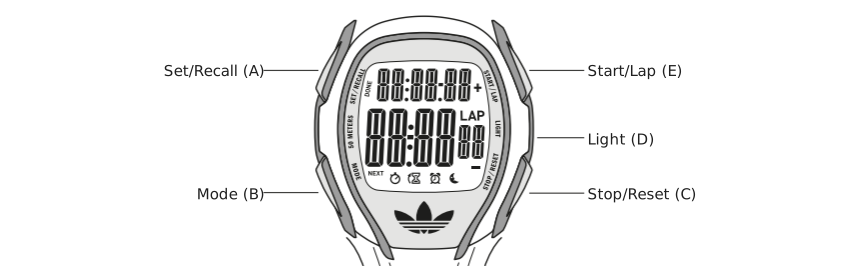
Press (C) or (E) to adjust "hours".
Press (C) or (E) to adjust, hold to adjust quickly.
Press (A) to confirm and return to TOD mode.
In Time Setting state, press (A) or no any key input for 3 minutes will exit Time set.
In Stopwatch mode, press (E) to start and (C) to stop, press (C) to clear (00'00"00).
When chronograph is running, press Set (E) to take current Lap or Split time and the display will flash for 10 seconds. At the same time, chronograph is continue counting for a new Lap, and after 10 seconds it will display the new Lap or Split information.
1/100 second resolution chronograph up to 1 hour, one second resolution up to 99:59.59 hours.
Optional Hourly chime and button beep.
3 seconds EL backlight and Night-Light function.
Time of the Day (TOD) Mode
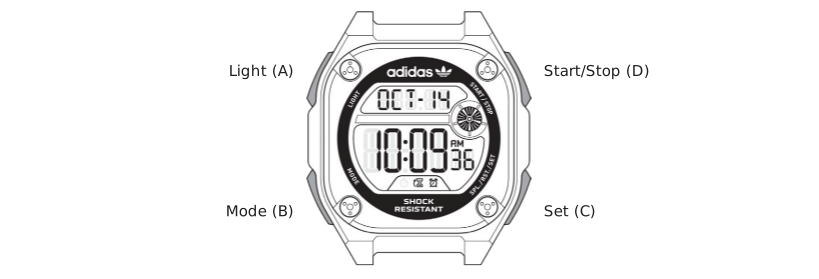
In TOD mode, press (D) to show the day of week.
Mode (B) can select different functions: Chronograph, Countdown, Alarm, Secondary Time.
Set Time & Date
In TOD mode, press (C) for 3 seconds to enter time set mode. "Hours" will flash.
Press Mode (B) to change setting item as the sequence: Hour – Minute – Second – Month – Day – Year – Hour Format – Date Format – Hourly Chime – Button Beep.
Press (B) to change setting item flash.
Press (D) to adjust "hours".
Press (D) to adjust, hold (D) to adjust quickly.
Press (C) to confirm and return to TOD mode.
In Time Setting state, press (C) or no any key input for 3 minutes will exit Time set.
In Stopwatch mode, press (D) to start or stop, press (C) to clear (00'00"00).
When chronograph is running, press Set (C) to take current Lap or Split time and the display will flash for 10 seconds. At the same time, chronograph is continue counting for a new Lap, and after 10 seconds it will display the new Lap or Split information.
When countdown is stopped, Press (C) to return to the set value.
When Countdown reaches 0, the alarm chimes for 10 seconds and "TMR" flashes. Press any key to stop sound.
Press (B) while Countdown timer is active to return to other modes, Countdown continues to operate in background.
Countdown Setting
When Countdown timer stops, hold (C). "Hour" will flash, press (B) to switch the setting item flash.
Press (D) to adjust value and hold (D) to adjust quickly.
Press (C) to confirm and return to Countdown mode.
If no button is pressed, watch automatically returns to Countdown mode after 1 minute.
Alarm Mode
In Alarm mode, press (C) button to turn On / Off the Alarm.
Set Alarm
In Alarm mode, press (C) to enter Alarm set mode, "Time" will flash, press (B) to switch between hours or minutes.
Press (D) to adjust hour or minutes.
Press (C) to confirm and return to Alarm mode.
If no button is pressed, watch automatically returns to Alarm mode after 1 minute.
When Alarm activates, press any button to stop.
Secondary Time
Set Secondary Time
In Time 2 mode, press (C) for 3 seconds to enter time set mode. "Hours" will flash.
Press Mode (B) to change setting item as the sequence: Hour – Minute – Second – Month – Day – Year – Hour Format – Date Format.
Press (B) to change setting item flash.
Press (D) to adjust "hours".
Press (D) to adjust, hold (D) to adjust quickly.
Press (C) to confirm and return to Time 2 mode.
Features
Retro Pop Digital
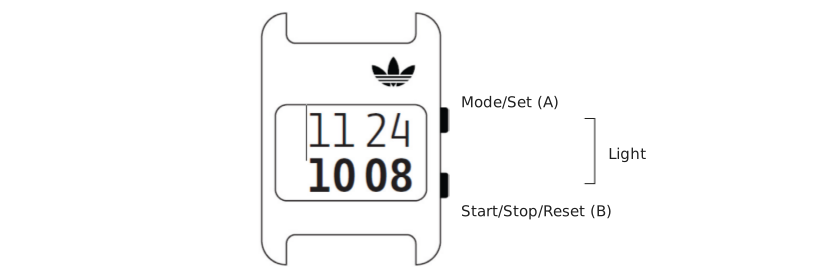
Press (A) and (B) for EL backlight. Remains on for 2 seconds in any Mode.
Press pusher (A) to advance through the modes in the following sequence: TIME OF THE DAY, CHRONOGRAPH, COUNTDOWN.
Press and hold (A) and (B) together for 3 seconds to activate the Night-Mode. The screen shall resume to the previous display state after the Night-Mode status banner timeout (1.5 sec). Press and hold (A) and (B) together for 3 seconds to turn off the Night-Mode. The moon icon shall go off. Night-Mode shall be automatically deactivated 1 hour after activation.
Time of the Day (TOD) Mode
In TOD mode, press (B) to switch from Date to Day of the Week, and press (B) for Seconds.
In TOD mode, press and hold (B) to switch to Time Zone 2. Press and hold (B) to switch back to Time Zone 1.
Set Time & Date
In TOD mode, press and hold (A) for 2 seconds to enter time set mode. Set Time 1 or Time 2.
Press (A) set "hour".
Press (B) to adjust "hour".
Press (A) to set "minute", and press (B) to adjust. Hold (B) to adjust quickly.
Press (A) to set "seconds", press (B) to adjust. Hold (B) to adjust quickly.
Press (A) to set "year", and press (B) to adjust. Hold (B) to adjust quickly.
Press (A) to set "month", and press (B) to adjust. Hold (B) to adjust quickly.
Press (A) to set "date", and press (B) to adjust. Hold (B) to adjust quickly.
Press (A) to set Time 12HR / 24HR and press (B) to switch.
Press (A) to set "beep" On/Off and press (B) to switch.
Press and hold (A) to confirm and return to TOD mode.
If no button is pressed watch automatically return to TOD mode after 1 minute.
Chronograph Mode
1/100-seconds resolution up to 1 hour; one second resolution up to 99:59:59 hours.
In Chronograph mode, press (B) to start or stop. Press and hold (B) to clear (00'00"00).
Hold down (B) for 2 seconds to return to the set value when the countdown stops.
When Countdown reaches 0, the alarm chimes and "TMR" flashes. Press any pusher to stop sound.
Press (A) while Countdown timer is active to return to other modes, Countdown continues to operate in background.
Countdown Setting
When Countdown timer stops, hold (A) for 3 seconds. "Hour" will flash, press (A) to switch the setting item flash.
Press (B) to adjust value and hold (B) to adjust quickly.
Press (A) to confirm and return to Countdown mode.
If no button is pressed, watch automatically returns to Countdown mode after 1 minute.
Set Your Watch: World Time
Features
LCD screen displays hour, minute, second, year (2000 – 2099), month, date, day of the week.
12-hour / 24-hour format selectable, auto-calendar.
Time of 85 major cities.
Hourly chime + 3 independent daily alarms.
Countdown timer can be set in the range of 1 minute to 180 minutes, and with auto-repetition function. When countdown time reaches the last one minute, the watch will sound every 10 seconds and then every second for the last 10 seconds.
Stopwatch starts counting from 0.01 second, the maximum display range of it is 9 hours, 59 minutes, 59.99 seconds. Ten groups of SPL times.
EL backlight.
Modes
Press (A) for EL backlight. Remains on for 3 seconds in any Mode.
Press pusher B to advance through the modes in the following sequence: TIME OF THE DAY, ALARM 1, ALARM 2, ALARM 3, CHRONOGRAPH, COUNTDOWN.
Backlight and DST Setting
In any mode, press (B)+(C) to enter Backlight and DST setting modes.
In Backlight mode, press (D) to select On or Off.
In DST mode, press (C) to select City Code chart, press (D) to switch a City Code time between Standard Time (STD) and Daylight-Saving Time (DST). Press (B) to exit.
Press (B) to exit setting mode.
Time of the Day (TOD) Mode
In TOD mode, press (C) to switch between Home Time + World Time Mode and Home Time + Date Mode.
In Home Time + World Time Display Mode, press (D) to scroll through City Codes (refer to the City Code chart).
In Home Time + World Time Display Mode, press (B) + (D) together, World Time and Home Time will change each other.
Press (B) for 2 seconds to enter time setting screen. Full screen will flash, press D button to turn On/Off Hourly chime.
Set Time
Press (C) to select items to be adjusted. The sequence is as follows: Screen Flashing, City, Seconds, Minutes, Hour, Month, Date, Year, 12/24H format.
Press (D) to adjust selected item.
Press (B) to exit setting mode.
Day of the week will automatically adjust after year and month have been adjusted.
Daily Alarm Mode
In Alarm mode, press (D) to view alarm time of the corresponding city. If you need to re-set the alarm time of Home Time, press (D) to select City Code of your home city.
Press (B) for 2 seconds to enter alarm setting screen.
Press (D) to turn On/Off alarm. Press (C) to select adjusted item: Alarm On/Off, Hour, Minutes. Press (D) to adjust selected item. Press (B) to confirm and return to alarm display mode.
When Alarm time of home city has been set, press (D) or (C) to select the city, Alarm time of home city will automatically adjust according to the time difference.
When Alarm time is reached, Alarm chime will automatically stop after 20 seconds, press (B), (C) or (D) to stop Alarm.
Chronograph Mode
In Stopwatch mode, press (D) to Start/Stop.
Reset to zero by pressing (D) + (C), LAP records will also reset.
When the Stopwatch is counting, press (C) for split (SPL) time, after 10 seconds watch will return to counting.
Press (D) button to record each SPL times (LAP1–LAP10).
If LAP time is full, new LAP time will replace the last LAP record.
When watch stops counting, press (C) to view LAP record mode, press (B) to exit LAP record mode.
When Stopwatch is counting, press (C) to enter countdown time mode, Stopwatch will continue counting in background.
Countdown Mode
In Countdown mode, press (D) to Start/Stop counting, the original setting (countdown) time will flash after it stops counting, then press (C) to Start/Stop cycle countdown time. If countdown time needs to be re-set, press (C) to adjust when setting time is flashing (Countdown time can be set between 1–180 minutes), press (B) to exit time setting.
When Countdown time stops, press (D) + (C) to return to original setting time.
When last minute of Countdown is reached, warning tone will sound every 10 seconds, during the last 10 seconds warning tone will sound every second. When Countdown finishes, warning tone will sound for 10 seconds continuously.
City Code Chart
Code
City
UTC Offset
PPG
Pago Pago, AS
−11:00
HNL
Honolulu, US
−10:00
ANC
Anchorage, US
−9:00
AKT
Alaska Standard
−9:00
LAX
Los Angeles, US
−8:00
YVR
Vancouver, CA
−8:00
PST
Pacific Standard
−8:00
DEN
Denver
−7:00
YEA
Edmonton
−7:00
MST
Mountain Standard
−7:00
CHI
Chicago
−6:00
MEX
Mexico City
−6:00
YWG
Winnipeg
−6:00
CST
Central Standard
−6:00
MIA
Miami
−5:00
NYC
New York
−5:00
YTO
Toronto
−5:00
EST
Eastern Standard
−5:00
CCS
Caracas
−4:00
YHZ
Halifax
−4:00
SCL
Santiago
−4:00
AST
Atlantic Standard
−4:00
YYT
St. Johns
−3:30
BUE
Buenos Aires
−3:00
RIO
Rio de Janeiro
−3:00
WGT
West Greenland
−3:00
FEN
Fernando de Noronha
−2:00
RAI
Praia
−1:00
EGT
East Greenland
−1:00
UTC
Coordinated Universal Time
00:00
WET
Western European Time
00:00
LIS
Lisbon
00:00
LDN
London
00:00
WAT
West Africa
+01:00
AMS
Amsterdam
+01:00
BER
Berlin
+01:00
MAD
Madrid
+01:00
MCM
Monte Carlo
+01:00
PAR
Paris
+01:00
PRG
Prague
+01:00
ROM
Rome
+01:00
STO
Stockholm
+01:00
CAT
Central Africa Time
+02:00
EET
Eastern European Time
+02:00
SAT
South Africa Standard
+02:00
ATH
Athens
+02:00
CAI
Cairo
+02:00
HEL
Helsinki
+02:00
JRS
Jerusalem
+02:00
NIC
Nicosia
+02:00
ANK
Ankara
+03:00
EAT
East Africa Time
+03:00
BGW
Baghdad
+03:00
DOH
Doha
+03:00
JED
Jeddah
+03:00
MOS
Moscow
+03:00
THR
Tehran
+03:30
GST
Gulf Standard
+04:00
DXB
Dubai
+04:00
KBL
Kabul
+04:30
KHI
Karachi
+05:00
DEL
Delhi
+05:30
KTM
Kathmandu
+05:45
DAC
Dhaka
+06:00
RGN
Yangon
+06:30
CXT
Christmas Island Time
+07:00
BKK
Bangkok
+07:00
AWT
Australian Western Standard
+08:00
BEI
Beijing
+08:00
SHA
Shanghai
+08:00
CEB
Cebu
+08:00
HKG
Hong Kong
+08:00
KUL
Kuala Lumpur
+08:00
MNL
Manila
+08:00
PER
Perth
+08:00
SIN
Singapore
+08:00
TPE
Taipei
+08:00
SEO
Seoul
+09:00
TKY
Tokyo
+09:00
ADL
Adelaide
+09:30
AET
Australian Eastern Standard
+10:00
GUM
Guam
+10:00
SYD
Sydney
+10:00
NOU
Noumea
+11:00
WLG
Wellington
+12:00
Set Your Watch: Analog-Digital
Features
6-digit LCD display show hour, minute, second, month, day.
Small hand indicates weekday.
Analog and digital time synchronization.
Automatic calendar (Year 2000 to 2099).
12/24-hour time formats.
World time (48 cities).
5 alarms, hourly chime functions.
Stopwatch function (max. range: 23 hours 59 minutes 59 seconds).
In any mode, press (A) to illuminate night-light EL backlight.
Press (B) to scroll through functions: TIME OF THE DAY (TIME), WORLDTIME (WT), STOPWATCH (STW), TIMER (TMR), ALARM (ALM).
In any mode, press (B) for 2 seconds to return to normal time mode.
In any mode, press (A) and (B) at the same time, hands will move to keep off LCD display.
Home City & DST Setting
Press (B) and scroll to ‘TIME’ mode.
Press & hold (D) until ‘SET’ flashes then disappears from display and current city code appears and scrolls across display. You are now in Home City setting mode.
Press (C) to advance or (A) to scroll back through City Code list to find the one you want. Pressing and holding (C) or (A) will advance City at a faster rate. Complete list of City Codes is located at the end of this manual.
Press (D) after you have selected your Home City to return to timekeeping mode.
Set Time & Date
Press (B) and scroll to ‘Time’ mode.
Press and hold (C) until ‘Set’ flashes and disappears from display and the current city code scrolls in display.
Press (B) to set DST. Use (A) or (C) to select On/Off.
Press (B) to scroll to 12/24-hour format. Use (A) or (C) to select 12H or 24H.
Press (B) to enter ‘Seconds’. Press (C) to reset to zero.
Press (B) to enter ‘Hour’. Press (A) to advance or (C) to go back. Note: be sure to scroll so you can select AM or PM. Note: in 24H mode no "P" will be displayed to indicate PM.
Press (B) to enter ‘Minute’. Press (A) to advance or (C) to go back. Repeat to enter ‘Year’, ‘Month’, ‘Day’.
Press (B) to enter ‘Key’. Press (A) or (C) to toggle between Key/Mute. If ‘Key’ is selected, watch will chime each time button is pressed.
Press (B) to select ‘Light’. Press (A) or (C) to select 1 or 3 second duration for EL backlight to stay illuminated.
Adjust Hands Reference Position
If the hands and digital display time are not consistent, please use the following method to adjust the hands to reference position:
Press (B) and scroll to ‘Time’ mode.
Press and hold (D) for approximately 5 seconds or until ‘SUB’ begins to flash. Once ‘SUB’ is flashing, release (D).
Watch is now in Day of the Week hand adjustment mode.
If day of the week hand is not pointing to ‘SU’ (Sunday), press (A) or (C) to move hand there. Holding down (A) or (C) will move hand at faster rate of speed.
Once day of week hand is pointing to ‘SU’, press (B) to move to hour hand adjustment.
Hour Hand Adjustment – ‘0:00’ will appear in display with ‘0’ flashing. Press (A) or (C) to move hour hand to 12 o’clock position.
Once hour hand is pointing at 12 o’clock, press (C) to move to minute hand adjustment.
Minute Hand Adjustment – ‘0:00’ remains on display, but ‘00’ flashing. Press (A) or (C) to move to minute hand to 12 o’clock position.
Press (D) to return to ‘Time’ mode.
World Time Mode
Press (B) until WT appears.
Press (C) to scroll each World Time city – 48 World Time cities / 31 time zones.
Press (D) to view current world time city name (scrolling: 3 letter abbreviation then full city name).
Set Daylight Saving Time (DST)
In World Time Mode, hold down (D) button for approximately 3 seconds to turn DST On/Off.
DST icon appears when DST is on & time will increase by 1 hour. DST setting affects only city being displayed. Note: if UTC is selected as Home City, there is no Daylight Savings Time (DST).
Stopwatch Mode
Press (B) until STW appears.
Press (C) to start timing, press (C) to stop timing, press (D) to reset to ‘00’.
To take a Split Time: Press (C) to start timing. Press (D) to see split time. Press (D) to release split. Press (C) to stop timing. Press (D) to reset to ‘00’.
Elapsed time is shown in 1/100th-second units. After the first hour, elapsed time will be shown in one-second units. Stopwatch timing range: 23 hours 59 minutes 59 seconds. If switching to the other mode when stopwatch running, the stopwatch will be running at the background.
Alarm Mode
In alarm mode, press (D) to select 5 sets of alarms and hourly chime, press (C) to turn the alarm ON or OFF.
Press (D) to switch alarm group number: AL1 > AL2 > AL3 > AL4 > AL5 > SIG.
In any mode, when reaching alarm time, it will chime for 10s. During the alarm, press any key to stop it. When the hourly chime is turned ON, it will sound twice at each hourly time.
Set Alarm
Press (B) until ALM appears.
Press (C) to select alarm (ALM1 thru ALM5) and hourly chime (SIG).
To turn on hourly chime (SIG) press (D).
Countdown Mode
Press (B) until TMR appears.
Press (C) until ‘SET’ flashes and then disappears and hour digits starts to flash.
Press (B) to scroll through Hour / Minute / Second. Flashing value indicates item to be set.
Press (C) to increase time or press (A) to decrease time.
Press (D) to exit countdown timer setting mode.
Once desired countdown time has been set press (C) to start timer.
Press (C) to stop timer if needed. Timer can be reactivated by pressing (C) again.
When timer reaches ‘0:00:00’ press any button to turn off.
Press (D) to reset timer.
Water Resistance / Shock Resistance
Water resistant up to 100 meters (328 ft).
Rinse watch with fresh water after exposure to salt water or perspiration.
Shock-resistance will be indicated on watch face or caseback. Watches are designed to pass ISO test for shock-resistance. However, care should be taken to avoid damaging crystal/lens.
City Code Chart
Code
City
UTC Offset
PPG
Pago Pago, AS
−11:00
HNL
Honolulu, US
−10:00
ANC
Anchorage, US
−9:00
LAX
Los Angeles, US
−8:00
YVR
Vancouver, CA
−8:00
DEN
Denver
−7:00
YEA
Edmonton
−7:00
CHI
Chicago
−6:00
MEX
Mexico City
−6:00
NYC
New York
−5:00
YHZ
Halifax
−4:00
YYT
St. Johns
−3:30
BUE
Buenos Aires
−3:00
RIO
Rio de Janeiro
−3:00
FEN
Fernando de Noronha
−2:00
RAI
Praia
−1:00
UTC
Coordinated Universal Time
00:00
LIS
Lisbon
00:00
LDN
London
00:00
MAD
Madrid
+01:00
PAR
Paris
+01:00
ROM
Rome
+01:00
BER
Berlin
+01:00
STO
Stockholm
+01:00
ATH
Athens
+02:00
CAI
Cairo
+02:00
JRS
Jerusalem
+02:00
JED
Jeddah
+03:00
MOS
Moscow
+03:00
THR
Tehran
+03:30
DXB
Dubai
+04:00
KBL
Kabul
+04:30
KHI
Karachi
+05:00
DEL
Delhi
+05:30
KTM
Kathmandu
+05:45
DAC
Dhaka
+06:00
RGN
Yangon
+06:30
BKK
Bangkok
+07:00
BEI
Beijing
+08:00
HKG
Hong Kong
+08:00
SIN
Singapore
+08:00
TPE
Taipei
+08:00
SEO
Seoul
+09:00
TKY
Tokyo
+09:00
ADL
Adelaide
+09:30
GUM
Guam
+10:00
SYD
Sydney
+10:00
NOU
Noumea
+11:00
WLG
Wellington
+12:00
Features
Retro Wave Three
This watch has five functions: ANALOG TIME, DIGITAL TIME, ALARM, CHRONOGRAPH, DATE.
Setting the Analog Time
Pull crown to position 1.
Turn crown clockwise / counterclockwise to correct time.
Push crown to position 0.
Setting the Digital Time
In Time display mode:
Press (C) for 2 seconds to enter in Time setting state. It will start setting the seconds, press pusher C to switch setting items (Minutes, Hours, Hour Format, Exit).
Press (B) to increase the setting value.
In the setting state without key operation for more than 3 minutes, current settings are saved and exit the setting state automatically.
Alarm Mode
In Alarm mode, press (C) button to turn On / Off the Alarm.
Press (B) and (C) together for 2 seconds to enable or disable the hourly chime.
Setting the Alarm
In Alarm mode, press (C) for 2 seconds to enter Alarm setting state, hour is flashing. Pressing on (C) will switch the setting items and press (B) will change the setting value.
In the setting state without key operation for more than 3 minutes, current settings are saved and exit the setting state automatically.
Chronograph Mode
1/100-seconds resolution up to 1 hour.
In Chronograph mode, press (B) to start or stop. Press (C) to clear (00'00"00).
Split Time Measurement
Example of using split time measurement for two runners.
Press (B) to start the timing of the first runner.
Press (C) to enter in split state and return to normal display after 5 seconds.
When Chronograph is running, press (B) again and will stop. Press (C) to clear (00'00"00).
When Chronograph is running to max time (59'99"99) it will stop automatically.
Setting the Date
In Date Mode, press (C) for 2 seconds, date will flash, with settings value as follow: DAY – MONTH – WEEK – EXIT.
Press (B) to increase setting value.
In the setting state without key operation for more than 3 minutes, current settings are saved and exit the setting state automatically.