Your Aston Martin watch was designed in compliance with the highest
standards of manufacture. It is warrantied against manufacturing
defects by Timex Group for a period of ONE YEAR from the original
purchase date, except as otherwise provided by law in the original
purchase country. Timex Group and its worldwide affiliates and
partners will honor this International Warranty.
To obtain warranty service, please contact your local authorized
Timex Group service center: [email protected].
Proof of purchase will be required for all warranty claims, clearly
showing the date, item purchased, and the retailer from which the
purchase was made. Warranty service is only honored on watches
purchased directly from Aston Martin authorized retailers. Second
hand or private sales will not be honored.
For in warranty services, Timex Group may at their option replace the
watch with an identical model or a model with similar features.
Important — Please Note That This Warranty Does Not Cover Defects or Damages to Your Watch:
after the warranty period expires;
if the watch was not originally purchased from an authorized Timex Group retailer;
from repair services not performed by Timex Group;
from loss or theft, accidents, tampering or abuse;
lens or crystal, strap or band, watch case, attachments, battery, normal wear and tear.
This warranty and the remedies contained herein are exclusive and in
lieu of all other warranties, express or implied, including any
implied warranty of merchantability or fitness for particular
purpose. Timex Group is not liable for any special, incidental or
consequential damages.
Some countries and states do not allow limitations on implied
warranties and do not allow exclusions or limitations on damages, so
these limitations may not apply to you. This warranty gives you
specific legal rights and you may also have other rights which vary
from country to country and state to state.
Aston Martin watches have been developed with the highest
attention to quality, function and detail. Please read the
following instructions carefully to fully understand all of the
functions of your finely crafted timepiece.
General Recommendation
Avoid placing your watch near devices generating strong magnetic field.
Avoid any impact that might damage your watch or effect its timekeeping.
Avoid exposing your watch to extreme changes in temperature.
Avoid direct contact with solvents, detergents, perfumes, chemicals, as they may damage your watch’s components.
External Cleaning
Use soapy water and a soft brush to clean your watch (except leather and fabric straps).
For sapphire-coated mineral glass, use a microfiber cloth slightly dampened with water. For deeper cleaning, lukewarm water and mild soap are suitable. Avoid harsh chemicals and abrasives.
For titanium components, clean gently with a soft cloth and mild soapy water. Avoid abrasive compounds or polishing agents, as these may alter the natural finish.
For ceramic components, use a soft damp cloth. For deeper cleaning, use mild soap and a soft brush. Avoid strong chemicals or abrasive cleaners.
Always rinse your watch in lukewarm water after use in salty or chlorinated environments (salt water, swimming pool).
Do not clean a leather strap with anything other than clean water.
Avoid drying the strap on hot surfaces or under direct sunlight, as this may affect the shape or quality.
Watches Features
Plating
Gold Color Plating
All gold watches undergoes an ION plating.
14 karat of gold color.
High resistance to corrosion.
It is durable and does not tarnish.
Rose Gold, Green, Black, Gun, Blue Color Plating
High resistance to corrosion.
Hard, durable metal, does not tarnish.
Sapphire-Coated Mineral Crystal
Scratch-resistant coating over mineral glass.
Durable, but deep scratches may require replacement.
Titanium
Lightweight.
Corrosion-resistant.
Hypoallergenic.
May develop a natural patina over time.
Ceramic
Scratch-resistant.
Hypoallergenic.
It retains its color.
Avoid impacts and temperature extremes.
Battery
The watch button cell or coin battery is not intended to be
replaced by a consumer. Only a jeweler or other professional is
to replace the battery. The Perfect Date function must be
recalibrated to the current date for your location before the
watch is returned to you.
Water-Resistance
If your watch is water-resistant, it will be indicated on the caseback.
50 Meter Water-Resistant watch withstands water pressure to 86 p.s.i.a. (equals immersion to 164 feet or 50 meters below sea level) and dust as long as crystal, crown and case remain intact.
100 Meter Water-Resistant watch withstands water pressure to 160 p.s.i.a. (equals immersion to 328 feet or 100 meters below sea level) and dust as long as crystal, crown and case remain intact.
200 Meter Water-Resistant watch withstands water pressure to 320 p.s.i.a. (equals immersion to 656 feet or 200 meters below sea level) and dust as long as crystal, crown and case remain intact.
Solar Powered Watches
Expose the watch in direct sunlight, sunlight through a window, or artificial (indoor) lighting to charge the battery prior to use. When fully charged, the watch can function without additional charging for up to 3 months.
Store watch where it will be exposed to light or the battery will run down and require a full charge.
Strap & Bezel
Adjust Your Strap
It is recommended that a retailer or jeweler adjusts your strap.
Foldover Clasp Bracelet
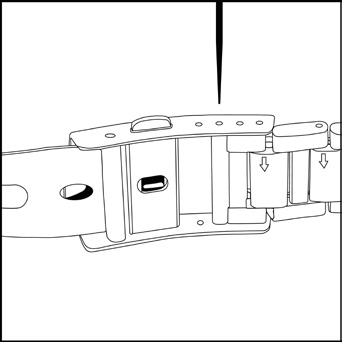
Find spring bar that connects bracelet to clasp.
Using a pointed tool, push in spring bar and gently twist bracelet to disengage.
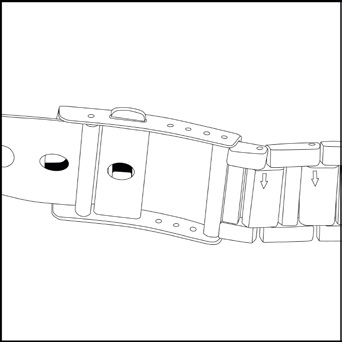
Determine wrist size, then insert spring bar in correct bottom hole.
Push down on spring bar, align with top hole and release to lock in place.
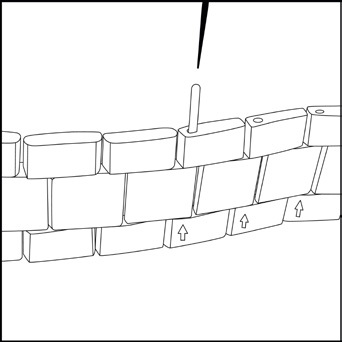
Size a Link Strap
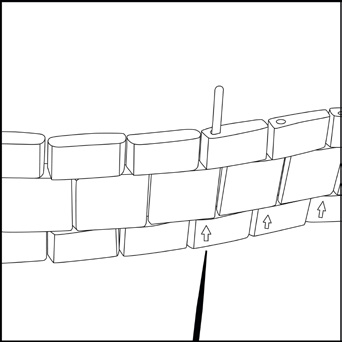
Place bracelet upright and insert pointed tool in opening of link.
Push pin forcefully in direction of arrow until link is detached (pins are designed to be difficult to remove).
Repeat until desired number of links are removed.
Re-Assembly
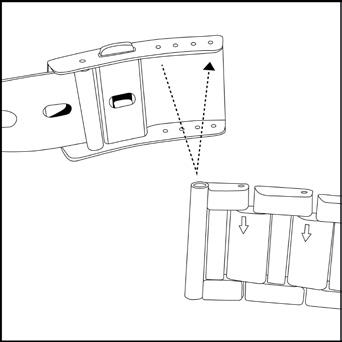
Re-join bracelet parts.
Push pin back into link in opposite direction of arrow.
Press pin down securely into bracelet until it is flush.
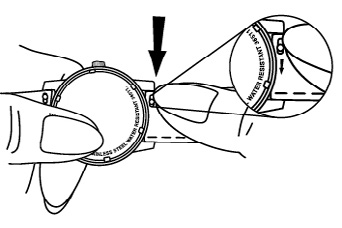
How to Remove Quick Release Spring Bars
Slide the Spring Bar: Gently slide the quick release spring bar towards the opposite side of the strap.
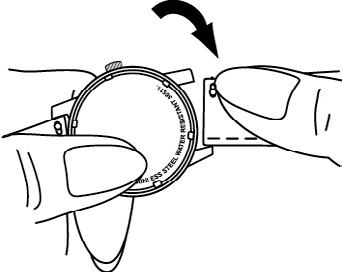
Push the Spring Bar: Use your fingernail or a small tool to push the spring bar out of its slot. You may need to slightly bend the strap to create enough space.
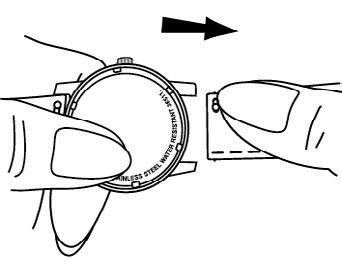
Pull Out the Spring Bar: Once the spring bar is partially released, carefully pull it out from the strap.
How to Install Quick Release Spring Bars
Insert the Spring Bar: Place one end of the spring bar into the hole on the watch lug.
Slide and Secure: Slide the spring bar towards the opposite side and align it with the hole on the other lug. Release the spring bar to secure it in place.
Check the Fit: Ensure the spring bar is securely installed before wearing your watch.
Interchangeable Bezels
Install the Bezel
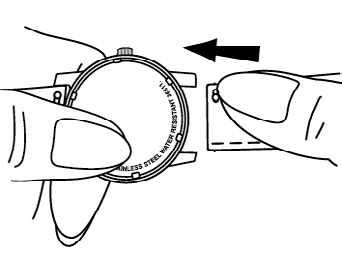
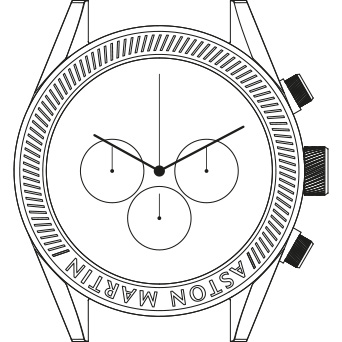
Prepare the watch head and the bezel.
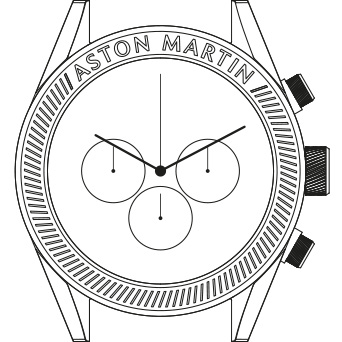
Place the bezel upside down on top of the watch head (align the bezel’s 12H with the watch head’s 6H).
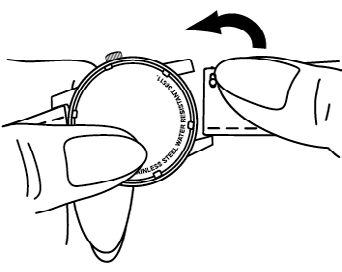
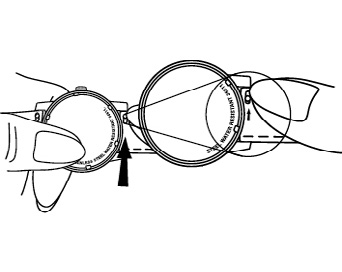
Press down firmly (you will feel some resistance) and rotate 180 degrees clockwise or counter clockwise until the bezel clicks into the correct position.
Remove the Bezel
Press down and rotate 180 degrees clockwise or counter clockwise.
Lift and remove the bezel.
Setting Your Watch
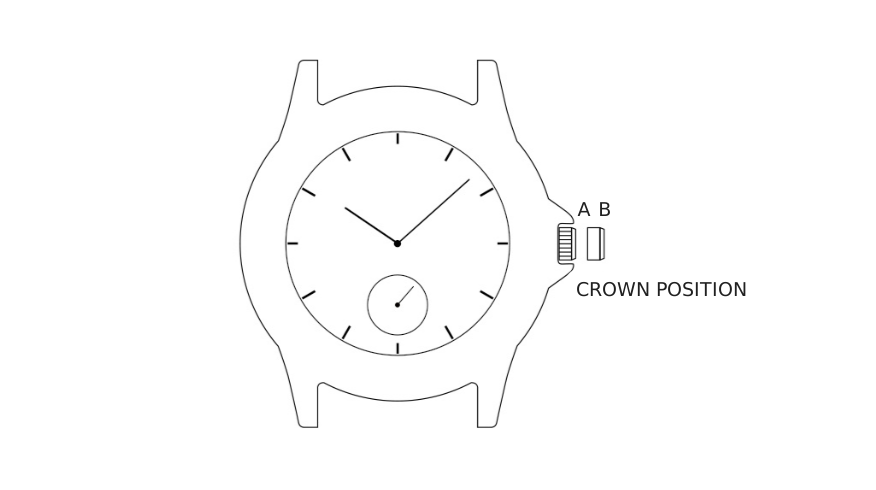
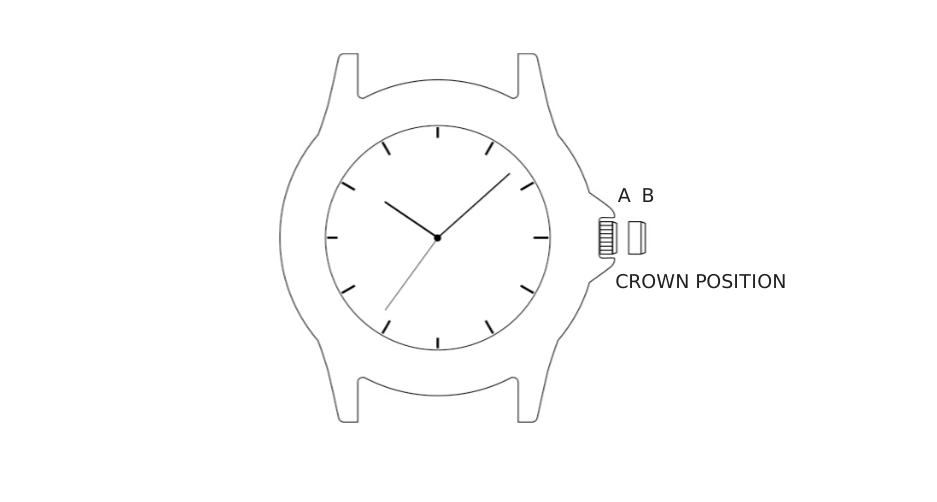
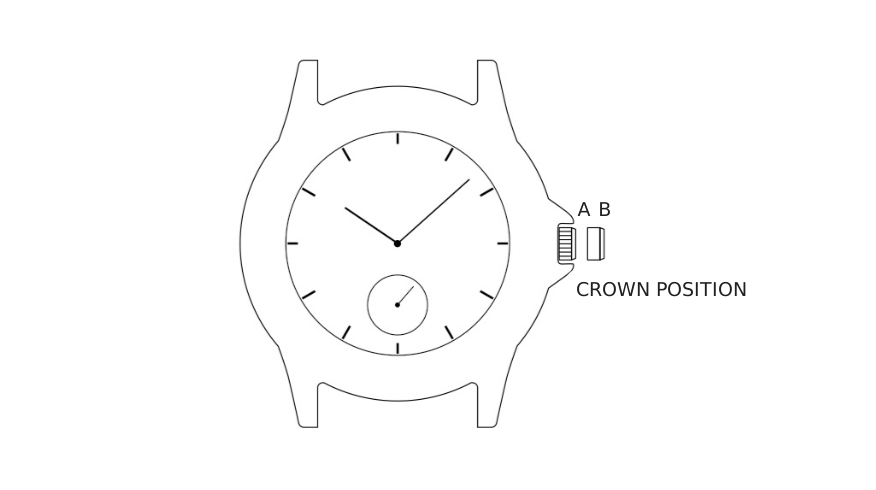
Set Your Watch: Basic Models
Time
To set the time:
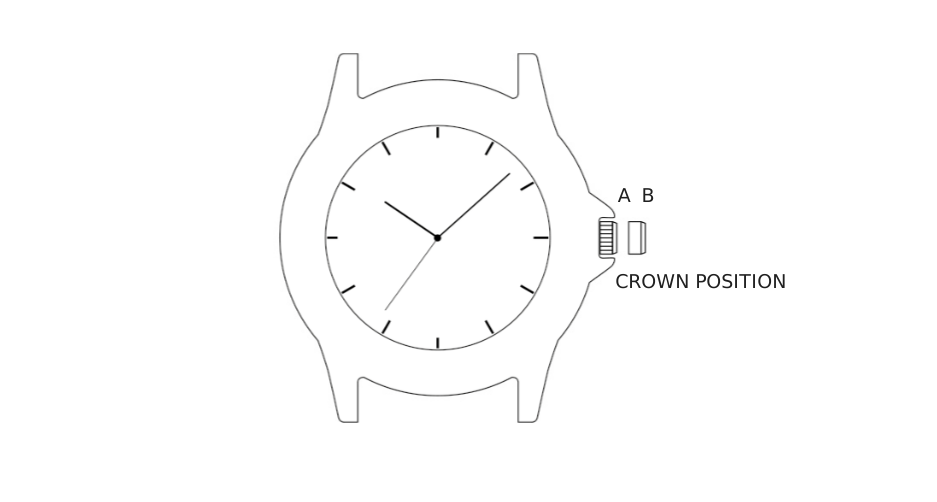
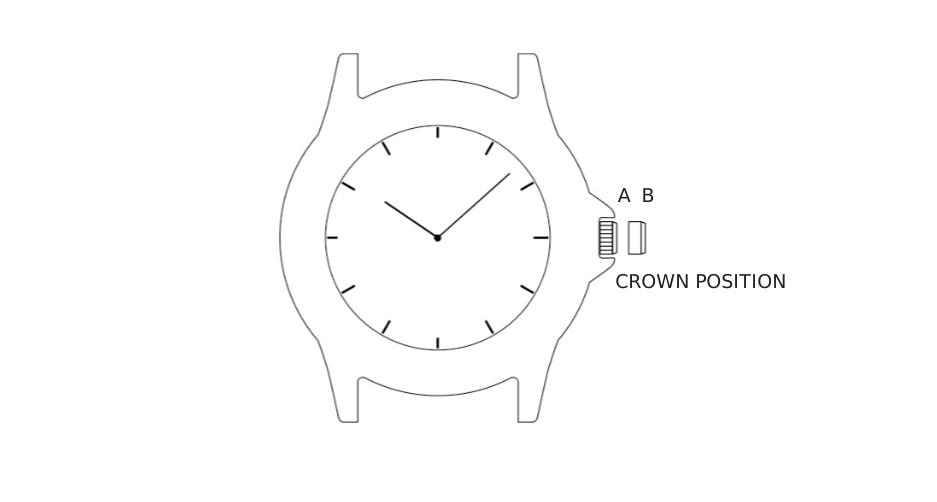
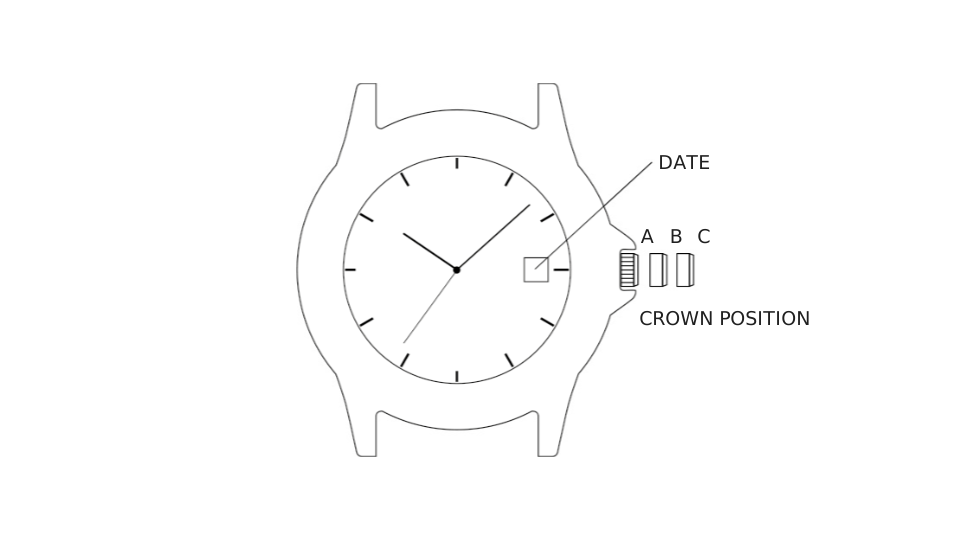
Pull crown to “B” position.
Turn crown clockwise / counter clockwise to correct time.
Push crown to “A” position.
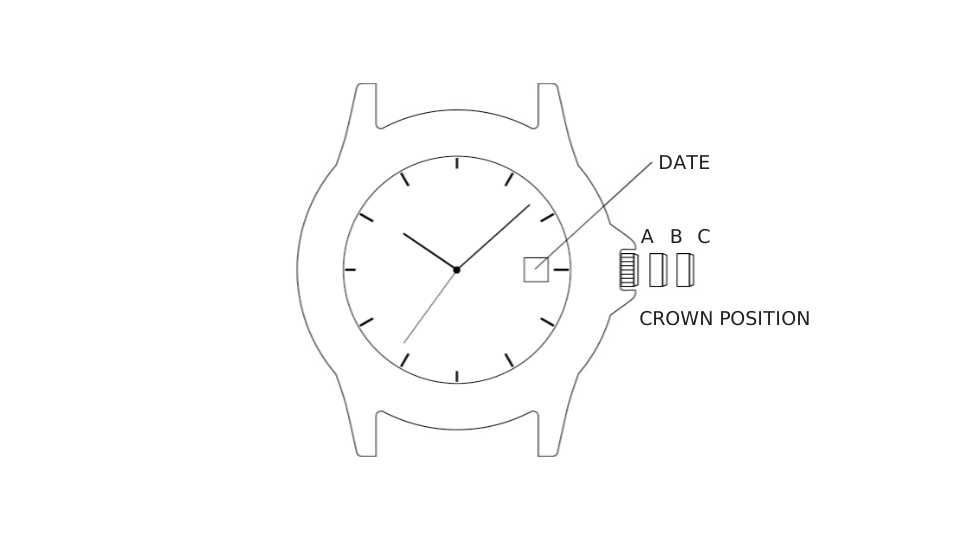
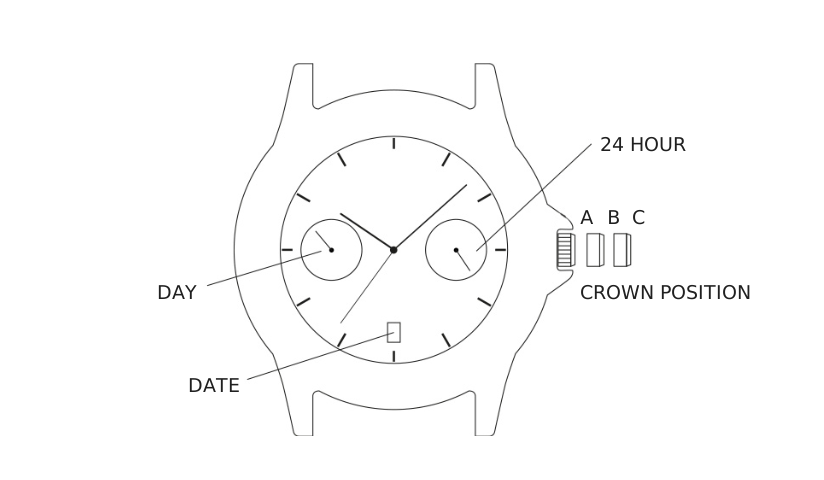
Set Your Watch: Date Models
Time
To set the time:
Pull out crown to “C” position.
Turn crown clockwise / counter clockwise to correct time.
Push in crown to “A” position.
Date
To set the date:
Pull out crown to “B” position.
Turn crown clockwise / counter clockwise to correct date.
Push in crown to “A” position.
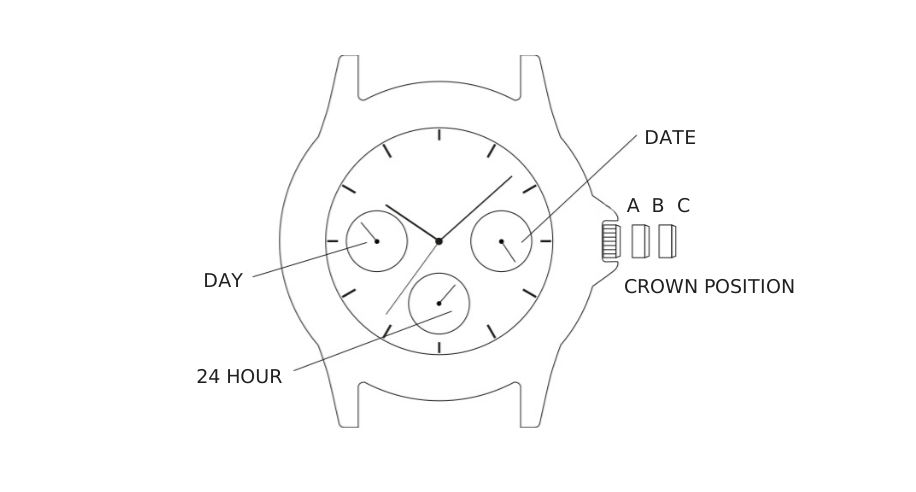
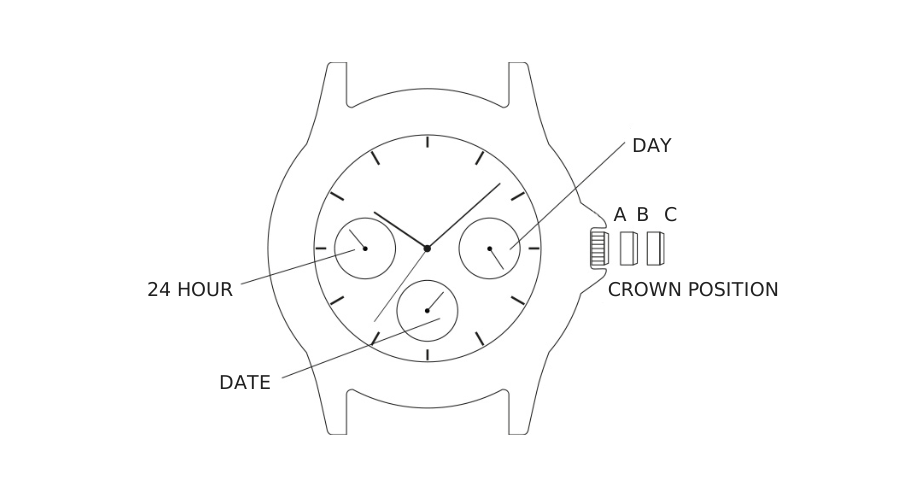
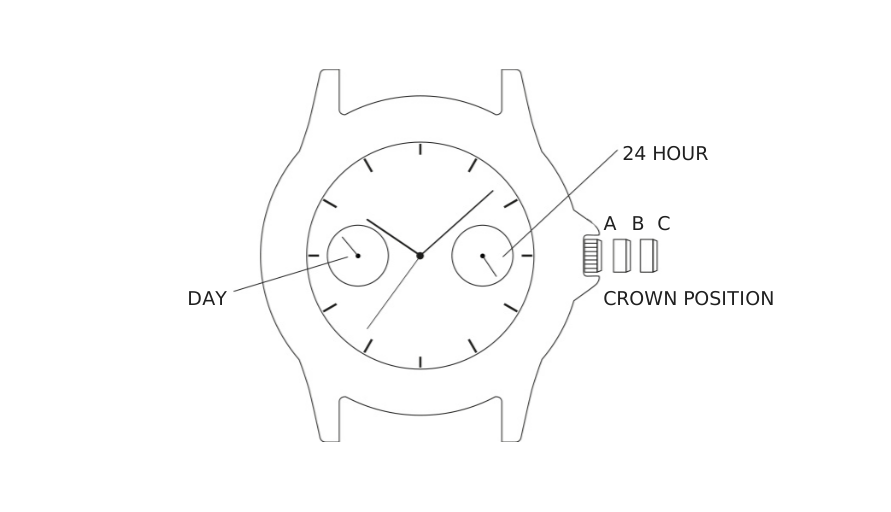
Set Your Watch: Multifunction Models
Time
To set the time:
Pull out crown to “C” position.
Turn crown either way to correct time.
Push in crown to “A” position.
Date
To set the date:
Pull out crown to “B” position.
Turn crown clockwise / counter clockwise to correct date.
Push in crown to “A” position.
Day of Week
To set the day:
Pull crown to “C” position.
Advance time 24 hours to change the day.
Push crown to “A” position.
Set Your Watch: Automatic Models
Time
To set the time:
Pull out crown to “C” position (or in “B” position if the watch has no date).
Turn crown clockwise / counter clockwise to correct time.
Push in crown to “A” position.
Date
To set the date:
Pull out crown to “B” position.
Turn crown clockwise / counter clockwise to correct date.
Push in crown to “A” position.
Set Your Watch: Chronograph Models
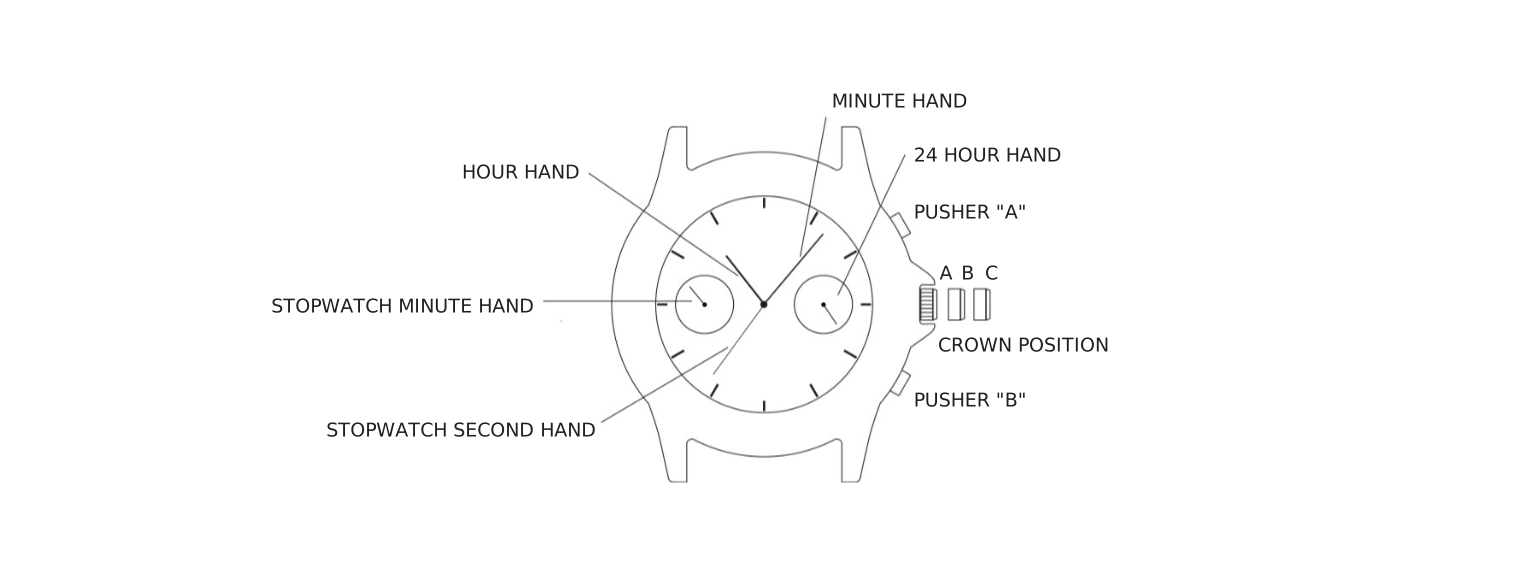
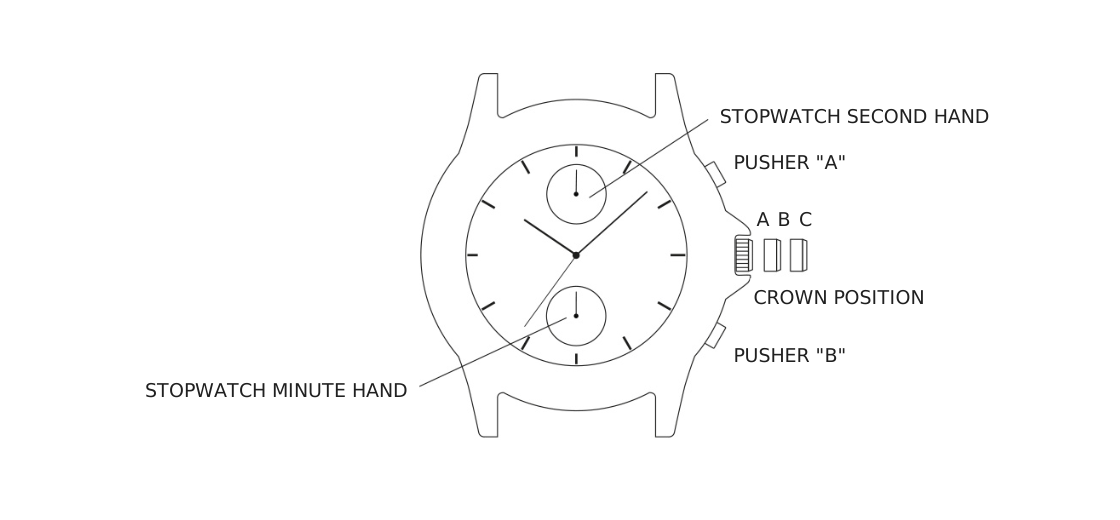
This Chronograph watch has 2 functions: TIME, STOPWATCH
Time
To set the time:
Pull crown to position “C”.
Turn crown clockwise to correct time.
Push crown to position “A”, the second hand begins to run.
Stopwatch
This stopwatch is able to measure and display time in 1/20
(1/1) second united up to max 11 hrs 59 min 59 sec.
The retrograde stopwatch 1/20 (1/1) second hands keeps
continuously running for 60 seconds after starting, and then
stops at “0” position.
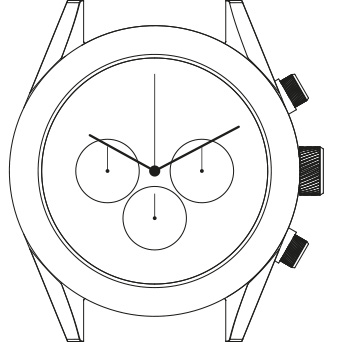
Press pusher “B” to enter the chrono mode.
Press pusher “A” to start timing.
Press pusher “A” again to stop timing.
Press pusher “B” to reset.
Correct the Stopwatch Hands
If after resetting the stopwatch hands it is found that they are not at the “12” or “0” position, correct them as follows:
Pull crown to position “B”.
Press pusher “A” to set the stopwatch second hand to the “0” position.
Press pusher “B” to set the stopwatch 1/20 second hand to the “0” position.
The stopwatch hands can be advanced rapidly by continuously pressing pushers “A” or “B”.
Once the hands return to “0” position, reset time and push crown to position “A”.
Set Your Watch: Chronograph Models
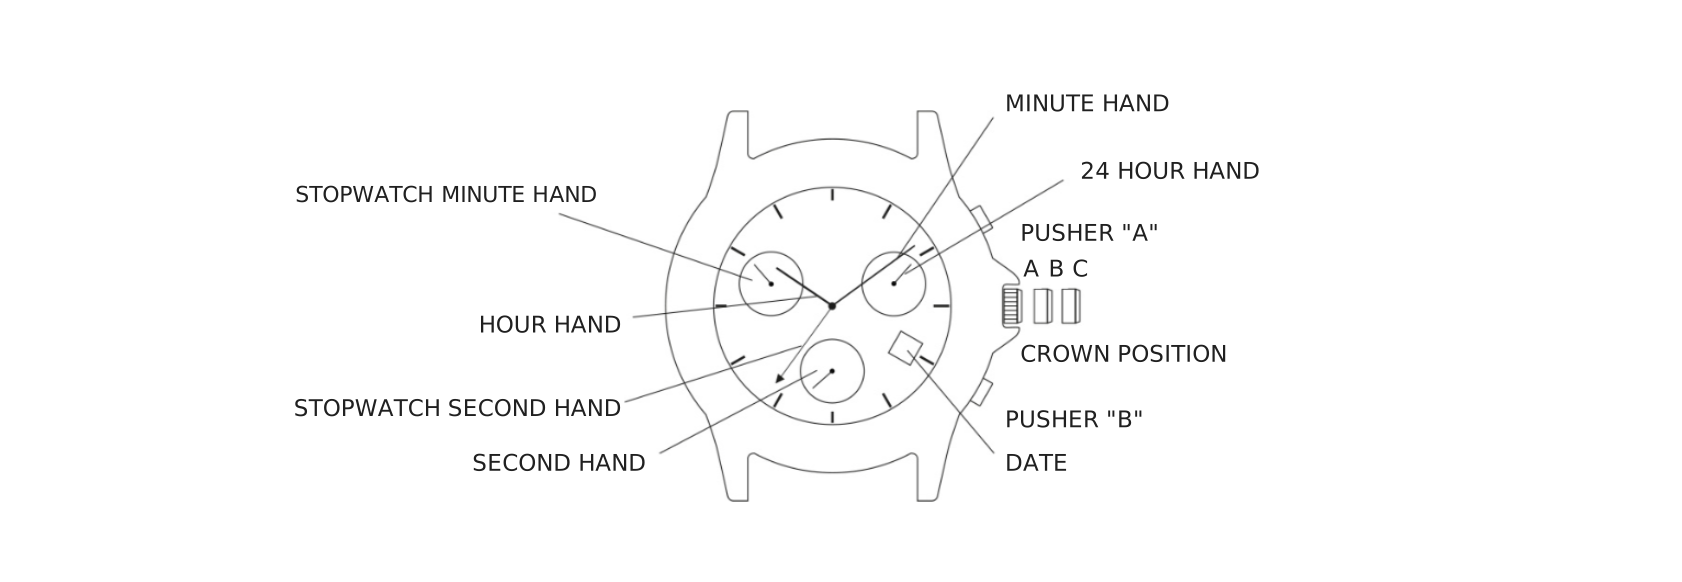
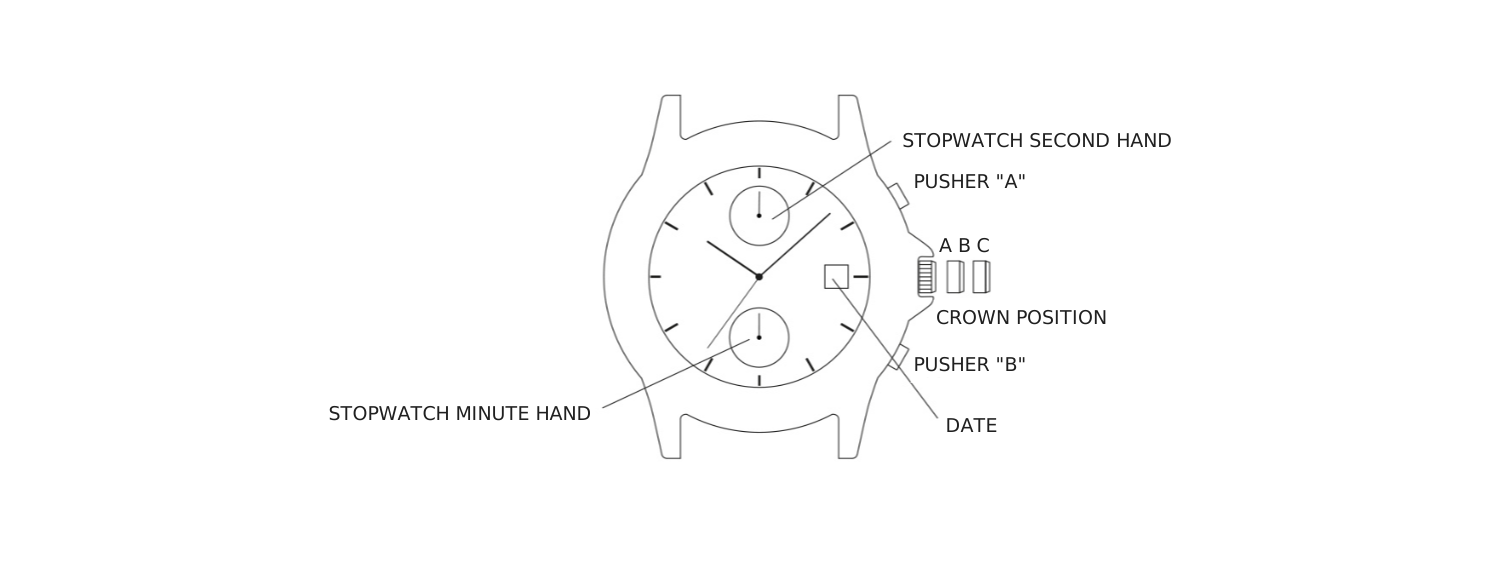
This Chronograph watch has 3 functions: TIME, CALENDAR, STOPWATCH
Time
To set the time:
Pull crown to position “C”.
Turn crown clockwise / counter clockwise to correct time.
Push crown to position “A”.
Calendar
To set the calendar:
Pull crown to position “B”.
Turn crown counter-clockwise to set calendar.
Push crown to position “A”.
Stopwatch
The stopwatch is capable of measuring and displaying time in 1/1
second united up to a maximum of 59 minutes 59 seconds.
Press pusher “A” to start timing.
Press pusher “A” again to stop timing.
Press pusher “B” to reset.
Correcting Stopwatch Hands
If after resetting the stopwatch second hand it is found that they are not at the “12” or “0” position, correct as follows:
Pull crown to “C” position.
Press pusher “A” continuously, the stopwatch second hand will advance rapidly until it gets close to the “12” position. Then, press pusher “A” repeatedly, the stopwatch second hand will move by intervals until it returns to “12” position.
Push crown to position “A”.
Set Your Watch: Chronograph Models
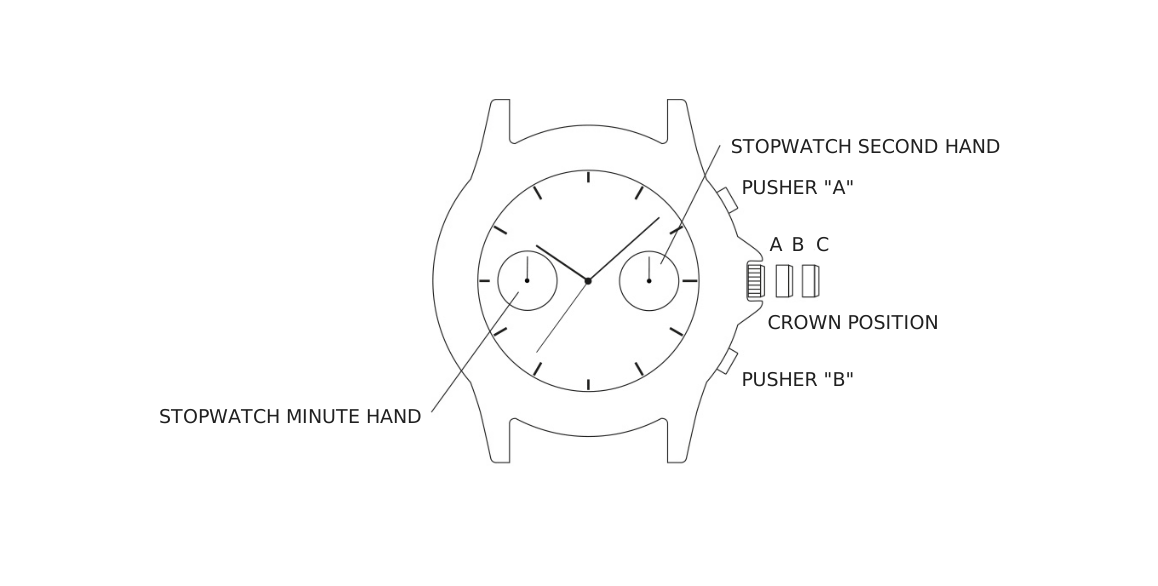
This Chronograph watch has 2 functions: TIME, STOPWATCH
Time
To set the time:
Pull crown to position “C”.
Turn crown clockwise / counter clockwise to correct time.
Push crown to position “A”.
Stopwatch
The stopwatch is capable of measuring: 1 minute elapsed up to
60 minutes. Before using the stopwatch, reset the stopwatch
hands to the “12” & “0” position.
Standard Stopwatch Measurement
Press pusher “A” to start timing.
Press pusher “A” to stop timing.
Press pusher “B” to reset.
Split Time Measurement
Example of using split time measurement for two runners. Two
runners can be timed simultaneously; the first runner’s
time can be recorded while the second runner’s time will
continue to be accumulated until he finishes.
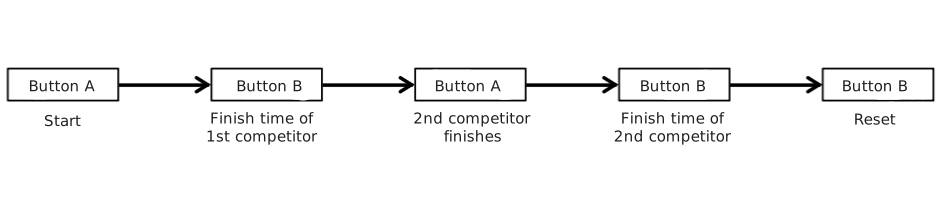
Press pusher “A” to start the timing of the first and second runner.
Press pusher “B” to stop and record the timing of the first runner. (Once pusher “B” is activated, even though the chrono minute hand and the big stopwatch sec. hand stop on the dial, the stopwatch still continues to run internally.)
Press pusher “B” to catch up the timing of the second runner. The stopwatch sec. hand will jump to show internal accumulated time and to carry on timing of the second runner.
Press pusher “A” to stop the timing of the second runner.
To Adjust Stopwatch Hand
Pull crown to position “C”.
Press pusher “A” continuously or repeatedly to adjust the stopwatch second hand to “0” or “12” position.
Press pusher “B” continuously or repeatedly to adjust the stopwatch minute hand to “0” or “12” position.
Set Your Watch: Chronograph Models
This Chronograph watch has 3 functions: TIME, CALENDAR, STOPWATCH
Time
To set the time:
Pull crown to position “C”.
Turn crown clockwise / counter clockwise to correct time.
Push crown to position “A”.
Calendar
To set the calendar:
Pull crown to position “B”.
Turn crown clockwise to correct calendar.
Push crown to position “A”.
Stopwatch
The stopwatch is capable of measuring: 1 minute elapsed up to
60 minutes. Before using the stopwatch, reset the stopwatch
hands to the “12” and “0” position.
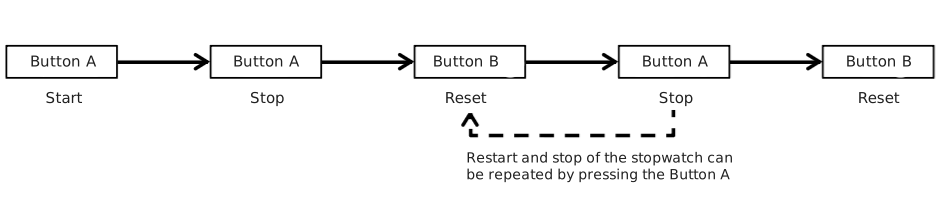
Standard Stopwatch Measurement
Press pusher “A” to start timing.
Press pusher “A” to stop timing.
Press pusher “B” to reset.
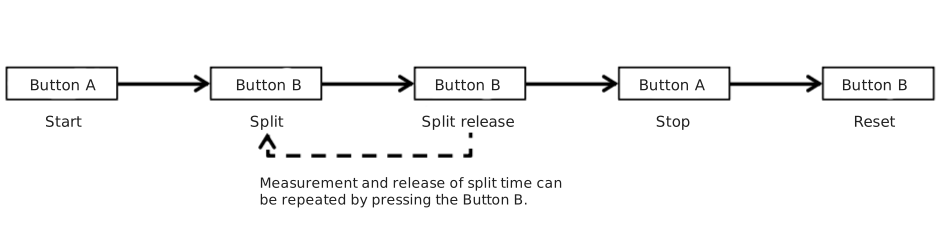
Split Time Measurement
Example of using split time measurement for two runners. Two
runners can be timed simultaneously; the first runner’s
time can be recorded while the second runner’s time will
continue to be accumulated until he finishes.
Press pusher “A” to start the timing of the first and second runner.
Press pusher “B” to stop and record the timing of the first runner. (Once pusher “B” is activated, even though the chrono minute hand and the big stopwatch sec. hand stop on the dial, the stopwatch still continues to run internally.)
Press pusher “B” to catch up the timing of the second runner. The stopwatch sec. hand will jump to show internal accumulated time and to carry on timing of the second runner.
Press pusher “A” to stop the timing of the second runner.
To Adjust Stopwatch Hand
Pull crown to position “C”.
Press pusher “A” continuously or repeatedly to adjust the stopwatch second hand to “0” or “12” position.
Press pusher “B” continuously or repeatedly to adjust the stopwatch minute hand to “0” or “12” position.
Push back the crown to position “A”. Record the time.
Press pusher “B” for third time to reset, all stopwatch chrono hands will return to “12” and “0” position.
Set Your Watch: Chronograph Models
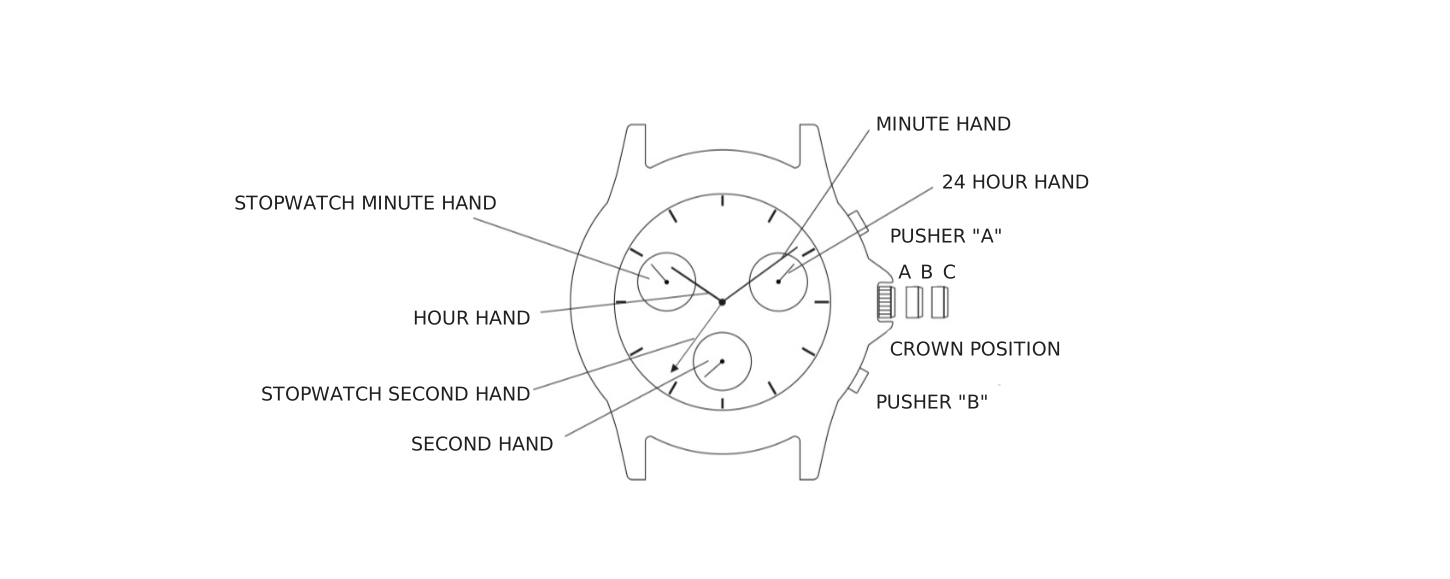
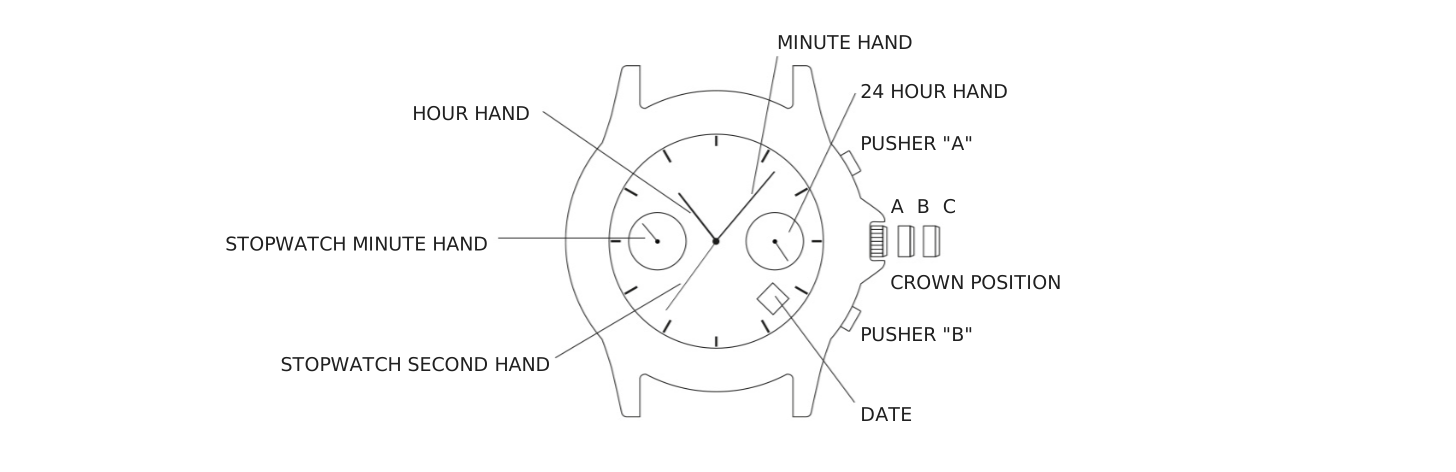
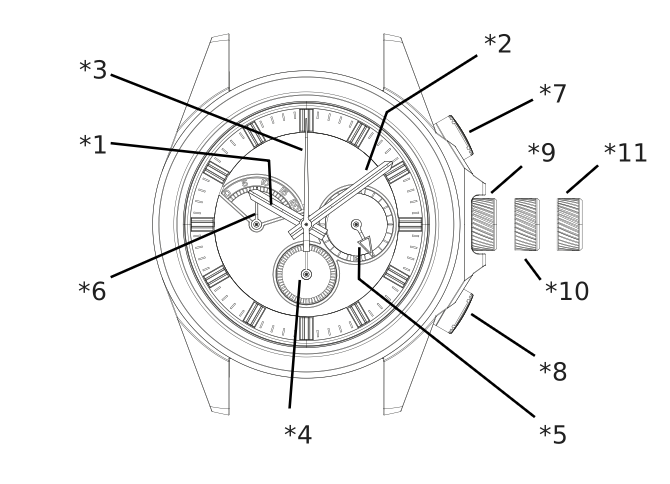
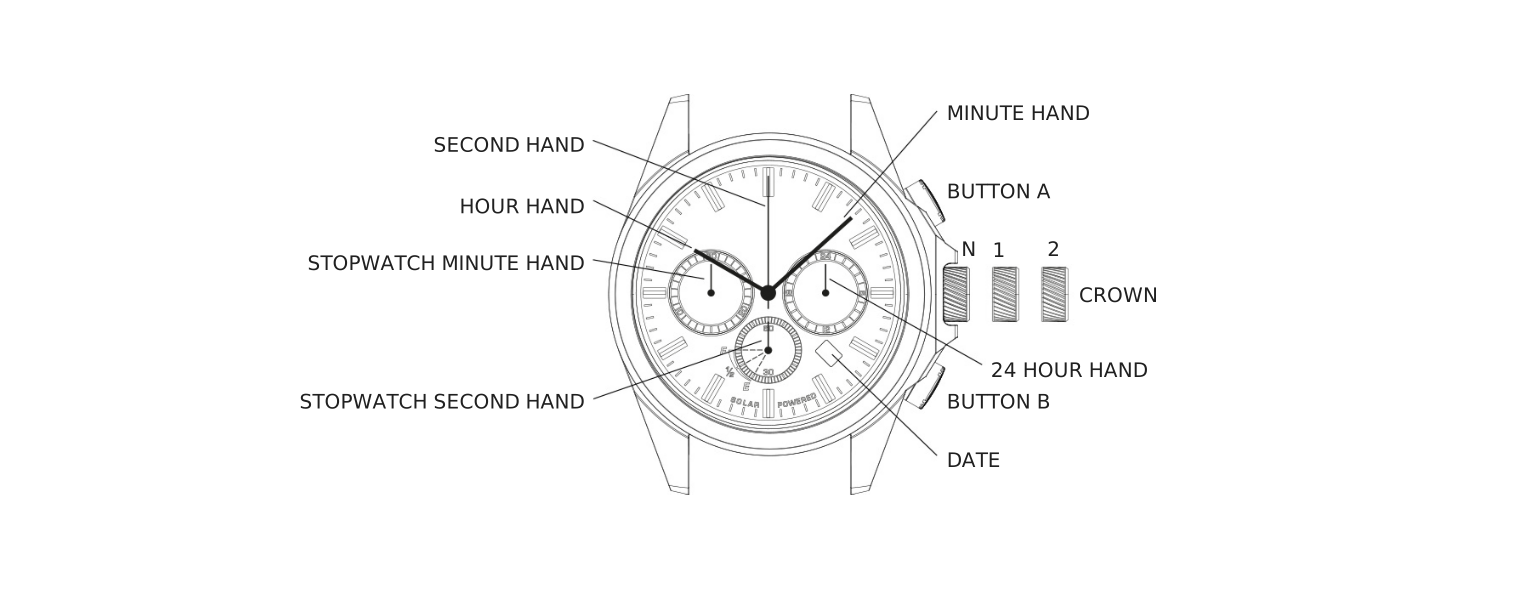
Hour Hand
Minute Hand
Chronograph Second Hand
Small Second Hand
24 Hour Hand
Chronograph Minute Hand (20 minute)
Button “A” (Start / Stop)
Button “B” (Reset)
Crown at Normal Position
Crown at First Position (Date Setting)
Crown at Second Position (Time Setting)
Time
To set the time:
Pull out the crown to the second click position.
Turn the crown to set hour and minute hands. (Check that AM / PM is set correctly)
Push the crown back into the normal position.
Calendar
To set the calendar:
Pull out the crown to the first click position.
Turn the crown clockwise for date setting.
Push the crown back into the normal position.
Reset
How to reset (After Battery Change)
It is possible to reset by the following two methods.
Method 1
Set the crown to the normal position.
Touch the AC terminal of circuit block and the switch spring with conductive tweezer to reset the circuit.
The small second hand will move at two-second interval for 10 seconds.
Method 2
Pull out the crown to the second click position.
Press the button (B) for two seconds and release the button.
Push the crown back to the normal position.
The small second hand will move at two-second interval for 10 seconds.
Chronograph
To use the chronograph:
Press button (A) to start the chronograph. The chronograph second hand will start moving.
Press button (A) again to stop the chronograph. The chronograph hands stop to indicate the elapsed time.
Press button (B) to reset the chronograph. All the chronograph hands will be reset to “0” position.
Set Your Watch: Chronograph Models with Solar Movement
Running Time
Expected running time from full charge to stoppage will be around 5 months.
This watch is a solar-powered watch containing a solar cell
underneath the dial to convert any form of light into
“electrical energy” and store the power in a
secondary battery. Unlike conventional quartz watches, this
watch does not use a silver oxide battery, thus eliminating the
need for battery replacement.
Over Charge Prevent Function
If the secondary battery is charged more than predetermined
voltage, over charge prevent function is operated to prevent the
secondary battery deterioration and breakage.
When the energy stored in the secondary battery is reduced to an
extremely low level, the second hand starts moving at two-second
intervals instead of the normal one-second intervals. In that
case, recharge the watch as soon as possible by exposing it to
light. Otherwise, the watch may stop operating in about 2 weeks.
Power depletion warning function.
Even if the watch is not charged for the time specified in the
column, the second hand may temporarily move at one-second
intervals. But it will soon resume moving at two-second
intervals; therefore, charge the watch for more than the
specified period.
How to Use Stopwatch Function
The stopwatch can measure up to 29’59” in one-second increments.
When the measurement reaches 30 minutes, the stopwatch automatically stops counting.
Standard Measurement
Accumulated Elapsed Time Measurement
Split Time Measurement
Measurement of Two Competitors
The stopwatch minute hand is capable of timing 30 minutes.
Before using the stopwatch, be sure to check that the crown is set at the normal position and that the stopwatch hands are reset to the “0” position.
If the stopwatch hands do not return to the “0” position when the stopwatch is reset to “0”, follow the procedure in “Stopwatch Hand Position Adjustment”.
Stopwatch Hand Position Adjustment
If the stopwatch hands are not in the “0” position, follow the procedures below to set them.
Pull the crown out to the 2nd click position.
Press the button “A” or “B” to set the stopwatch hands to the “0” position. The movements of the stopwatch minute hand and the stopwatch second hand are interlocked. To set the stopwatch minute hand to the “0” position, continue to move the stopwatch second hand until the stopwatch minute hand reaches the “0” position.
Push the crown back to the normal position.
The stopwatch hands move quickly if the button “A”
or “B” is kept pressed. When the stopwatch is
measuring, if the crown is pulled out to the 2nd click position,
it will be automatically reset.
How to Charge and Start the Watch
Charging the Watch
Expose the watch to sunlight or strong artificial light (of more than 1,000 Lx).
When the watch has stopped operating, the second hand will start moving at two-second intervals.
Keep the watch exposed to the light until the second hand moves at one-second intervals.
When the watch is charged after it has completely stopped, set the date and time before wearing the watch.
When you start the watch or when the energy remaining in the
secondary battery is very low, charge it sufficiently by
exposing the watch to light.
The second hand immediately starts moving at two-second
intervals, but the energy stored in the secondary battery is not
yet sufficient. If the watch is turned away from the light, it
may stop operating.
It is not necessary to charge the watch fully. It is important,
however, to charge the watch sufficiently, especially in the
case of initial charging.
To prevent energy depletion:
Avoid covering the watch face with your clothing while wearing it.
When the watch is not in use, leave it in a brightly lit place for as long as possible.
Make sure that the watch temperature does not exceed 50°C.
Guidelines for Charging Time
The below table provides only general guidelines.
Guidelines for charging time by illumination, light source, and environment
Illumination (Lx)
Source of Light
Environment
Dial Transparency Rate is 20%
Dial Transparency Rate is 30%
A (Approx. Hours)
B* (Approx. Hours)
C (Approx. Hours)
A (Approx. Hours)
B* (Approx. Hours)
C (Approx. Hours)
700
A Fluorescent Lamp
Inside the Office
—
26
110
—
18
69
3,000
Sunlight
30W 20cm
77
.62
55
24
.15
35
10,000
Cloudy2
42
.0
71
61
.5
5
100,000
Fine Weather
80
.7
35
.3
0.52
Condition A: Time required for full charge.
Condition B: Time required for steady operation.
Condition C: Time required for 1 day’s charge.
(*) The values in this column represent the charging times
required until the second hand moves constantly at one-second
intervals after the watch starts operating with the second hand
moving at two-second intervals.
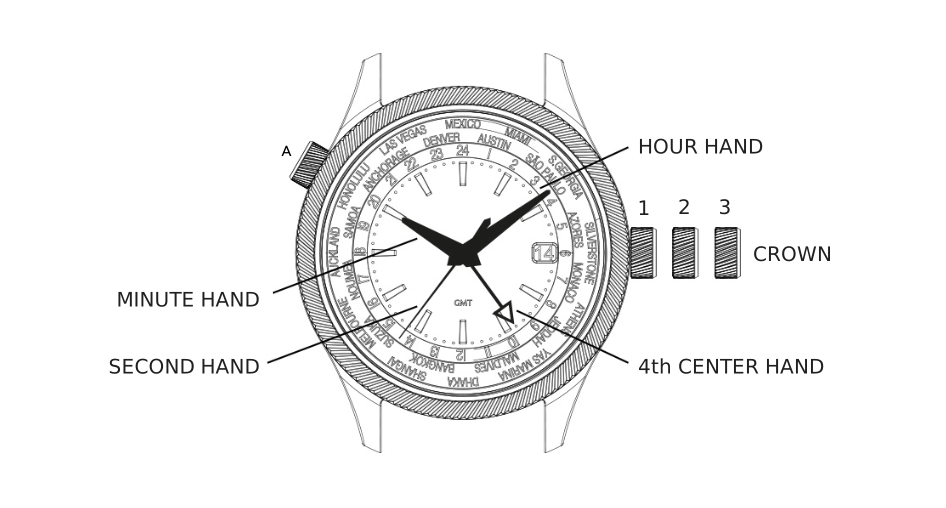
4th Center Hand Adjustment
To readjust a misaligned 4th center hand:
Pull the crown out to position 3.
4th center hand should point to 12 o’clock. If within 5 seconds of pulling the crown to position 3 the 4th center hand does not point to 12 o’clock, press button “A” to move the hand clockwise until it points to 12 o’clock. Pressing and holding button “A” will make the hand move at a fast rate.
Push crown in to position 1 when finished.
4th Center Hand Calibration
The 4th center hand is calibrated at the factory to reflect the
standard minutes within the hour as defined by Universal Time
Coordinated. Globally a majority of locations use the standard
minutes. If the location you are using for the 2nd time zone
uses the standard minutes, the 4th center hand does not require
recalibration. Only if you wish to have the second time zones to
reflect locations that do not follow the standard minute, the
instructions to recalibrate the 4th center hand are as follows:
Pull the crown out to position 3. The 4th center hand will point to 12 o’clock.
Rotate the crown to position the minute hand in the correct position within the hour required for the location you are wishing to use for the 2nd and 3rd time zones.
Push the crown in to position 2. The 4th center hand will point to its currently calibrated position of the minutes within the hour.
Push button “A” to move the 4th center hand clockwise until it aligns with the minute hand. Pressing and holding button “A” will make the hand move at a fast rate.
Pull the crown out to position 3. The 4th center hand will point to 12 o’clock.
Rotate the crown to position hour and minute hands to the correct time.
Push crown in to position 1 when finished.
Please note: the 4th center hand will track the time using the
current calibration of the minutes within the hour. Time zones 2
both utilize the 4th center hand and therefore the locations
being tracked in time zones 2 must both utilize the same minutes
within the hour for these time zones to be displayed properly.
Setting the 4th Center Hand (Time Zone II)
Note the current time in the location you wish to track as the
2nd time zone. Press button “A” until the 4th center
hand is pointing to that time on the inner ring. (Please note:
this scale is a 24-hour format). The 4th center hand will
advance 30 minutes each time button “A” is pressed.
Pressing and holding button “A” will make the hand
move at a fast rate. This will set the 2nd time zone on the
watch.
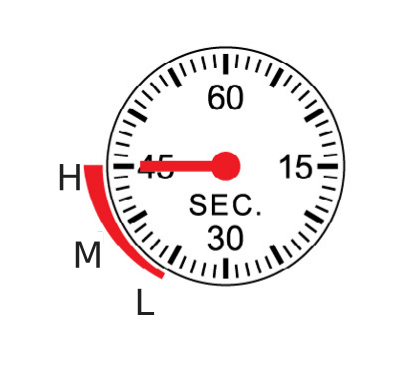
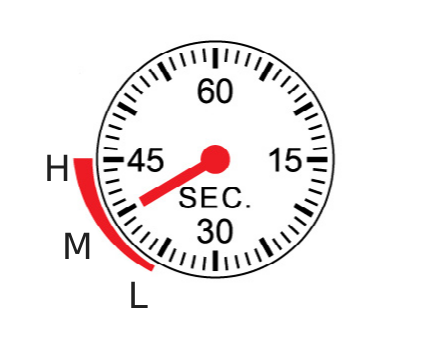
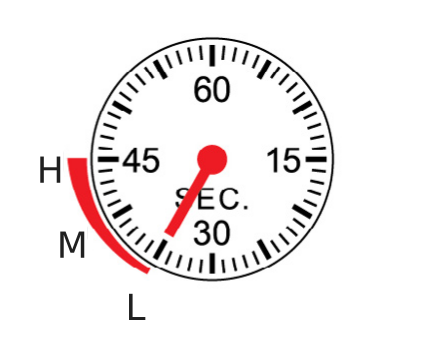
Guidelines for Battery Indicator
Press button “B” more than 1 second. The remaining battery capacity is indicated.
Status indication is 2 seconds. Then it return automatically.
Battery level indicator display and corresponding power reserve
Battery Level
Display
Power Reserve
High
Position: 45 seconds
90 days or more
Middle
Position: 40 seconds
30-90 days
Low
Position: 35 seconds
30 days or less
World Time (GMT) Models
2 Time Zone Function
Your watch has the ability to display three time zones:
Hour and Minute hands: Displays the time in a standard 12 hour format. Please note: The date displayed in the date window is linked to the time displayed by these two hands.
4th center hand and inner ring: Displays the time in a 24-hour format.