
About Gc

Gc combines the very best in Swiss precision with the sophistication of French style to produce bold statement timepieces. Urbane, distinct and alluring, Gc watches are crafted to be as striking and unique as the individuals who wear them. Our dedication to bold style and elevated quality is a mark of true distinction in the watch industry and set the brand apart.

Gc believes in empowering people to find their own style and to lead where others follow. Reflecting a European heritage that encourages self-expression, Gc designs watches that embrace and celebrate your personal style.

"La Précision du Style" defines our passion for the best of Swiss Precision and French style.

Watch Features

Screw Down Crown (where applicable)
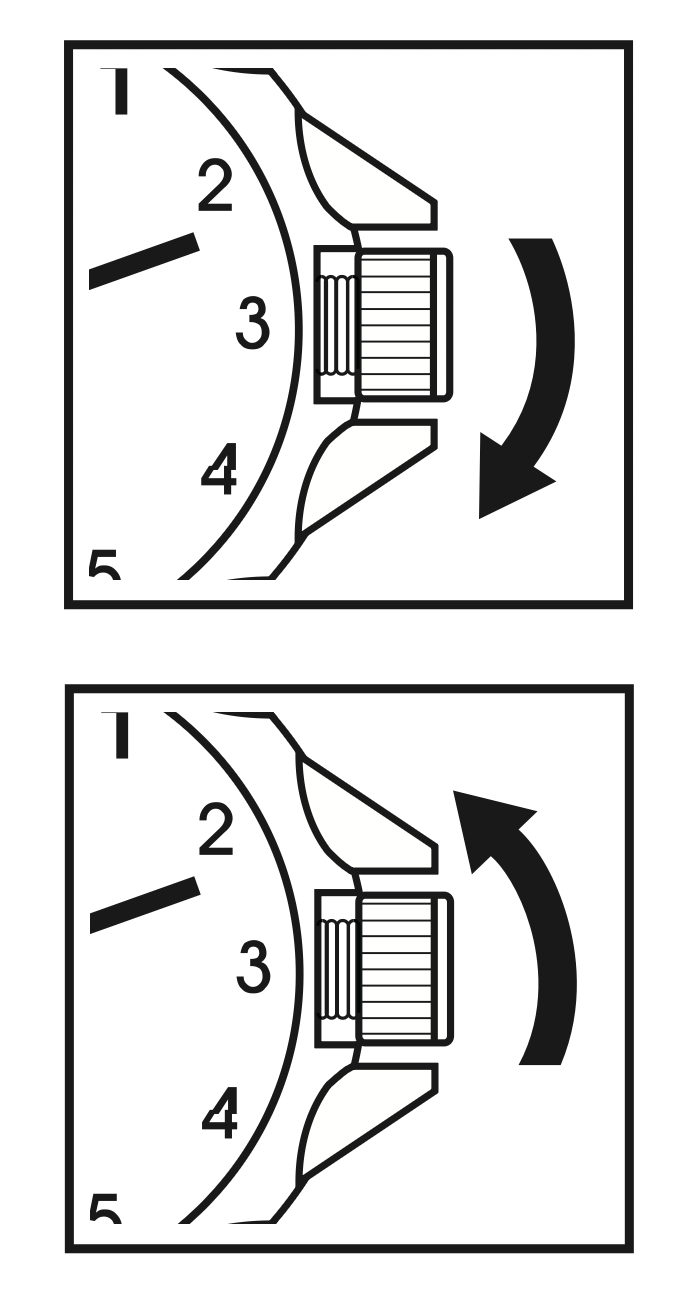
Two diagrams showing the crown being unscrewed counter-clockwise and screwed clockwise

Screw down crowns are used to ensure water resistance. Do NOT pull crown unless it is unscrewed first.

  • UNSCREW the crown counter-clockwise (towards you) until it turns freely without tension.
  • GENTLY pull the crown out to desired position for watch setting (see specific operating instructions on following pages).
  • When finished setting the watch, GENTLY push the crown in towards the watch.
  • While pushing in on the crown, begin to turn clockwise (away from you) until it is SECURELY screwed down.
Water Resistance

Your watch is water resistant to the depth noted on the caseback. If exposed to salt or chemical water, please rinse the watch with fresh water and wipe with a soft, dry cloth.

Rating Activity
30 M / 3 ATM / 100 Ft. Accidental splashes. Not suitable for swimming.
50 M / 5 ATM / 165 Ft. Suitable for swimming in shallow water.
100 M / 10 ATM / 330 Ft. Suitable for swimming and snorkelling.

Instructions

Simple Time & Mini Sweep

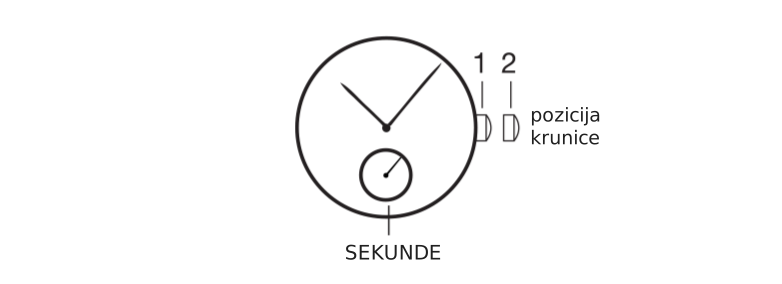
Watch diagram: crown position and seconds hand indicators
Simple Time & Mini Sweep

To set the time:

  1. PULL out crown to position 2.
  2. TURN crown either way to correct time.
  3. PUSH back crown to position 1.

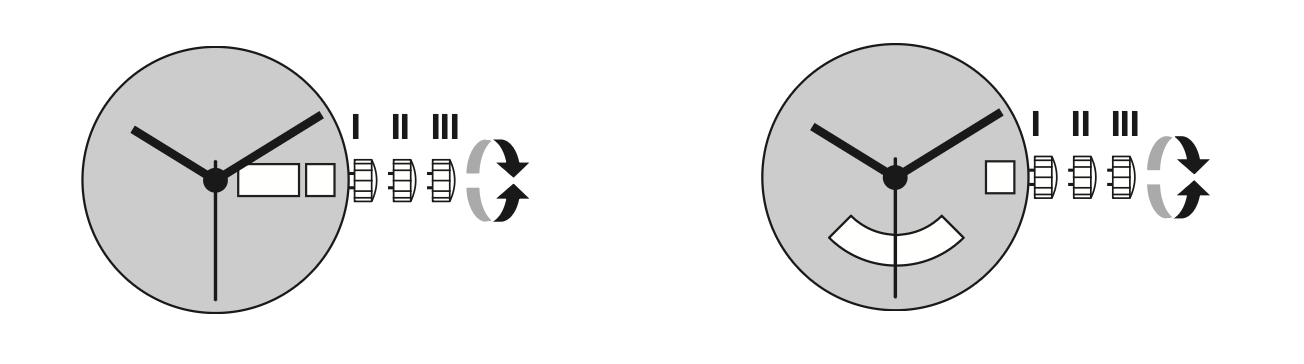
Simple Time & Simple Day / Date

Two watch diagrams showing crown positions I, II and III for Simple Time and Simple Day/Date

To set the time:

  1. PULL out crown to position 3.
  2. TURN crown either way to correct time.
  3. PUSH back crown to position 1.

To set the date:

  1. PULL out the crown to position 2.
  2. TURN crown clockwise to correct date.
  3. PUSH in crown to position 1.

To set the day:

  1. PULL out the crown to position 2.
  2. TURN crown anti-clockwise to correct the day.
  3. PUSH in crown to position 1.

If Your Watch Comes with a Movement with Two Languages (English / French)

Watch diagram showing crown positions I, II and III for two-language movement

Quick change correction for day of the week:

  • The blocking time for the day of the week quick-change correction is from approximately 10 pm and midnight.
  • The second language always first appears around 24:00 hours for about 2 hours, until the display changes to the required language.
  • Pull the crown out to position II (watch still running).
  • Turn crown anticlockwise until the desired day of the week appears in the required language.
  • Push the crown back to position.

Multifunction

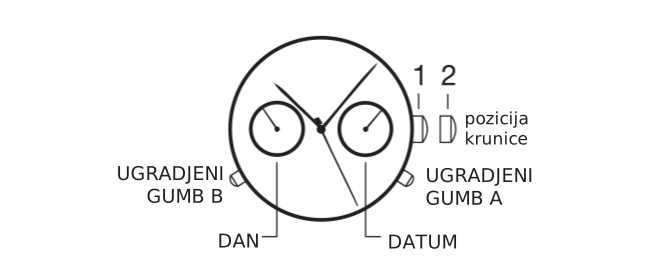
Two-Eye Day / Date

Watch diagram: day, date, inset pusher A and B, crown position
Two-Eye Day / Date
To set the time:
  1. PULL out crown to position 2.
  2. TURN crown clockwise to correct time. Day and date will also change.
  3. PUSH back crown to position 1.
To set the date:
  1. PULL out the crown to position 2.
  2. TURN crown clockwise to correct date.
  3. PUSH in crown to position 1.
To set the day:
  1. PULL out the crown to position 2.
  2. Advance time 24 hours to change the day.
  3. PUSH back crown to position 1.

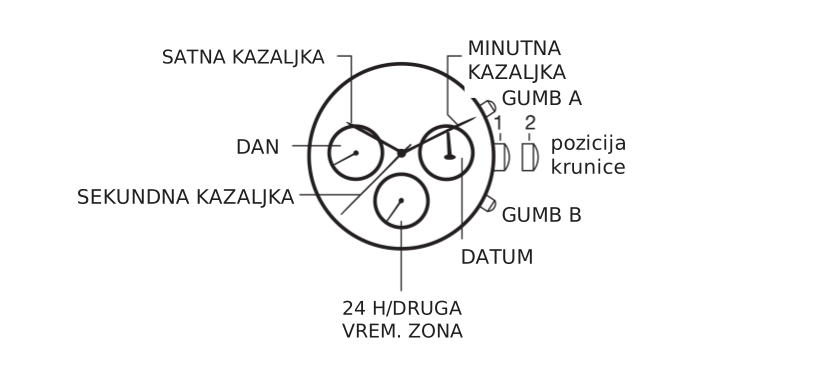
Three-Eye Day / Date / Second Time Zone

Watch diagram: minute hand, pushers A and B, second time zone indicator, crown position
Three-Eye Day / Date / Second Time Zone
To set the time:
  1. PULL out crown to position 2.
  2. TURN crown clockwise to correct time. Day and date will also change.
  3. PUSH back crown to position 1.
To set the second time zone:
  1. SET the crown to position 1.
  2. PRESS pusher B step by step to advance the hour hand of the second time zone until the desired time is set.
  3. Stop pressing the button after finishing the setting.
To set the day and date:
  1. PULL out the crown to position 2.
  2. TURN crown clockwise to correct day or date. The day hand will advance one day when 4:30 in the morning is reached.
  3. PUSH back crown to position 1.

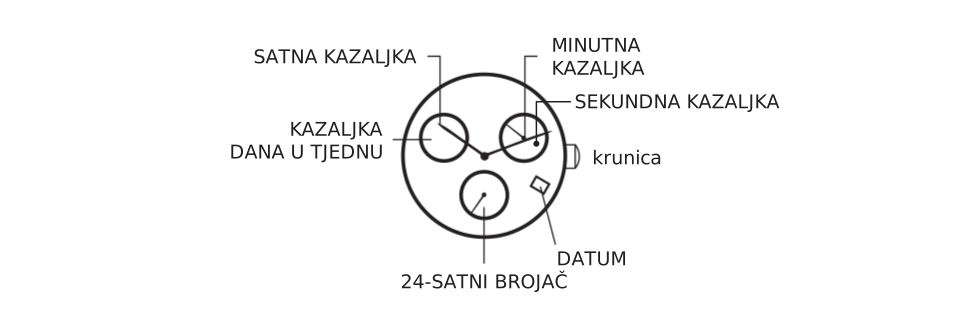
3,6,9 — Three-Eye Day / Date with 24H Counter

Watch diagram: 24-hour counter, day of the week hand, crown
Time Correction
To set the time:
  1. PULL out crown to position 3.
  2. TURN crown until you reach the correct time.
  3. PUSH the crown back to position 1.
Setting the date (quick mode):
  1. PULL crown to position 2 (the watch continues to run).
  2. TURN the crown anticlockwise until the correct date appears.
  3. PUSH the crown back to position 1.
Setting the date, day of the week and time:
  1. PULL the crown to position 3 (the watch stops).
  2. TURN the crown anticlockwise until yesterday's day of the week appears.
  3. PUSH the crown to position 2.
  4. TURN the crown until yesterday's date appears.
  5. PULL the crown to position 3 (the watch stops).
  6. TURN the crown anticlockwise until the correct time appears.
  7. PUSH the crown back into position 1.

GMT

GMT watch diagram — crown positions I, II, III and 24H display indicator
GMT

To set the time:

  1. PULL out crown to position III (watch stopped).
  2. TURN crown until the current time is displayed (remember the 24-hour cycle).
  3. PUSH the crown back to position I.

To set the date:

  1. PULL crown to position II (watch still running).
  2. TURN the crown anticlockwise until the required date appears.
  3. PUSH the crown back to position I.

24H Display:

  1. PULL the crown to position II (watch still running).
  2. TURN the crown anticlockwise until the desired time appears.
  3. PUSH the crown back into position I.

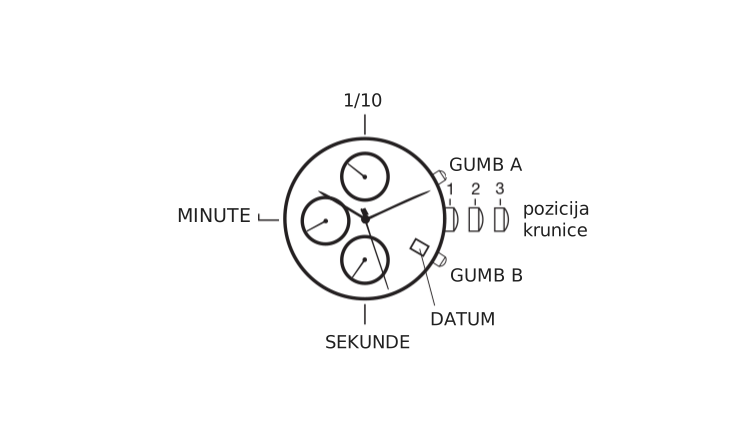
Chronograph

Watch diagram: minute, seconds, 1/10 second indicator, date, pusher B, crown position
12,6,9 Three-Eye Chrono 1/10 Sec
Watch diagram: minute and hour chronograph hands, stopwatch second hand, pushers A and B
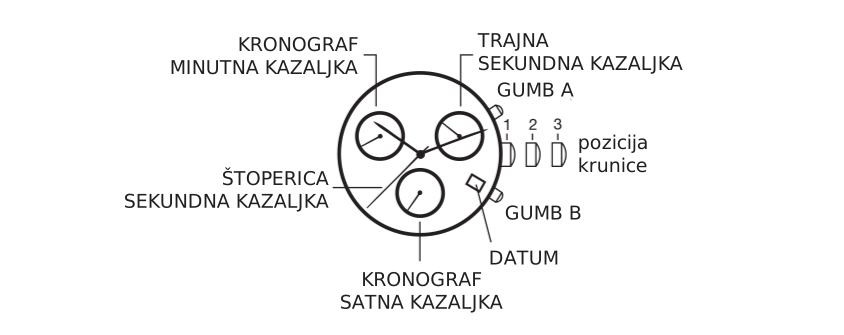
3,6,9 Three-Eye Chrono
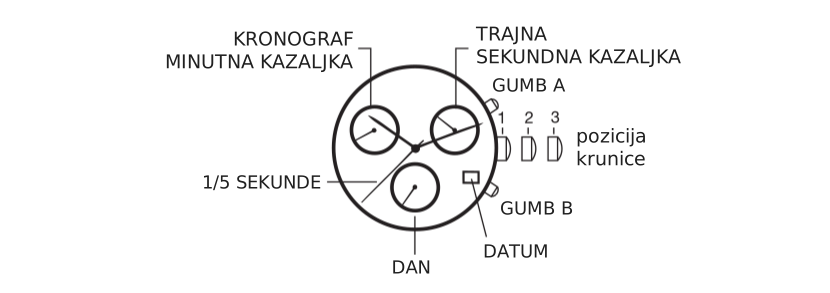
Watch diagram: permanent second hand, chronograph minute hand, pushers A and B, 1/5 second indicator
2,6,10 Three-Eye Chrono 1/5 Sec
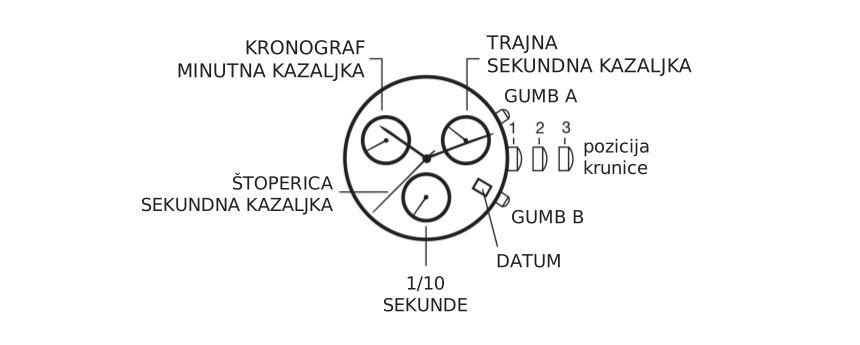
Watch diagram: minute chronograph hand, 1/10 second indicator, stopwatch second hand
3,6,9 Three-Eye Chrono 1/10 Sec

These chronograph watches have 3 functions:

Time

To set the time:
  1. PULL crown to position 3.
  2. TURN crown either way to correct time (same for Day when this function is available).
  3. PUSH back crown to position 1.

Calendar

  1. PULL crown to position 2.
  2. TURN crown clockwise to correct calendar.
  3. PUSH back crown to position 1.

Stopwatch

The stopwatch is capable of measuring:

  • One minute elapsed up to 30 minutes.
  • Chronograph hand 1/10 or 1/5 second.
Standard Stopwatch Measurement:
  1. PRESS pusher A to start timing.
  2. PRESS pusher A to stop timing.
  3. PRESS pusher B to reset.
Accumulated Elapsed Time Measurement:
  1. PRESS pusher A to start timing.
  2. PRESS pusher A to stop timing.
  3. PRESS pusher A to restart timing.
  4. PRESS pusher A to stop 2nd timing.
  5. PRESS pusher B to reset.
Split Time Measurement:
  1. PRESS pusher A to start timing.
  2. PRESS pusher B to 'split'.
  3. PRESS pusher B to begin again.
  4. PRESS pusher A to stop.
  5. PRESS pusher B to reset.
Timing 2 Competitors:*
  1. PRESS pusher A to start timing of 1st event.
  2. PRESS pusher B to stop timing of 1st event; stopwatch continues to run internally.
  3. PRESS pusher A to start timing of 2nd event.
  4. PRESS pusher B to view time of 2nd event.
  5. PRESS pusher B to reset.

Corrective Mode for Stopwatch Chrono Hands

On all Chrono movements, if the largest hands do not reset perfectly back to the 12 o'clock or zero position:

  1. PULL crown to position 3.
  2. If center stopwatch second hand or Chrono hands do not reset to the 12 o'clock or zero position, press pusher A and B simultaneously for at least 2 seconds.
  3. The center stopwatch second hand will rotate by 360 degrees to activate corrective mode.
  4. If center stopwatch second hand or Chrono hands are not located at '12' or '0' position, either press pusher A continuously or repeatedly until the center stop second hand moves by each interval and returns to '12' and '0' position. Press pusher B once to activate corrective move of next minute Chrono hand, hour Chrono hand, or 1/10 second Chrono hand. Press pusher A continuously or repeatedly until all hands return to '12' and '0' position.
  5. PUSH back crown to position 1 to activate the adjustment.

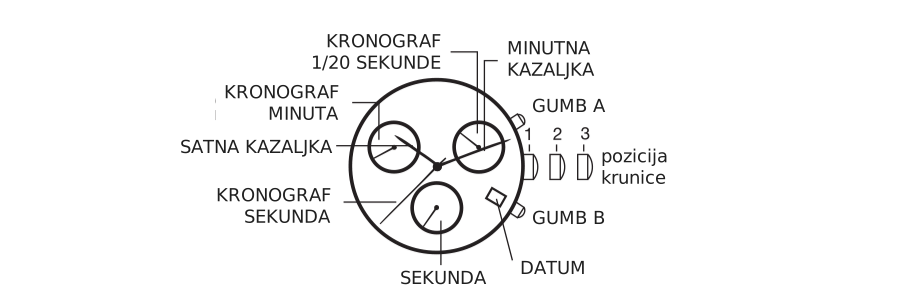
2,6,10 — Three-Eye Chrono 1/20 Sec

Watch diagram: chronograph second, minute, and 1/20 second hands, pushers A and B, crown position
2,6,10 Three-Eye Chrono — 1/20 Sec

Time

To set the time:
  1. PULL crown to position 3.
  2. TURN crown either way until you reach the correct time.
  3. PUSH the crown back to position 1.

Calendar

  1. PULL crown to position 2.
  2. TURN the crown either way to move hour hand. Two complete revolutions relative to the 12 o'clock position will move the date forward or backward.
  3. PUSH the crown back to position 1.

Stopwatch

The stopwatch is capable of measuring:

  • 1/20 seconds elapsed up to 1 second.
  • Seconds elapsed up to 1 minute.
  • Minutes elapsed up to 30 minutes.
Standard Stopwatch Measurement:
  1. PRESS pusher A to start timing.
  2. PRESS pusher A to stop timing.
  3. PRESS pusher B to reset.
Split Time Measurement:
  1. PRESS pusher A to start timing.
  2. PRESS pusher B to split.
  3. PRESS pusher B to resume timing.
  4. PRESS pusher A to stop.
  5. PRESS pusher B to reset.

Corrective Mode

  1. PULL crown out to position 2.
  2. PRESS pusher B until the hand at 10 o'clock eye resets to the "30" position.
  3. PULL crown out to position 3.
  4. PRESS pusher A until the chronograph second hand resets to the "0" or "60" / 12-hour position.
  5. PRESS pusher B until the hand at the 2 o'clock eye resets to the "0" position.
  6. PUSH in crown to position 1.

Indiglo® Night-Light

Push on the crown while in position 1. The entire dial will be illuminated. Electroluminescent technology used in Indiglo® night-light illuminates the entire watch face at night and in low-light conditions.

Night-Mode® Feature

To use Night-Mode® feature:

  1. PUSH and HOLD crown in position 1 for 4 seconds to activate Night-Mode® feature. Pressing any pusher will cause the Indiglo® night-light to stay on for 3 seconds.
  2. Night-Mode® feature will last for 8 hours.
  3. Or PUSH and HOLD crown while in position 1 for 4 seconds to deactivate Night-Mode® feature.

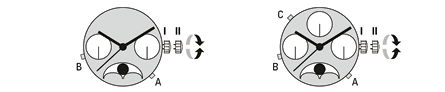
Ronda Xtratech Moonphase — Cal. 706.1 / 706.2

Ronda Xtratech movement diagram — crown and pusher positions
Ronda Xtratech — Cal. 706.1 / 706.2

Setting sequence — moonphase, day of week, date and time

(e.g. after a battery change)

  1. Pull crown out to position II (watch is stopped).
  2. Set the moonphase display: Turn the hands forward by turning the crown, until the full moon position appears.
  3. Set the day of the week and date: Turn the crown until the time of 6:00 am appears.
  4. Using quick-change correction, set the date with pusher A, and the day of the week of the last full moon with pusher B (see table). Then using the crown, move the hands forwards until the current date appears.
  5. Set the time: Turn the crown until the current time is displayed (remember the 24-hour cycle).
  6. Push crown back into position I.

Quick-change corrections

  • Date (pusher A): Press pusher A until the current date is displayed (remember the blocking period).
  • Day of the week (pusher B): Press pusher B until the current day of the week is displayed (remember the blocking period).
  • Month (pusher C — cal. 706.3 only): Press pusher C until the current month is displayed (remember the blocking period).
Full moon dates
2025 2026 2027 2028 2029 2030 2031 2032
JAN130322123019827
FEB120121102818726
MAR140322113019927
APR130221092818725
MAY121/3120082717725
JUN113019072615523
JUL102918062515422
AUG092817052413321
SEP0726160422111/3019
OCT0726150322113018
NOV0524140221102917
DEC0524132/3120092816

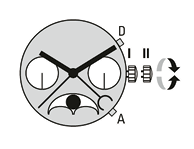
Ronda Xtratech Moonphase with Calendar Week

Ronda Xtratech movement diagram — moonphase with calendar week
Ronda Xtratech — Moonphase / Calendar Week

Setting sequence — moonphase, date, day of week and time

(e.g. after battery change)

  1. Pull the crown out to position II (watch stopped).
  2. Set the moonphase display: Turn the crown clockwise past midnight, until the full moon position appears.
  3. Set the day of the week: No quick-change correction is available for the day of the week. Change the time display by turning the crown backwards and forwards (1:00 am / 10:00 pm / 1:00 am / 10:00 pm / 1:00 am …) until the day of the week of the last full moon is displayed.
  4. Set the date: Turn the crown until 6:00 am appears in the time display (beyond the blocking time). Set the date of the last full moon with pusher A. Then with the crown, move the hands forwards until the current date is displayed.
  5. Set the time: Turn the crown until the current time is displayed (remember the 24-hour cycle).
  6. Set the calendar week: Use pusher D to set the current calendar week.
  7. Push the crown back into position I.

Quick-change corrections

  • Date (pusher A): Press pusher A until the current date is displayed (blocking period: 10:00 pm – 5:00 am).
  • Calendar week (pusher D): Press pusher D until the current calendar week is displayed (blocking period: Saturday 10:00 pm – Monday 12:00 pm).

Battery Care & Warranty

Battery Care & Safety

The battery contains a small amount of mercury. Please recycle or dispose of properly. Visit watchbatteryrecycle.org for more information.

Warranty

Your Gc watch is covered by an international guarantee against any manufacturing defects for a period of 24 months from the date of purchase indicated on the guarantee card. Any part found to be defective within this period will be repaired or replaced at no charge. In order to benefit from this guarantee, you will be required to present the Gc Watches international guarantee certificate, duly completed, dated, stamped and signed by an authorized Gc Watches retailer.

The Gc Watches International Guarantee Certificate does not cover:

  • Defects arising from damage, mishandling, incorrect or abusive use (knocks, crushing, moisture in the case of non water resistant watches), alteration or repairs not performed by an authorized Gc Watches retailer.
  • Leather straps or bracelets.
  • Batteries.
  • Normal wear of base metal, surface-coated watches.
  • Theft or loss of the complete watch or components.
Please recycle

For more information please visit

gcwatches.com