About Your Watch

Congratulations on purchasing your GUESS watch. Please read these instructions carefully to understand how to operate your GUESS timepiece. Your watch may not have all of the features described in this booklet.

For additional information, please visit GUESSWatches.com.

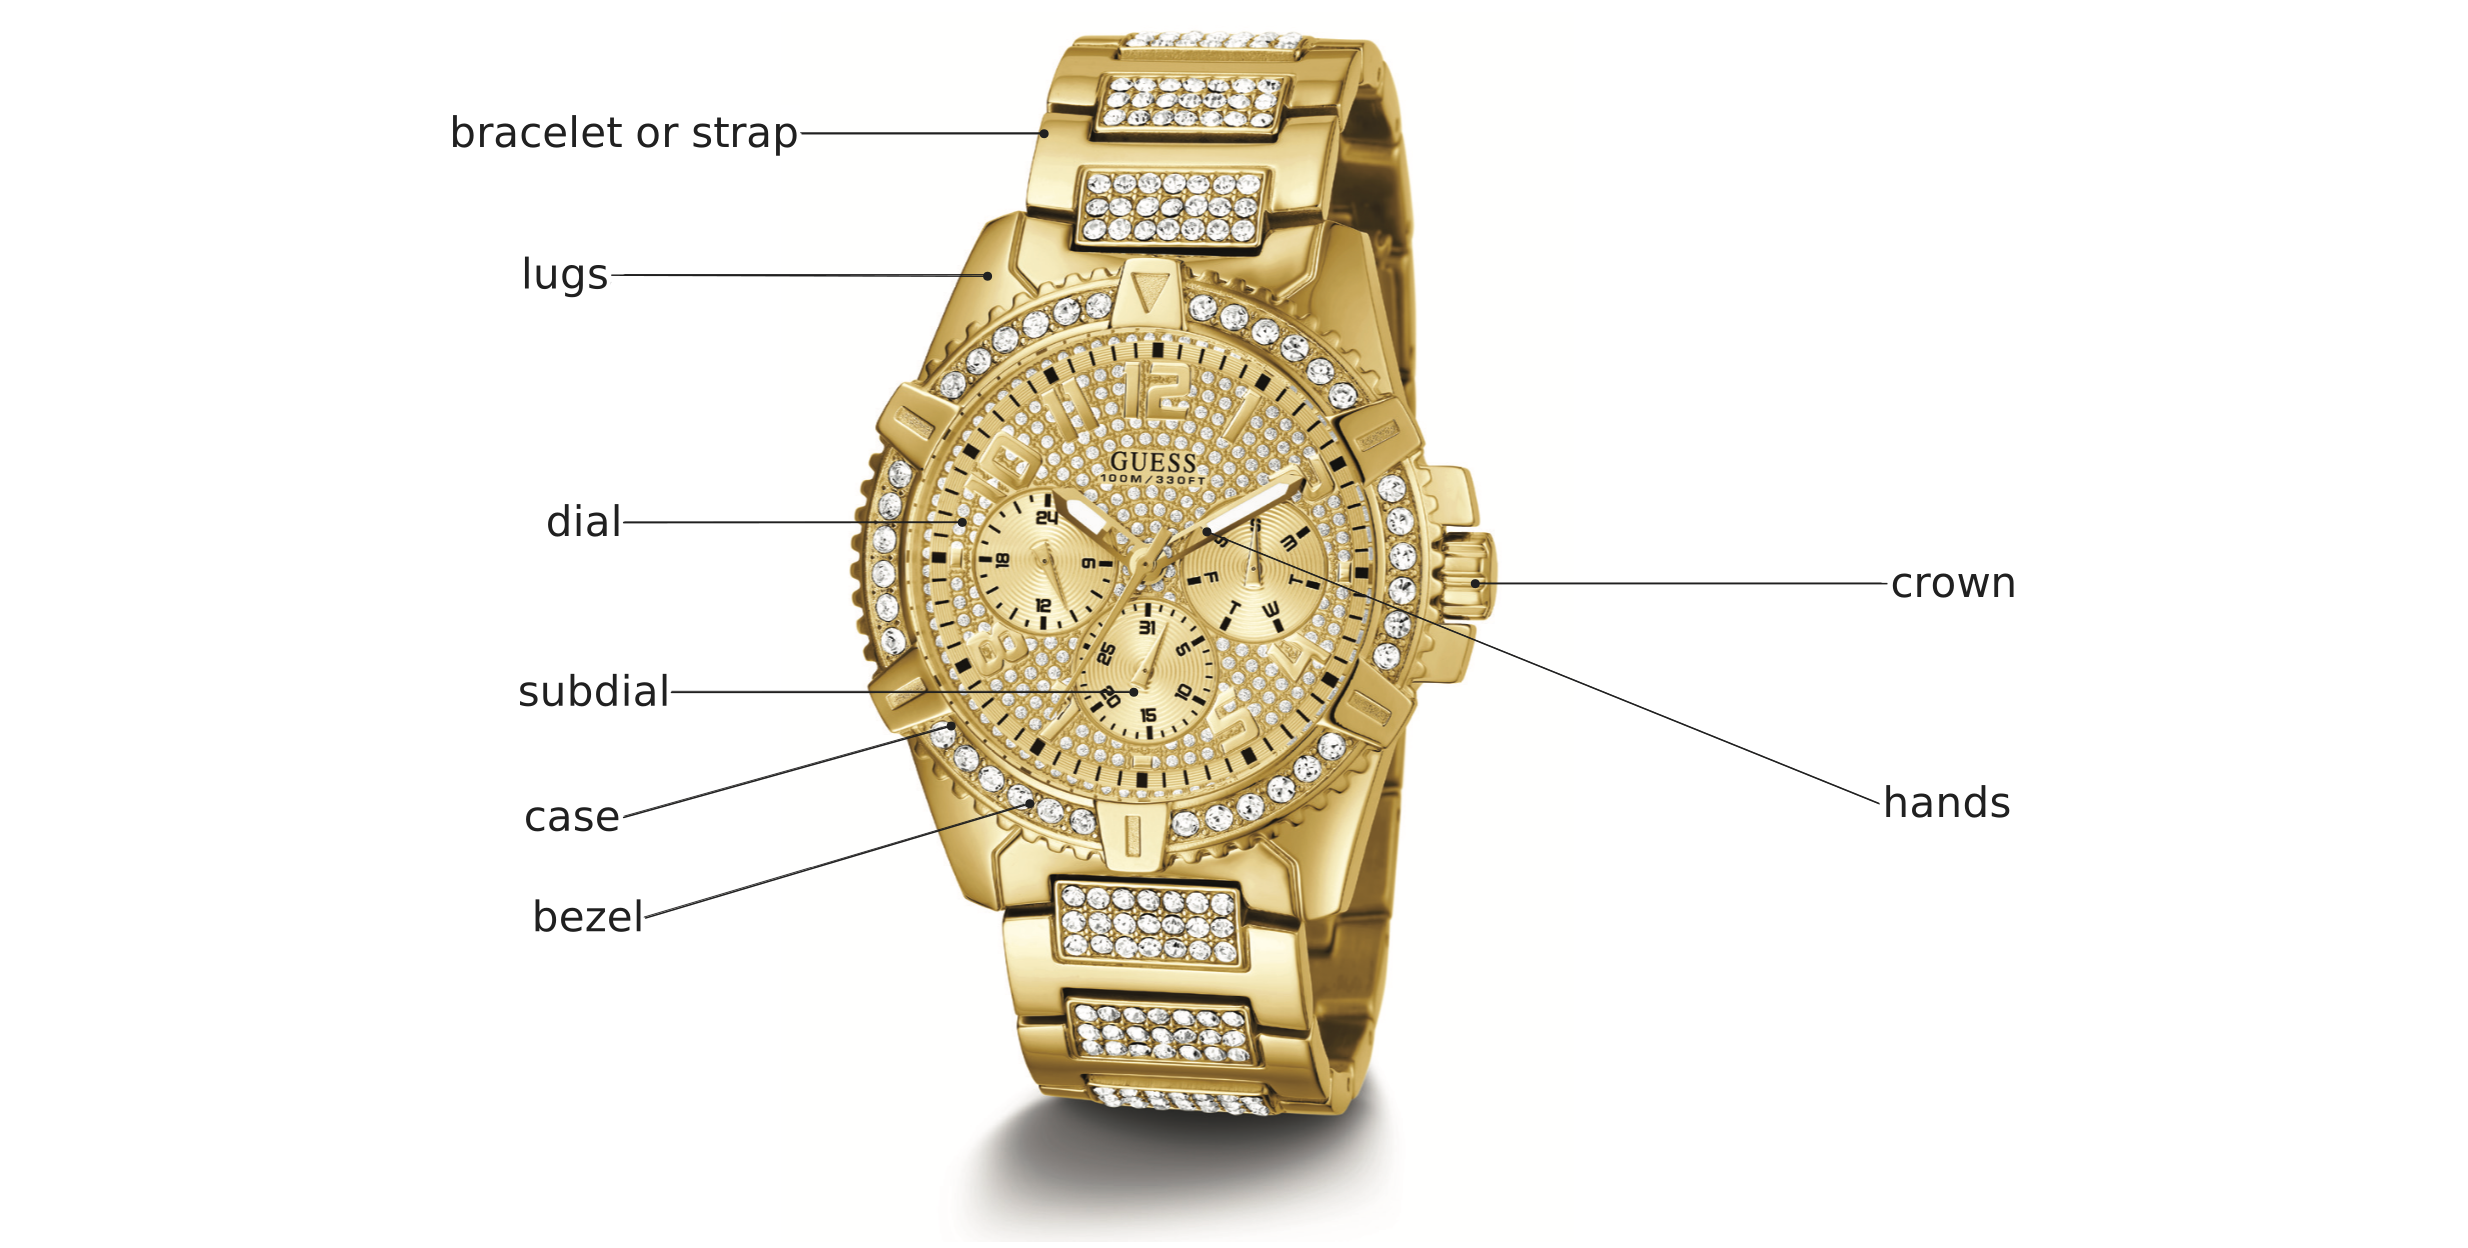
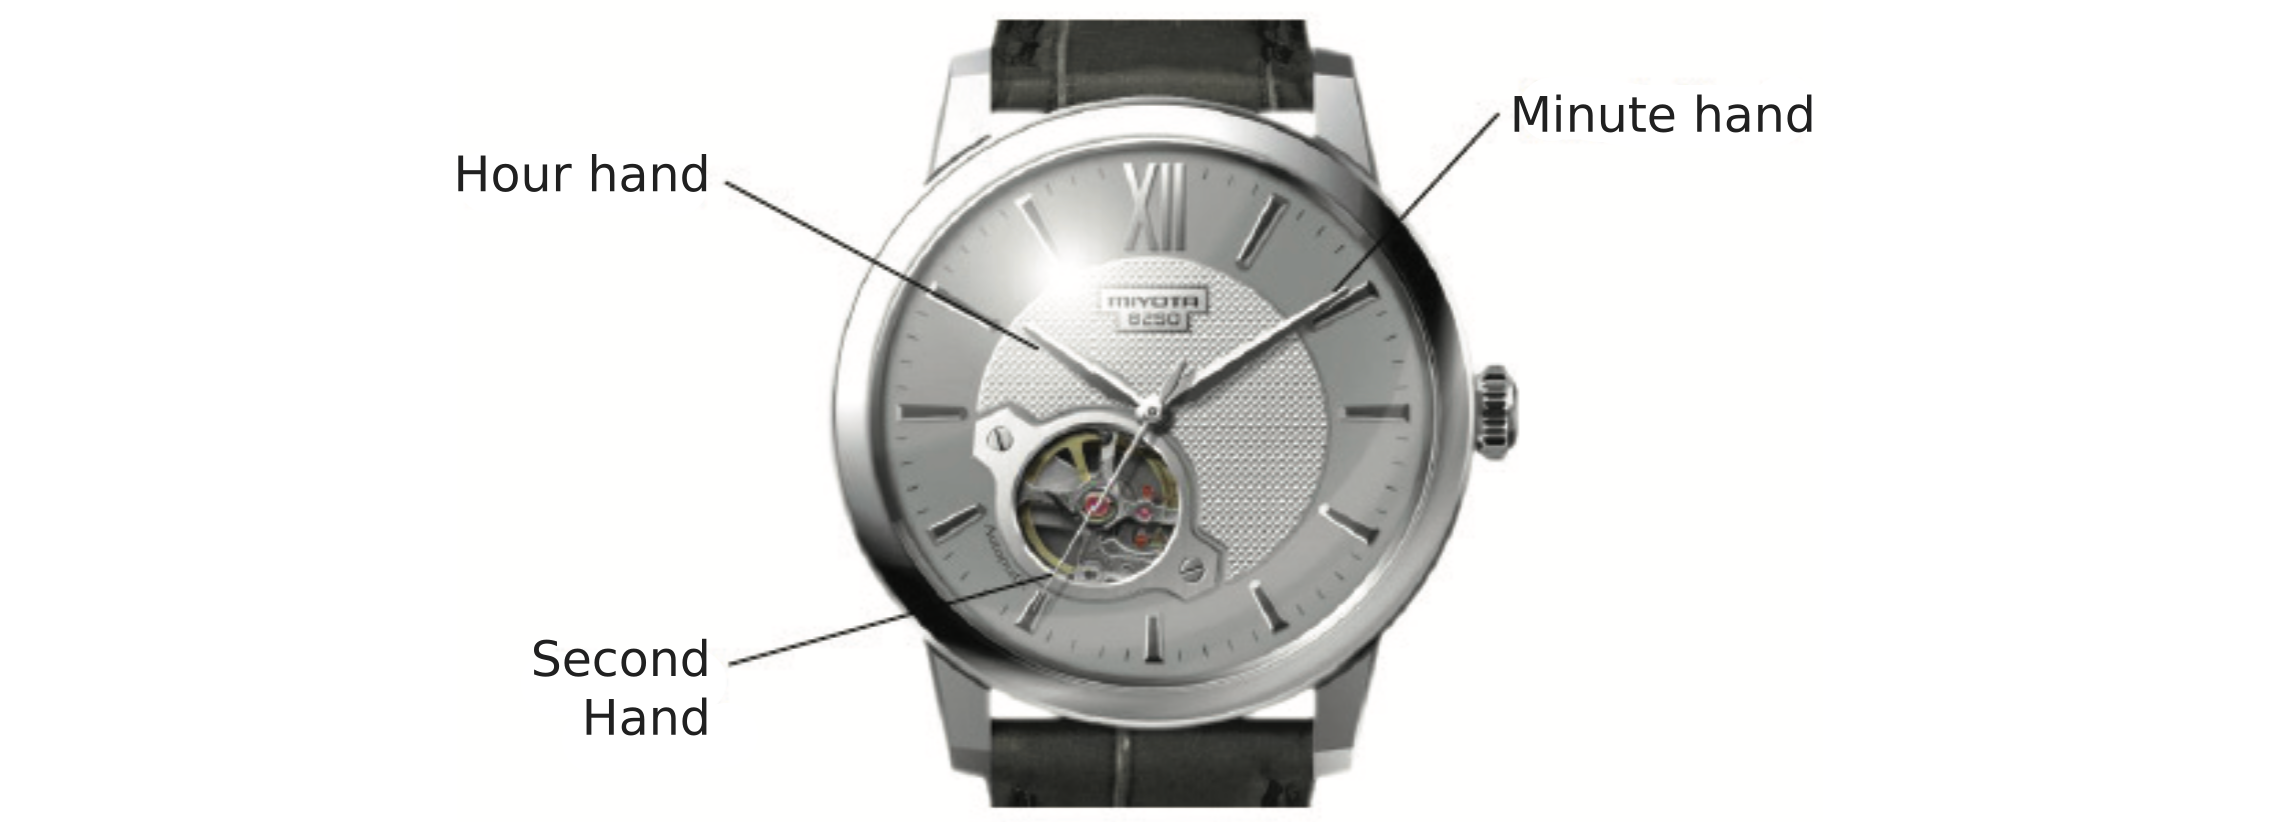
Watch diagram labelling: bracelet or strap, lugs, dial, crown, subdial, case, hands, and bezel
Watch anatomy

Warranty

U.S. Customers

We offer a Two Year Warranty on all purchases made from July 1st, 2017. Any purchases made prior to July 1st, 2017 hold a 10 Year Limited Warranty. In the event of a defect or malfunction within the warranty period from date of purchase, your watch will be repaired or replaced, at our option.

The limited warranty does not apply to normal wear and tear, abuse or water damage and excludes batteries, case, strap or bracelet; does not cover costs, parts or labor, shipping & handling, defects or damage caused by any source other than GUESS Watches. Proof of purchase is required for all Warranty Repairs. If you live in the U.S. contact us for more information.

International Customers

If you live outside the U.S., please contact your local representative for country-specific warranty information: guesswatches.com/pages/guesswatches-global-representative

Your GUESS or Gc watch is covered by an international guarantee against any manufacturing defects for a period of 24 months from the date of purchase. Any part found to be defective within this period will be repaired or replaced at no charge.

The GUESS & Gc Watches international guarantee certificate does not cover defects arising from damage, mishandling, incorrect or abusive use (knocks, crushing, moisture in non water-resistant watches), alteration or repairs not performed by an authorized GUESS or Gc Watches retailer.

Always have your watch checked, serviced and repaired by a GUESS or Gc Agent to maintain your guarantee.

Watch Care

Do

  • Use a soft tissue to clean the case and crystal of your timepiece.
  • If the case and crystal look very dirty, use a soft tissue dipped in soapy water.

Do Not

  • Clean a leather strap with anything other than clean water.
  • Never use chemical products like petroleum spirits to clean your timepiece.

It is preferable to avoid wearing your GUESS watch to the beach, or to play extreme sports, so as to avoid knocking or scratching them.

Repeated contact with perfumes, cosmetics, or household detergents may damage your timepiece.

Watches will withstand Water Resistance if the crystal, crown, push buttons, case and gaskets remain intact.

DO NOT operate crown or buttons when watch is wet or submerged.

A hard knock might cause the watch to lose its water-resistance. If you plan to use your watch under water, have the water-resistance checked at least every 12 months. If the case has to be opened for any reason, ask your GUESS agent to check the waterproof seals for the case back, glass and crown, and replace them if necessary.

Battery

Battery life may vary between 2 to 4 years, depending on the model and the way your watch is used.

Most of our quartz watches equipped with a centre seconds-hand have an end-of-life battery warning system (EOL). Approximately two weeks before the end of the battery-life, the centre seconds-hand jumps every four seconds to signal that the battery is running low. When this happens, replace the battery immediately. A dead battery inside the watch might damage the movement.

Instructions

Simple Time / Mini Sweep

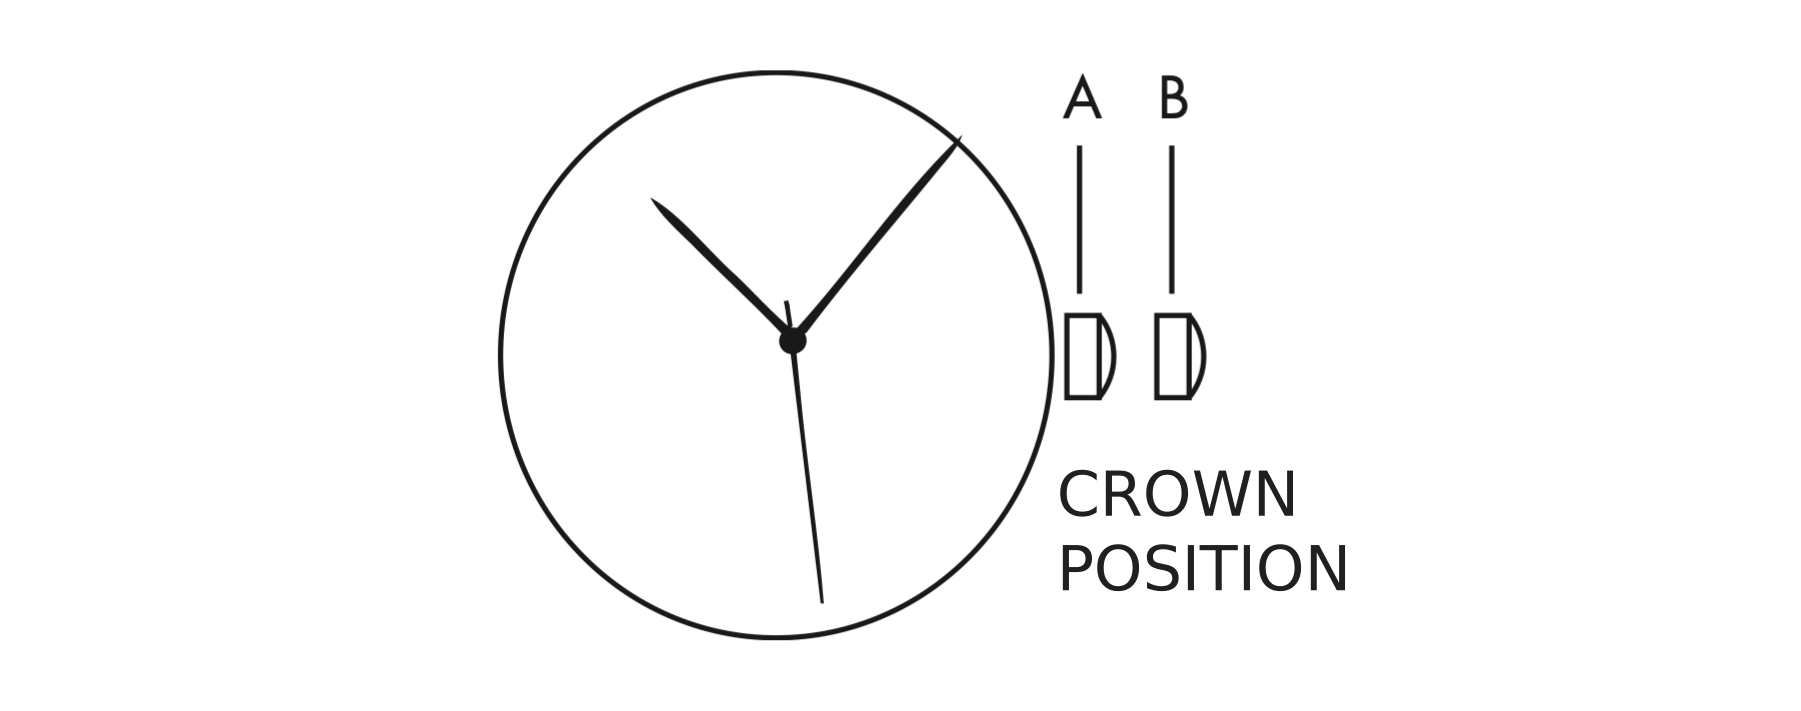
Watch diagram showing crown positions A and B
Simple Time / Mini Sweep

To set the time:

  1. PULL out crown to position B.
  2. TURN crown either way to correct time.
  3. PUSH in crown to position A.

Day / Day & Date

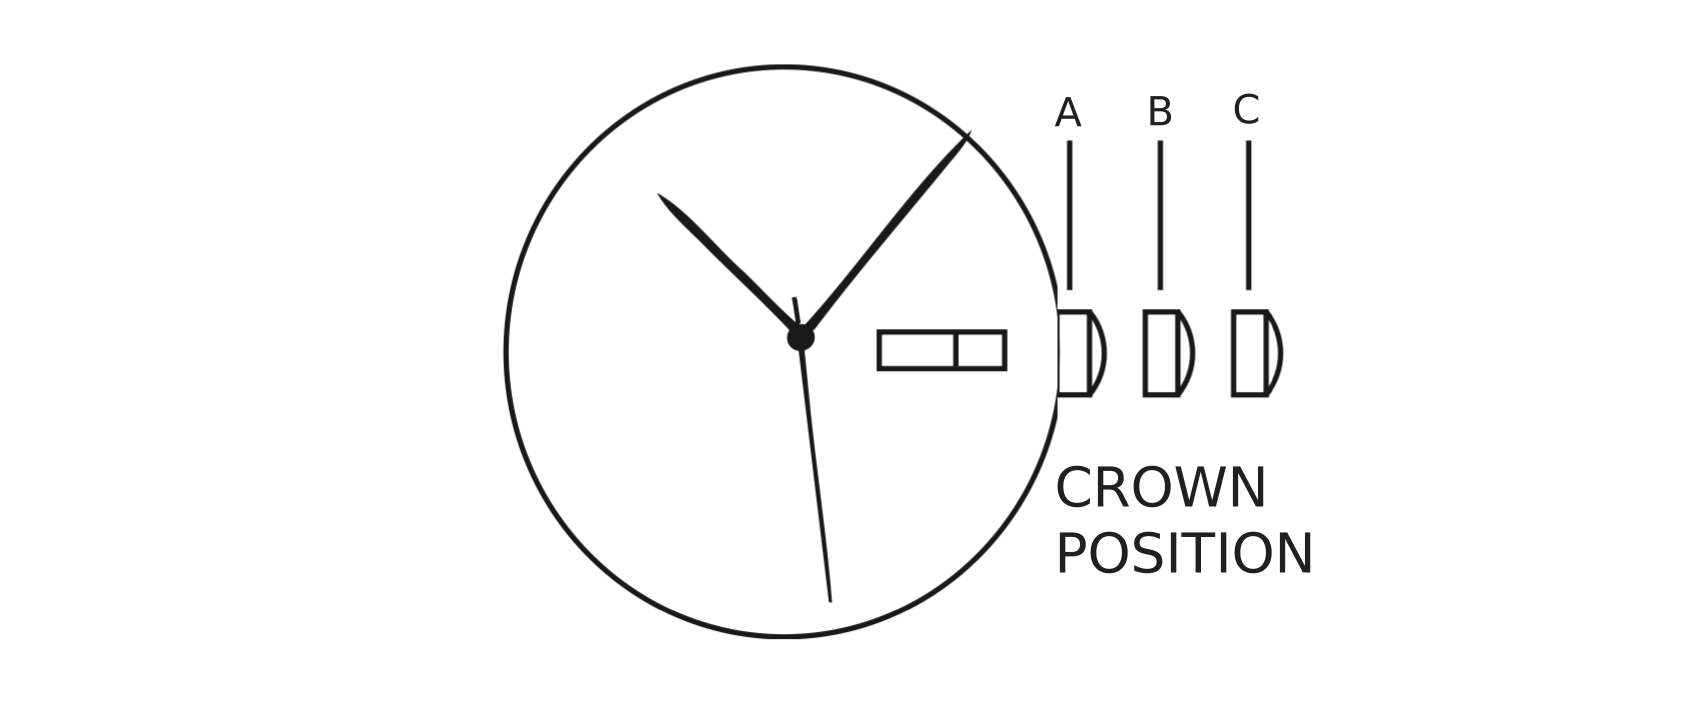
Watch diagram showing crown positions A, B and C
Day / Day & Date

To set the time:

  1. PULL out Crown to position C.
  2. TURN Crown either way to correct time.
  3. PUSH in Crown to position A.

To set the calendar / date:

  1. PULL out Crown to position B.
  2. TURN Crown away from you to correct date.
  3. TURN Crown towards you to correct the day.
  4. PUSH in crown to position A.

Multi-function Day/Date/Pusher

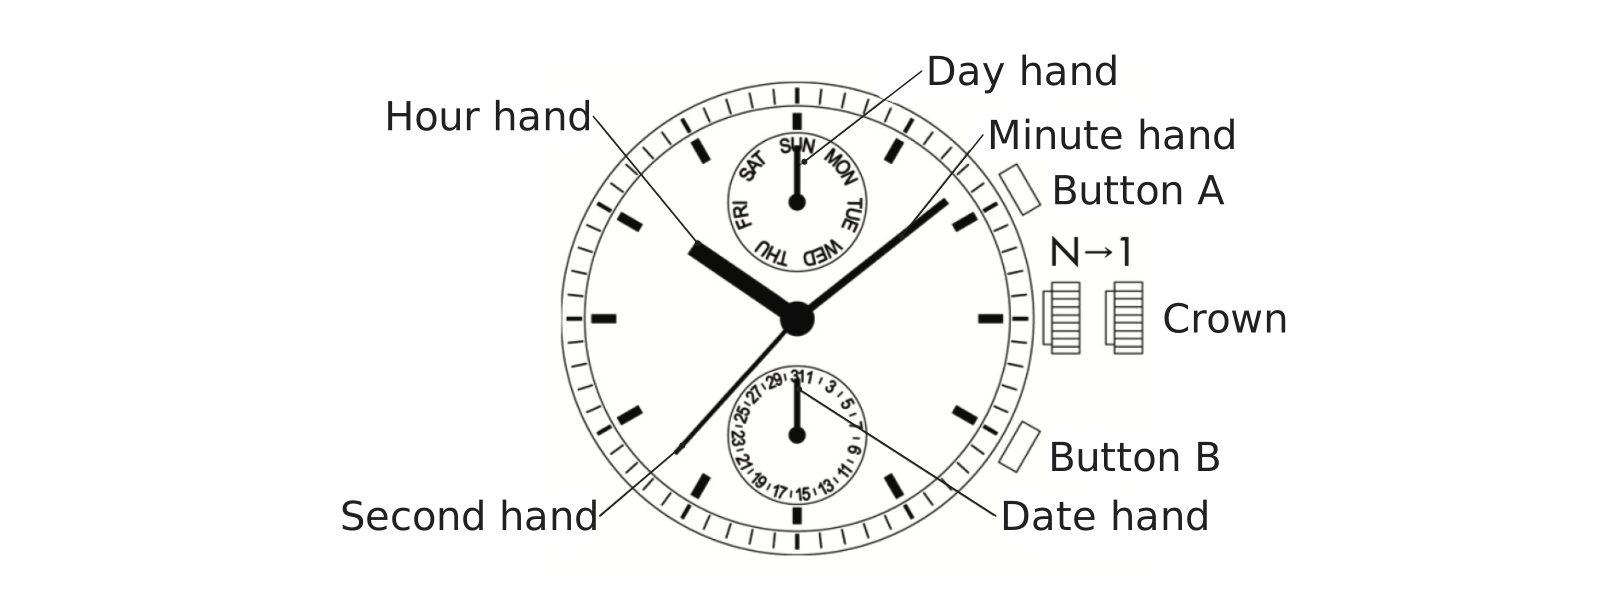
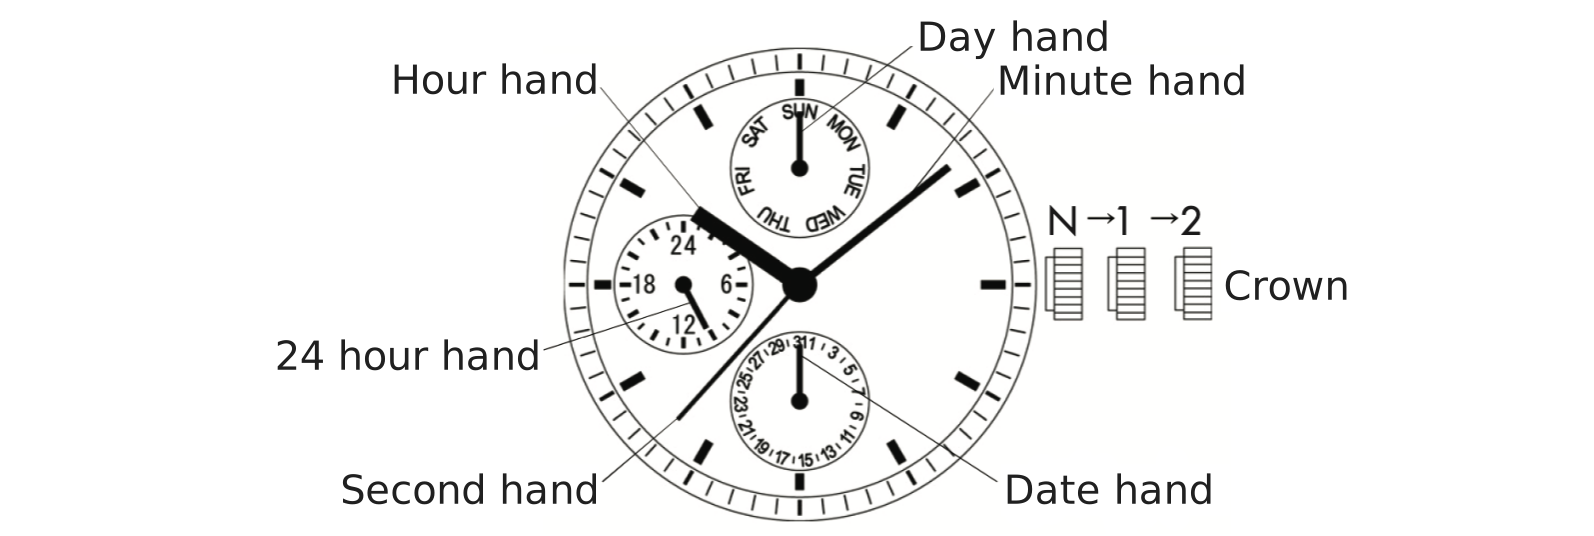
Multi-function Day/Date/Pusher watch diagram with labelled hands and buttons
Multi-function Day/Date/Pusher — display

Crown and button operation

Crown position
N — Normal 1 — 1st click
Crown Free (running) Time setting
Button A Day change —
Button B Date change —

To set time:

  1. Pull the crown out to the 1st click position when the second hand is at the 12 o'clock position.
  2. Turn the crown to set the hour and minute hands. Take a.m./p.m. into consideration. When setting the minute hand, advance it 4 to 5 minutes ahead of the desired time and then turn it back to the exact time.
  3. Push the crown back to the normal position.

To set date and day of the week:

  • Day correction: With each press of Button A, the day hand advances to the next day of the week.
  • Date correction: With each press of Button B, the date hand advances 1 day.

Multi-function Day/Date/24 Hour/Pusher

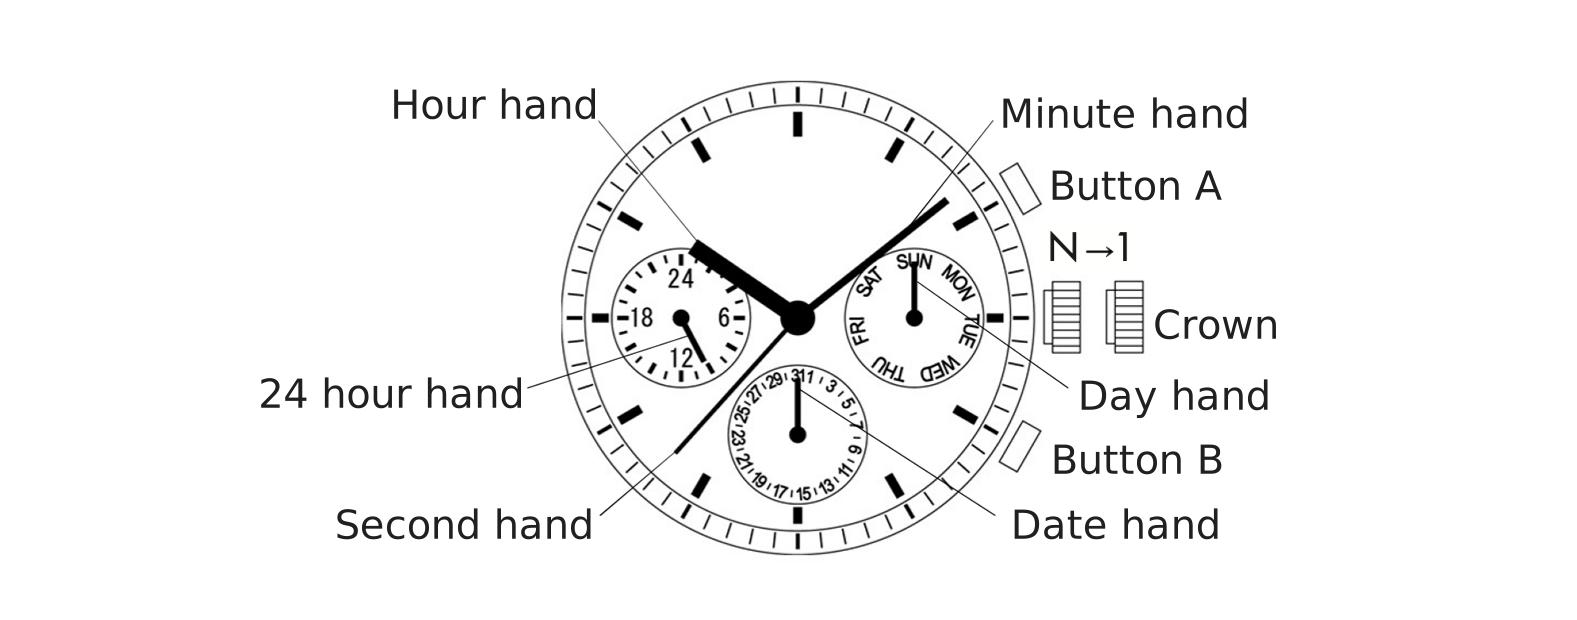
Multi-function Day/Date/24 Hour/Pusher watch diagram with labelled hands and buttons
Multi-function Day/Date/24 Hour/Pusher — display

Crown and button operation

Crown position
N — Normal 1 — 1st click
Crown Free (running) Time setting
Button A Day change —
Button B Date change —

To set time:

  1. Pull the crown out to the 1st click position when the second hand is at the 12 o'clock position.
  2. Turn the crown to set the hour and minute hands. Take a.m./p.m. into consideration. The 24 hour hand moves correspondingly with the hour hand — check that it is correctly set. When setting the minute hand, advance it 4 to 5 minutes ahead of the desired time and then turn it back to the exact time.
  3. Push the crown back to the normal position.

To set date and day of the week:

  • Day correction: With each press of Button A, the day hand advances to the next day of the week.
  • Date correction: With each press of Button B, the date hand advances 1 day.

Multi-function Day/Date/24 Hour/Pusher

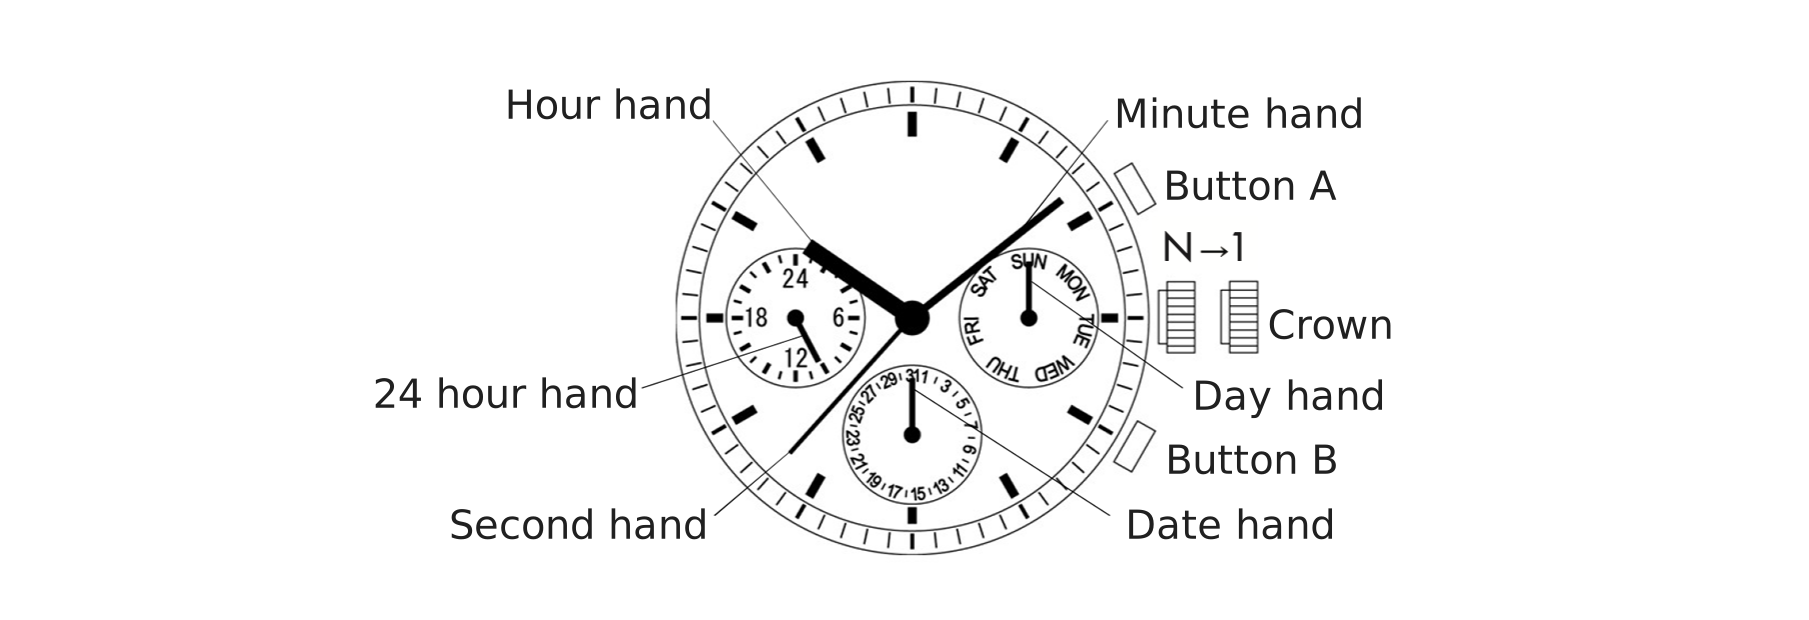
Multi-function Day/Date/24 Hour/Pusher watch diagram with labelled hands and buttons
Multi-function Day/Date/24 Hour/Pusher — display

Crown and button operation

Crown position
N — Normal 1 — 1st click
Crown Free (running) Time setting
Button A Day change —
Button B Date change —

To set time:

  1. Pull the crown out to the 1st click position when the second hand is at the 12 o'clock position.
  2. Turn the crown to set the hour and minute hands. Take a.m./p.m. into consideration. The 24 hour hand moves correspondingly with the hour hand — check that it is correctly set. When setting the minute hand, advance it 4 to 5 minutes ahead of the desired time and then turn it back to the exact time.
  3. Push the crown back to the normal position.

To set date and day of the week:

  • Day correction: With each press of Button A, the day hand advances to the next day of the week.
  • Date correction: With each press of Button B, the date hand advances 1 day.

Multi-function Date

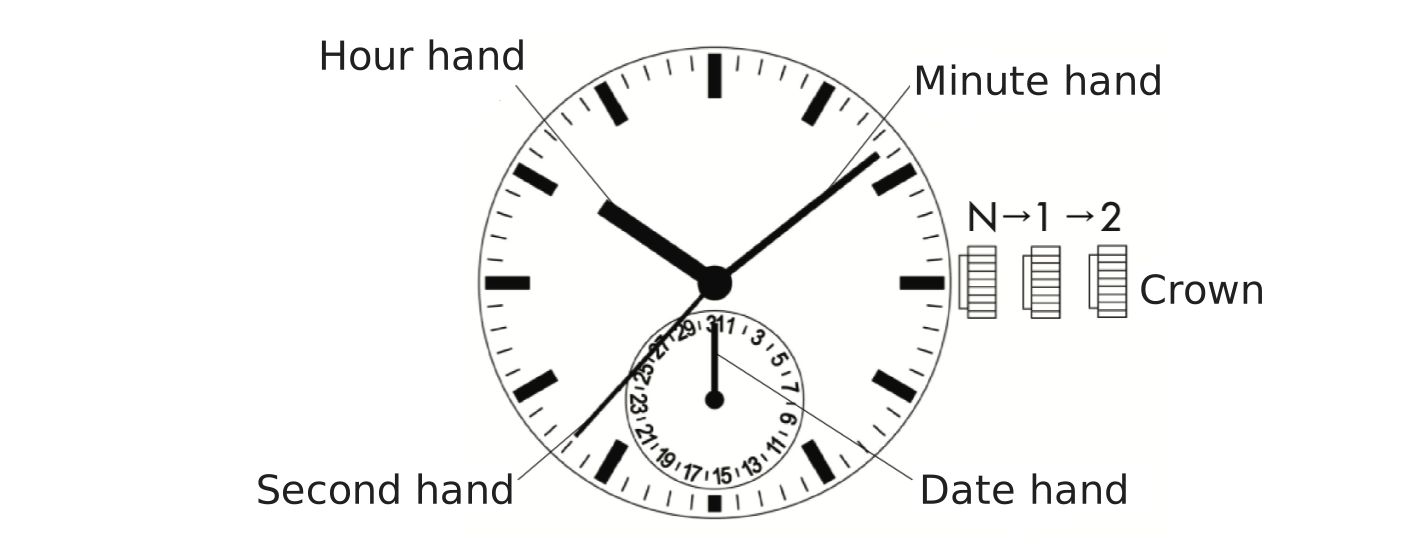
Multi-function Date watch diagram with labelled hands and crown positions
Multi-function Date — display

Crown operation

Crown position
N — Normal 1 — 1st click 2 — 2nd click
Crown Free (running) Turn counterclockwise for date change Time setting

To set time:

  1. Pull the crown out to the 2nd click position when the second hand is at the 12 o'clock position.
  2. Turn the crown to set the hour and minute hands. Take a.m./p.m. into consideration. Advance the minute hand 4 to 5 minutes ahead of the desired time and then turn it back to the exact time.
  3. Push the crown back to the normal position.

To set date:

  1. Pull the crown out to the 1st click position. The date hand will not move back by turning the crown clockwise.
  2. Push the crown back to the normal position.

Multi-function Day/Date/24 Hour

Multi-function Day/Date/24 Hour watch diagram with labelled hands and crown positions
Multi-function Day/Date/24 Hour — display

Crown operation

Crown position
N — Normal 1 — 1st click 2 — 2nd click
Crown Free (running) Turn counterclockwise for date change / day change Time setting

To set time:

  1. Pull the crown out to the 2nd click position when the second hand is at the 12 o'clock position.
  2. Turn the crown clockwise to advance the hour and minute hands until the day hand is set to the desired day of the week. The day hand will not move back by turning the crown counter-clockwise. To advance the day hand quickly, turn the hour and minute hands back 4 to 5 hours beyond the point of the day change (between 11:00 p.m. and 4:00 a.m.), then advance again.
  3. Turn the crown to set the hour and minute hands to the desired time. Take a.m./p.m. into consideration. The 24 hour hand moves with the hour hand — check it is correctly set. Advance the minute hand 4 to 5 minutes ahead of the desired time and then turn it back to the exact time.
  4. Push the crown back to the normal position.

To set date:

  1. Pull the crown out to the 1st click position.
  2. Turn the crown counter-clockwise to set the date hand. The date hand will not move back by turning the crown clockwise.
  3. Push the crown back to the normal position.

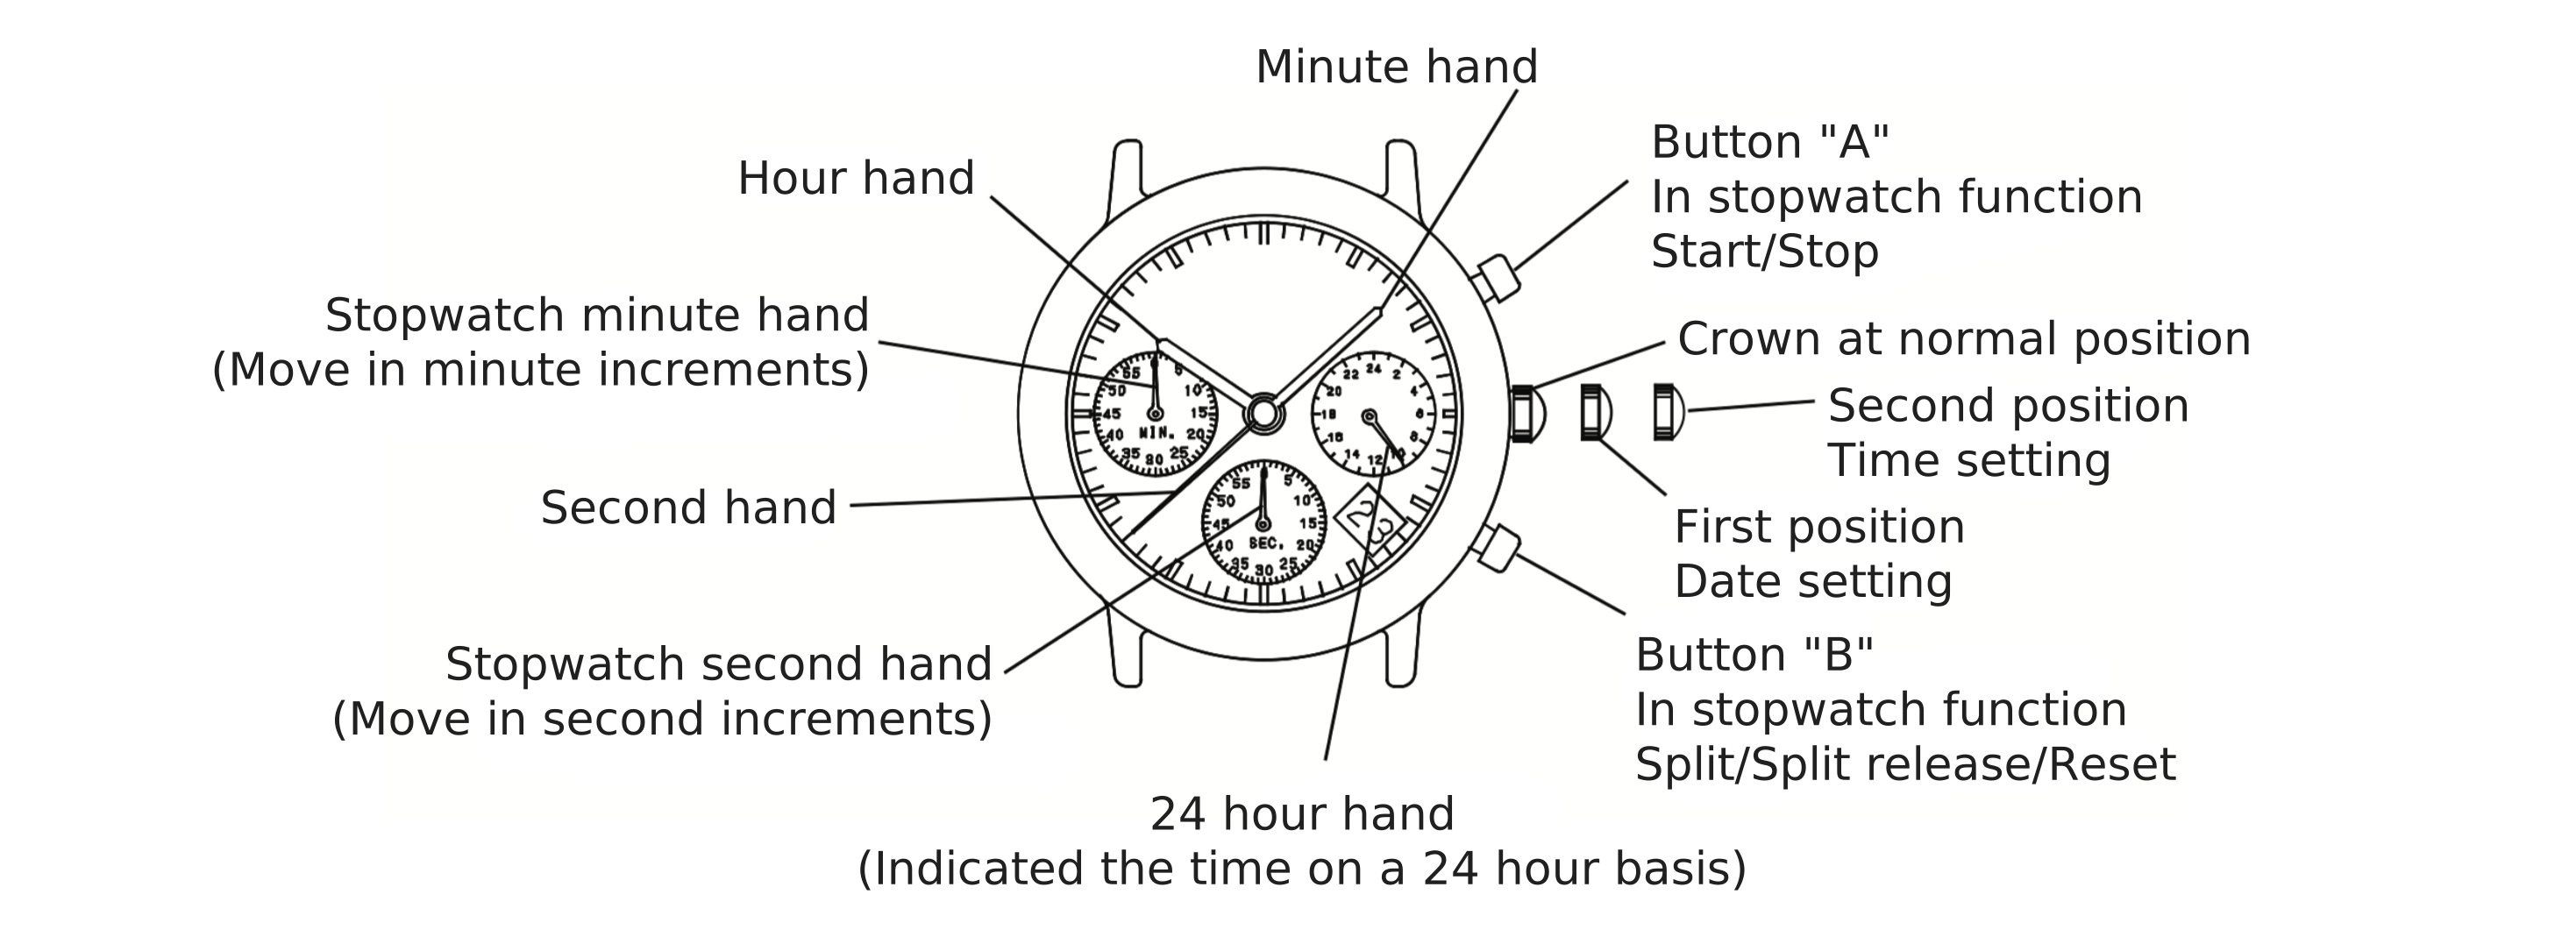
Chronograph 1/1 sec.

Chronograph 1/1 sec.

2-click crown · date at 3 · no 24hr hand
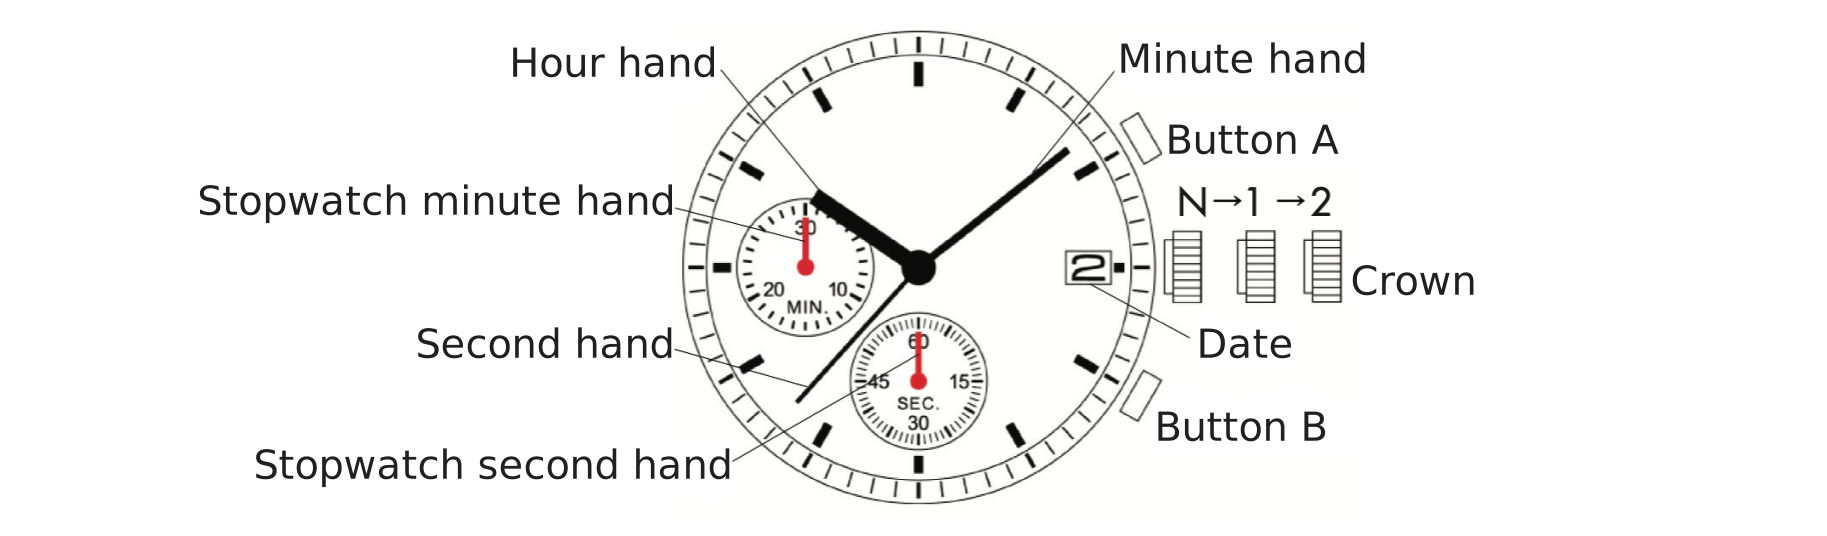
Chronograph 1/1 sec. display diagram showing hands, crown positions and buttons
Chronograph 1/1 sec. — display (variant A)

Crown and button operation

Crown position
N — Normal 1 — 1st click 2 — 2nd click
Crown Free (running) Turn counterclockwise to set date Time setting
Button A Stopwatch: Start / Stop / Restart Stopwatch: Start / Stop / Restart Stopwatch hand adj. (clockwise)
Button B Stopwatch: Reset / Split / Split release Stopwatch: Reset / Split / Split release Stopwatch hand adj. (counter-clockwise)

To set time:

  1. Pull the crown out to the 2nd click position when the second hand is at the 12 o'clock position. If the stopwatch is measuring, pulling to the 2nd click will automatically reset the stopwatch hands to "0".
  2. Turn the crown to set the hour and minute hands. Take a.m./p.m. into consideration. Advance the minute hand 4 to 5 minutes ahead of the desired time and then turn it back to the exact time.
  3. Push the crown back to the normal position.

To set date:

  1. Pull the crown out to the 1st click position.
  2. Turn the crown to set the date.
  3. Push the crown back to the normal position.

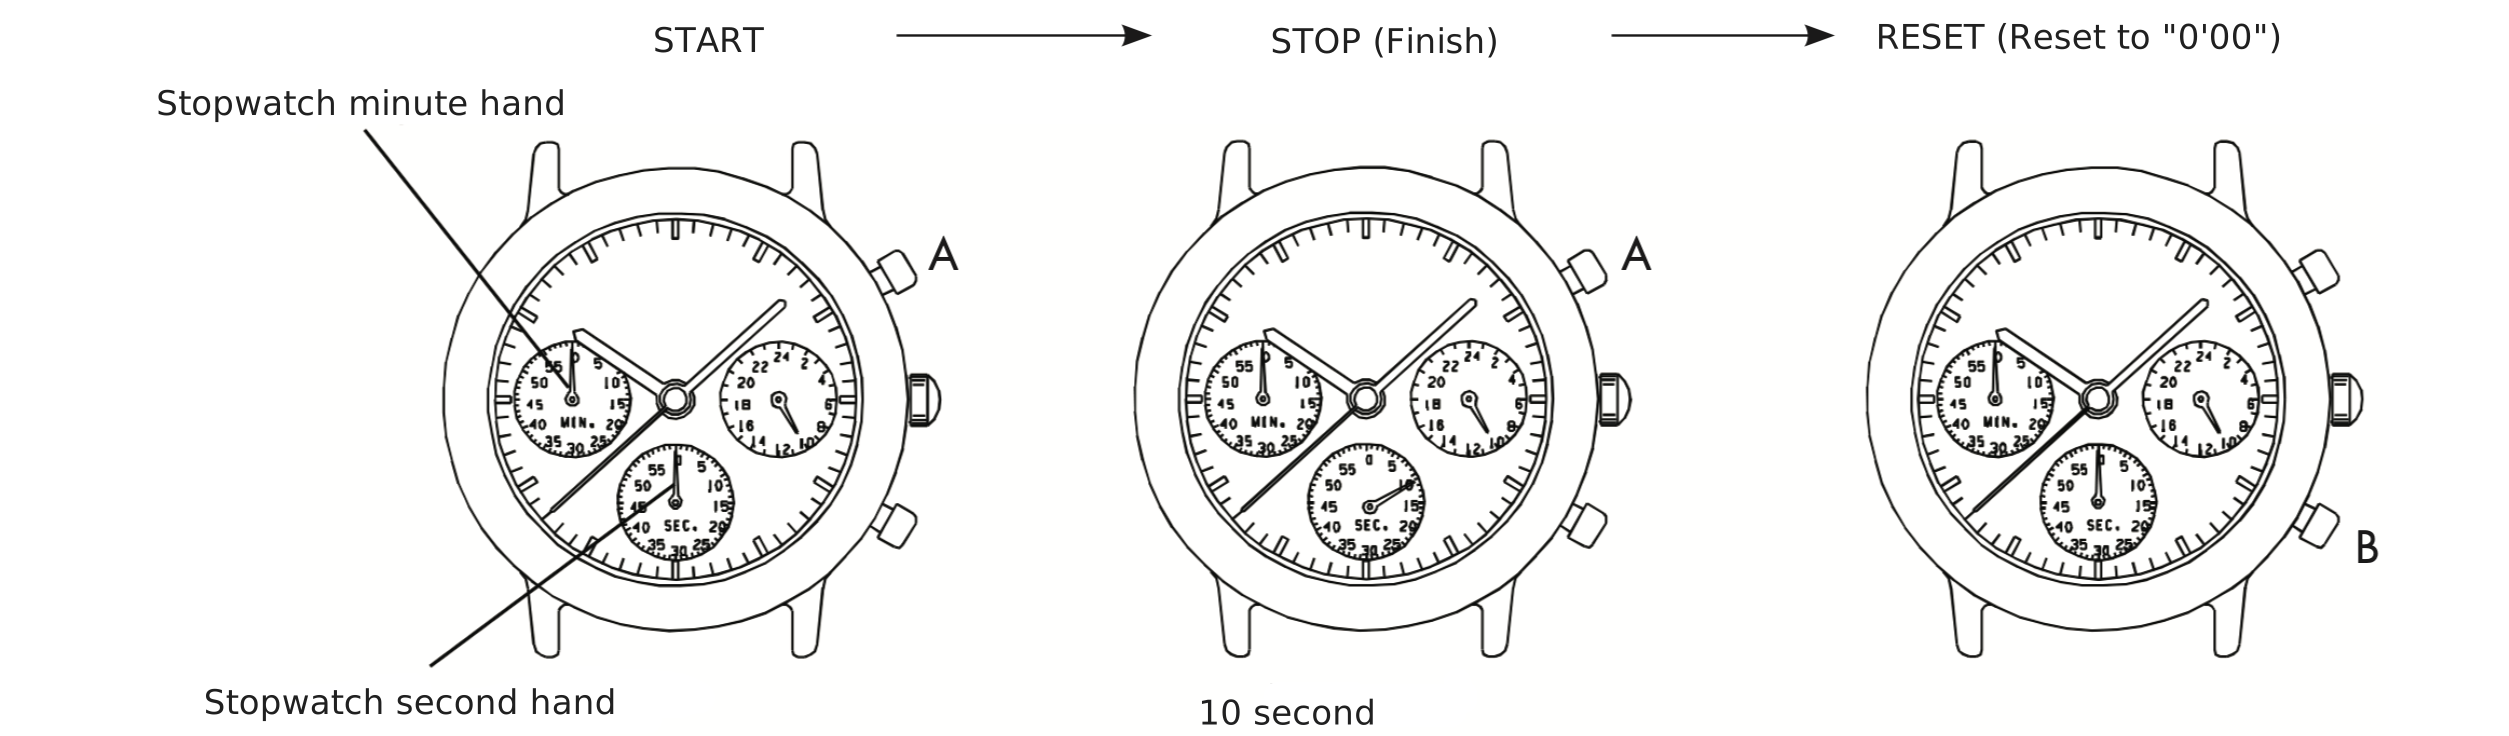
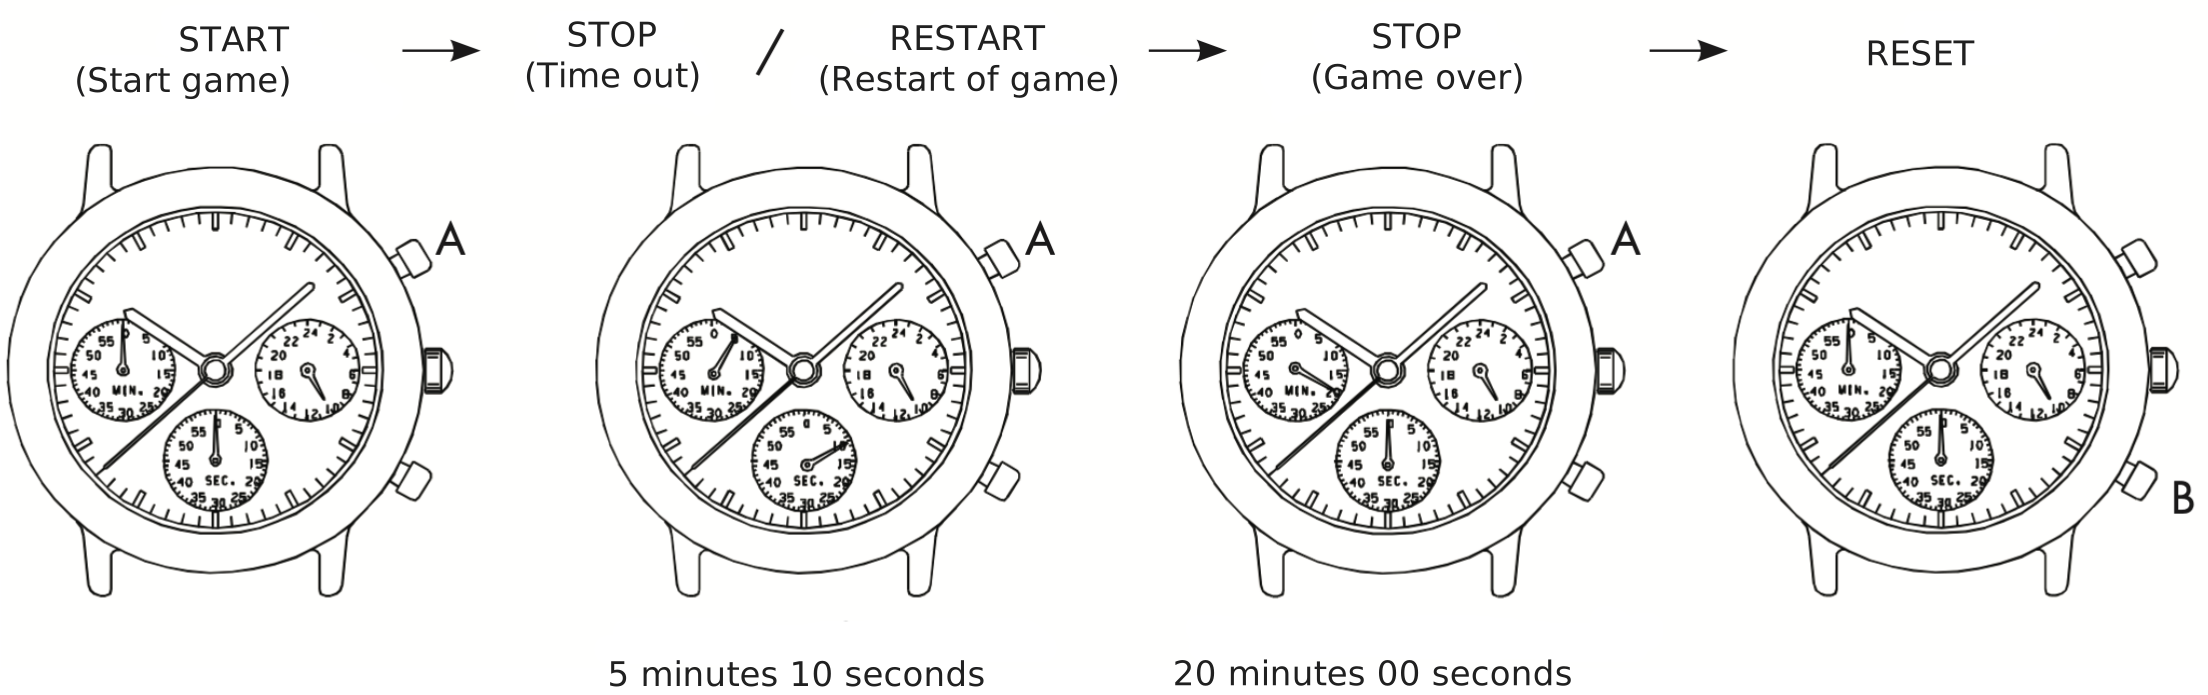
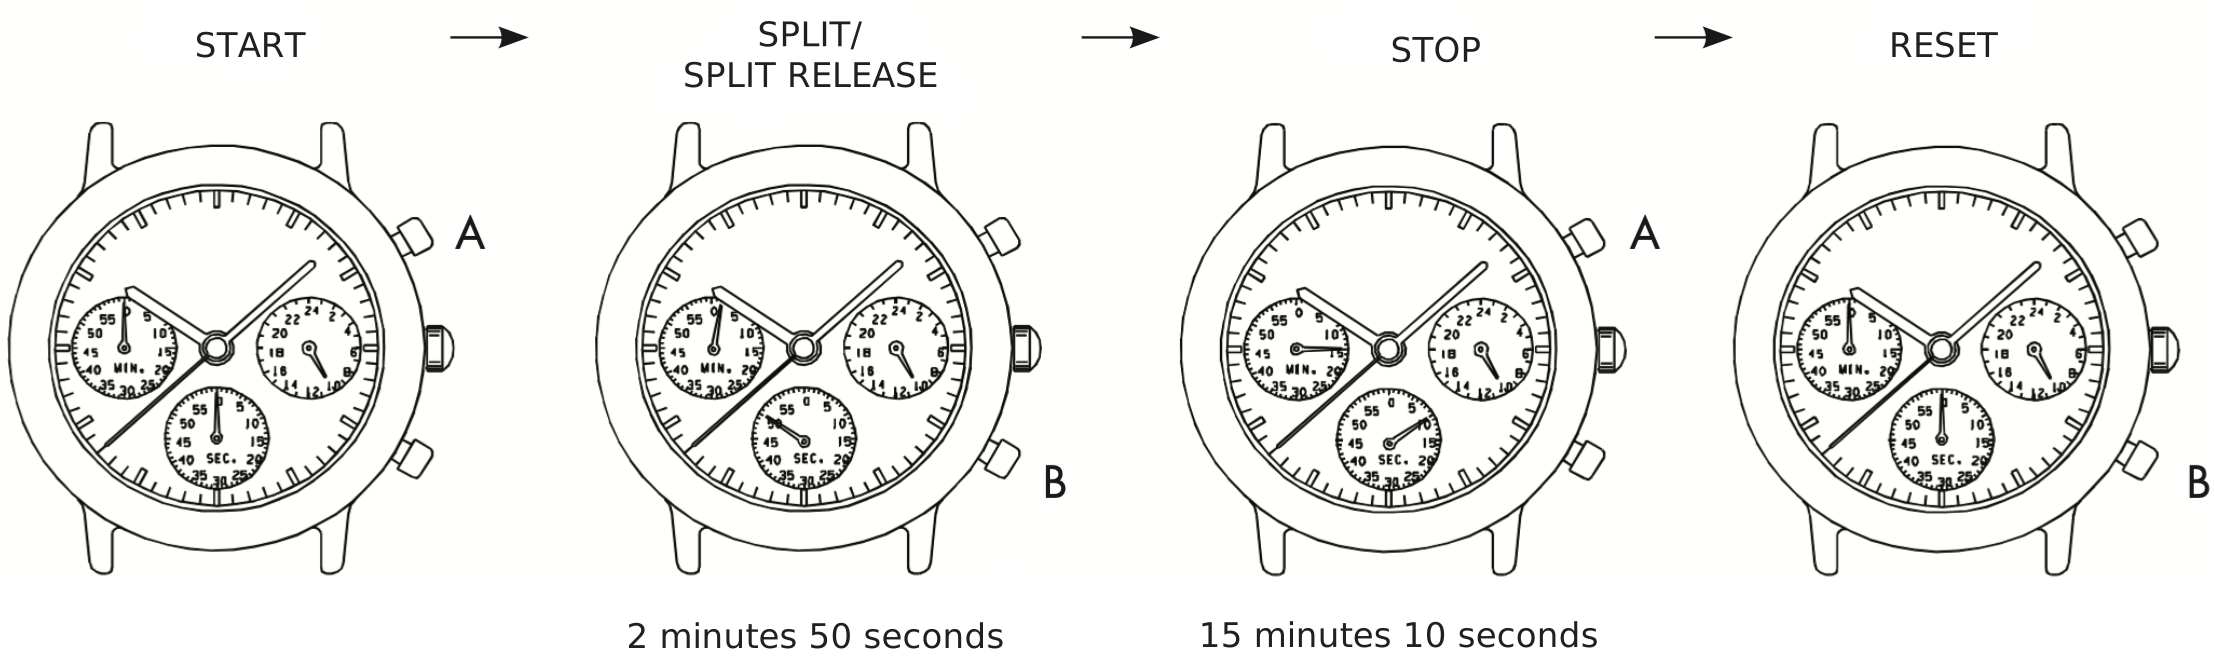
Using the stopwatch:

Measures up to 29'59" in 1-second increments. Automatically stops at 30 minutes.

  • Standard measurement:
    Press A to start → A to stop → B to reset.
  • Accumulated elapsed time:
    Press A to start → press A to stop and restart as needed → A final stop → B to reset.
  • Split time:
    Press A to start → press B for split (hands freeze) → press B to release split (repeat as needed) → A to stop → B to reset.
  • Two competitors:
    Press A to start → B at 1st competitor's finish → A at 2nd competitor's finish → B → B to reset.

Before using the stopwatch, confirm the crown is at the normal position and the stopwatch hands are at "0".

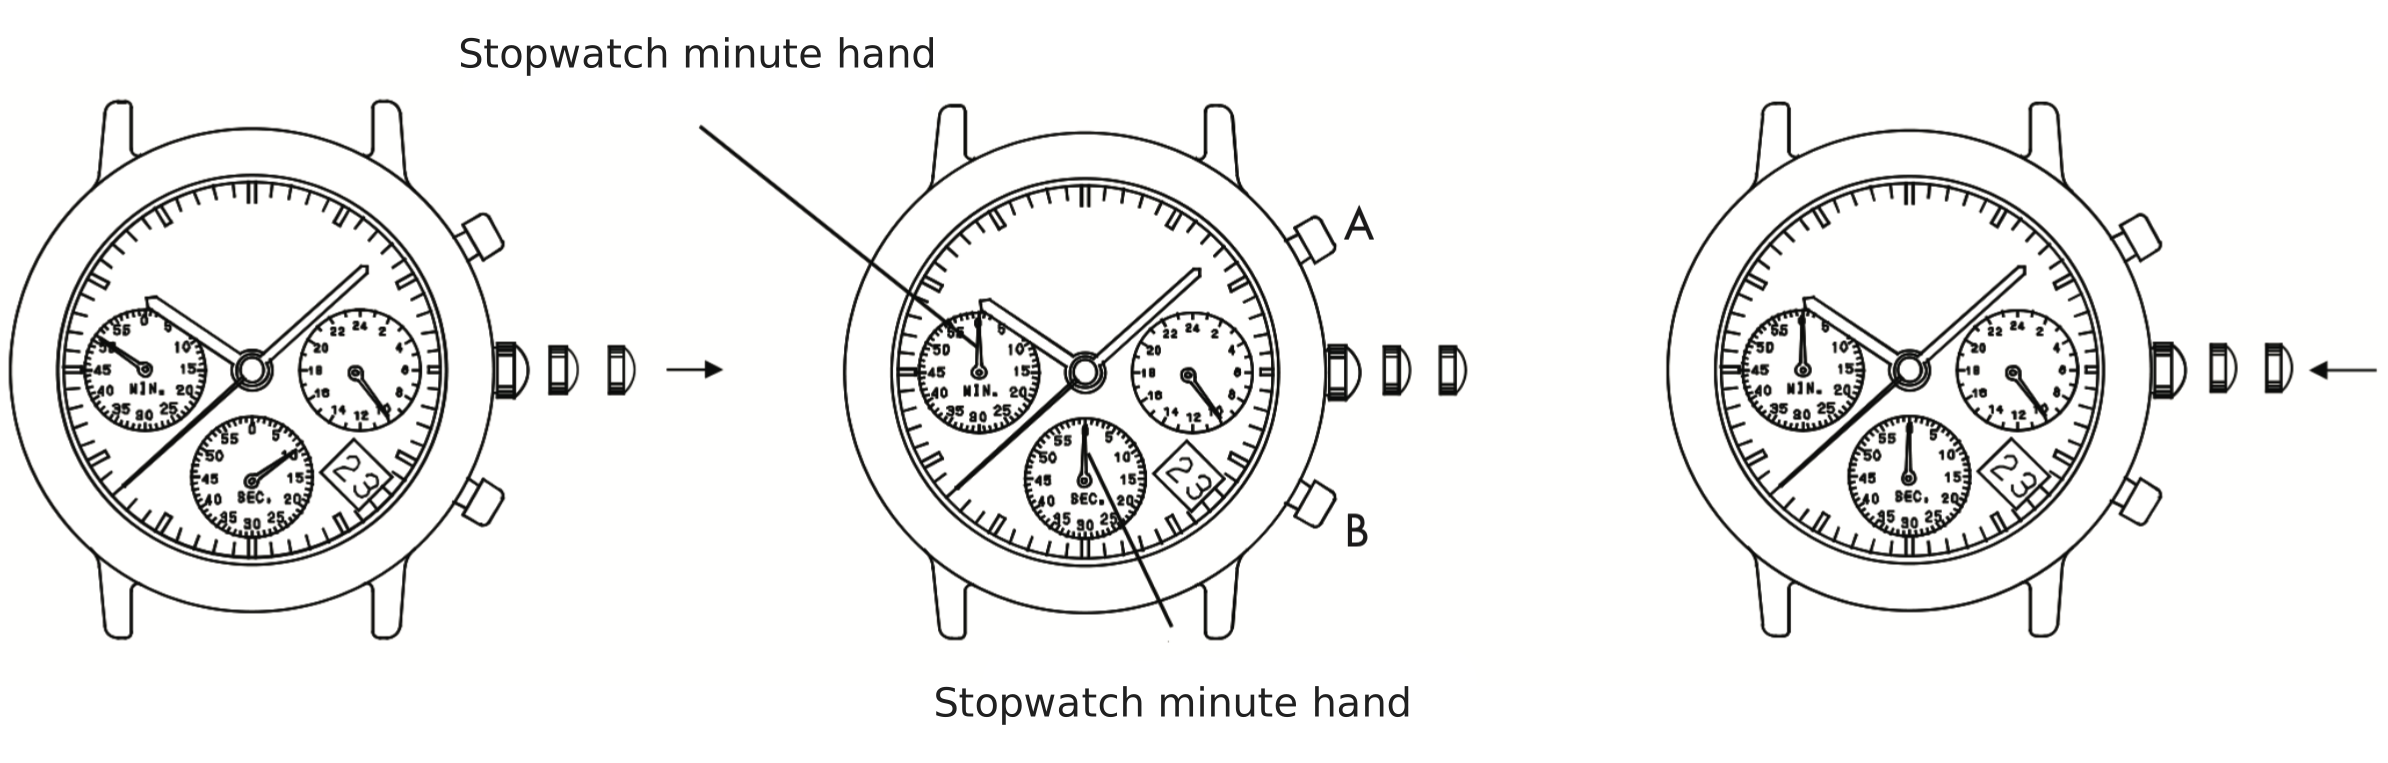
Stopwatch hand position adjustment:

If the stopwatch hands are not in the “0” position, follow the procedures below to set them.

  1. Pull the crown out to the 2nd click position. If the stopwatch is measuring, it will be automatically reset.
  2. Press Button A or B to move the stopwatch hands to the "0" position. The stopwatch minute and second hands are interlocked — continue moving the second hand until the minute hand reaches "0". Hold the button to move the hands quickly.
  3. Push the crown back to the normal position.

Power depletion warning:

When the battery nears its end, the second hand moves at 2-second intervals instead of the normal 1-second intervals. Have the battery replaced as soon as possible. The watch remains accurate while the second hand is moving at 2-second intervals, but the stopwatch will not operate.

Chronograph 1/1 sec.

2-click crown · date at 3 · with 24hr hand
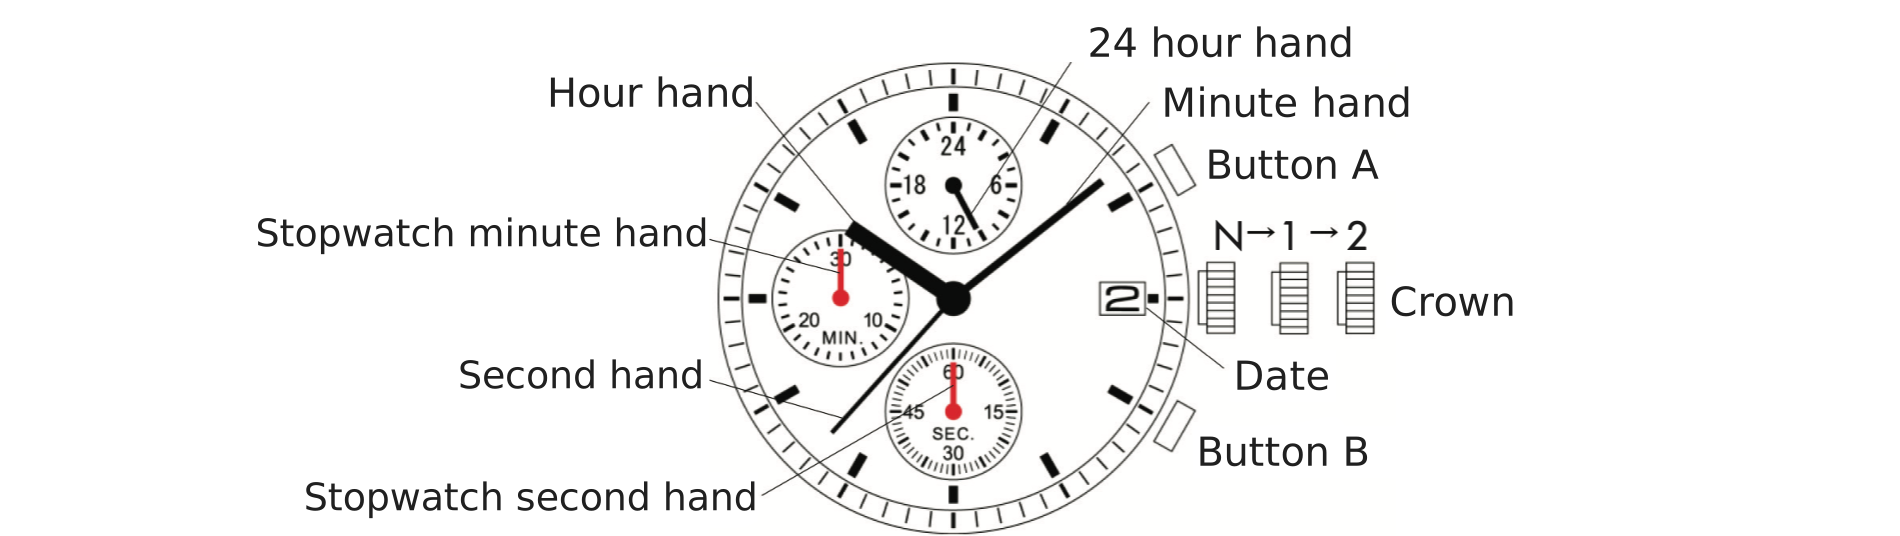
Chronograph 1/1 sec. with 24hr hand — display diagram
Chronograph 1/1 sec. — display (variant B, with 24hr hand)

Crown and button operation

Crown position
N — Normal 1 — 1st click 2 — 2nd click
Crown Free (running) Turn counterclockwise to set date Time setting
Button A Stopwatch: Start / Stop / Restart Stopwatch: Start / Stop / Restart Stopwatch hand adj. (clockwise)
Button B Stopwatch: Reset / Split / Split release Stopwatch: Reset / Split / Split release Stopwatch hand adj. (counter-clockwise)

To set time:

  1. Pull the crown out to the 2nd click position when the second hand is at the 12 o'clock position. If the stopwatch is measuring, pulling to the 2nd click will automatically reset the stopwatch hands to "0".
  2. Turn the crown to set the hour and minute hands. Take a.m./p.m. into consideration. The 24 hour hand moves with the hour hand — check that it is correctly set. Advance the minute hand 4 to 5 minutes ahead of the desired time and then turn it back to the exact time.
  3. Push the crown back to the normal position.

To set date:

  1. Pull the crown out to the 1st click position.
  2. Turn the crown to set the date.
  3. Push the crown back to the normal position.

Stopwatch usage and hand adjustment:

Same operation as Chronograph 1/1 sec. (variant A). See above for full stopwatch instructions.

Power depletion warning:

Same as Chronograph 1/1 sec. (variant A).

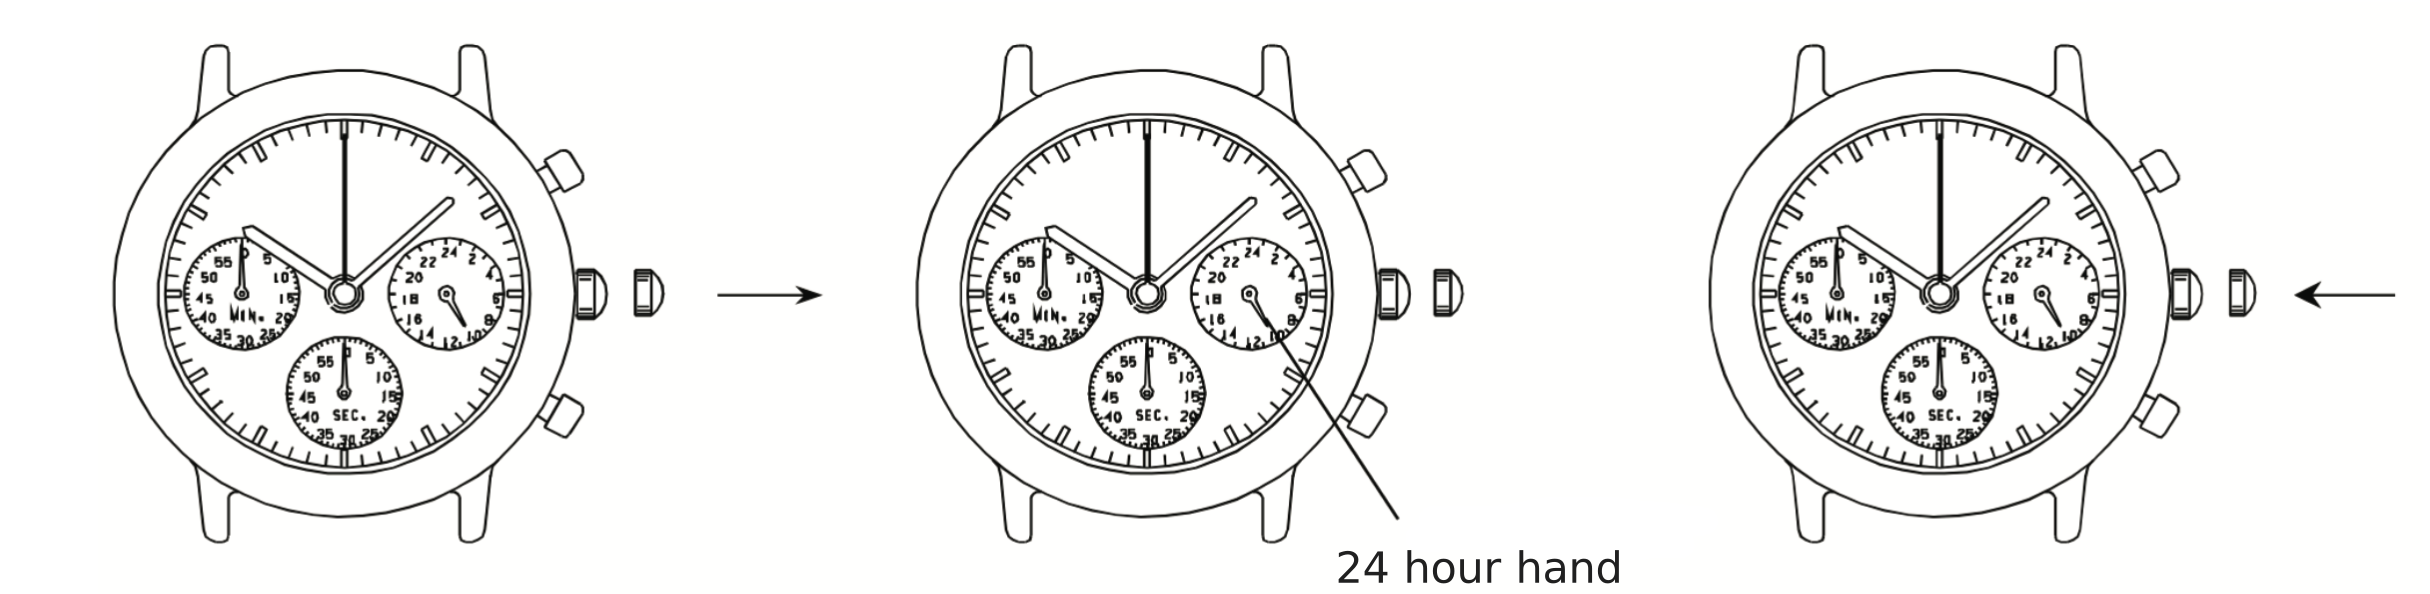
Chronograph 1/1 sec.

1-click crown · with 24hr hand
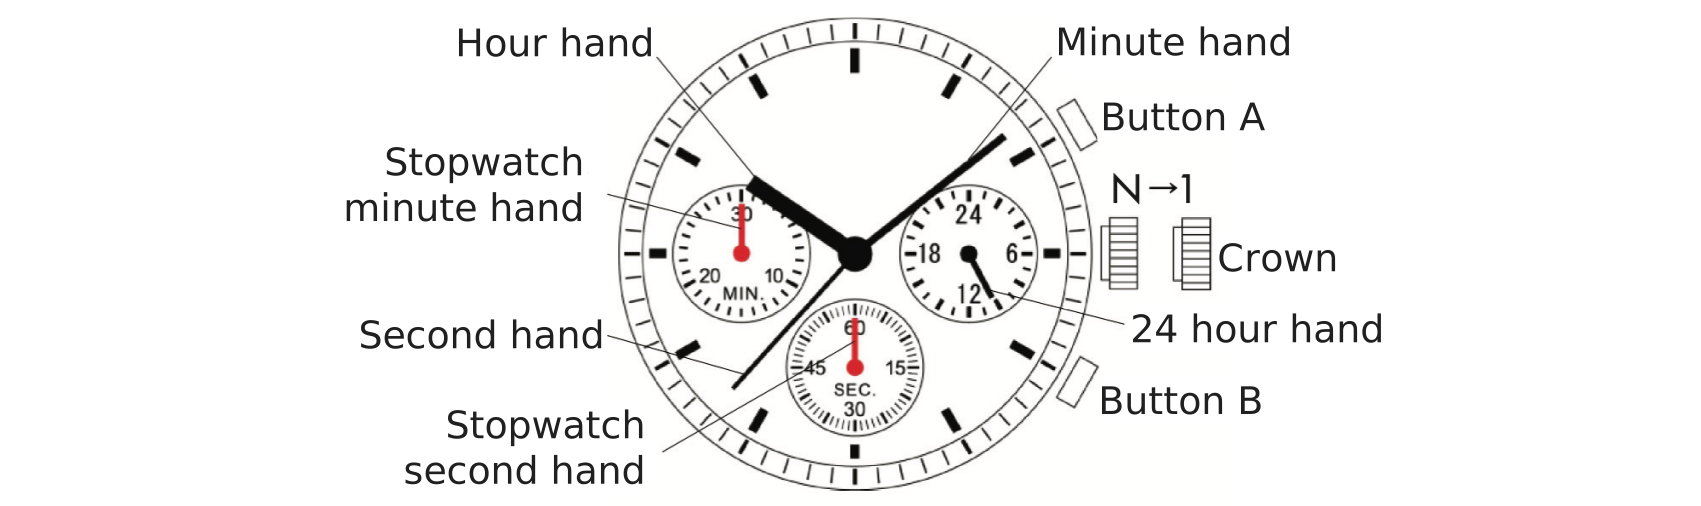
Chronograph 1/1 sec. 1-click crown with 24hr hand — display diagram
Chronograph 1/1 sec. — display (variant C, 1-click crown)

Crown and button operation

Crown position
N — Normal 1 — 1st click
Crown Free (running) Time setting
Button A Stopwatch: Start / Stop / Restart Stopwatch hand adj. (clockwise)
Button B Stopwatch: Split / Split release Stopwatch hand adj. (counter-clockwise)

To set time:

  1. Pull the crown out to the 1st click position when the second hand is at the 12 o'clock position. If the stopwatch is measuring, pulling to the 1st click will automatically reset the stopwatch hands to "0".
  2. Turn the crown to set the hour and minute hands. Take a.m./p.m. into consideration. The 24 hour hand moves with the hour hand — check that it is correctly set. Advance the minute hand 4 to 5 minutes ahead of the desired time and then turn it back to the exact time.
  3. Push the crown back to the normal position.

Stopwatch usage and hand adjustment:

Same operation as Chronograph 1/1 sec. (variant A). See above for full stopwatch instructions.

Power depletion warning:

Same as Chronograph 1/1 sec. (variant A).

6 (date) 9 (24hr) 12 (day)

6 (date) 9 (24hr) 12 (day) watch display diagram with labelled hands and buttons
6 (date) 9 (24hr) 12 (day) — display

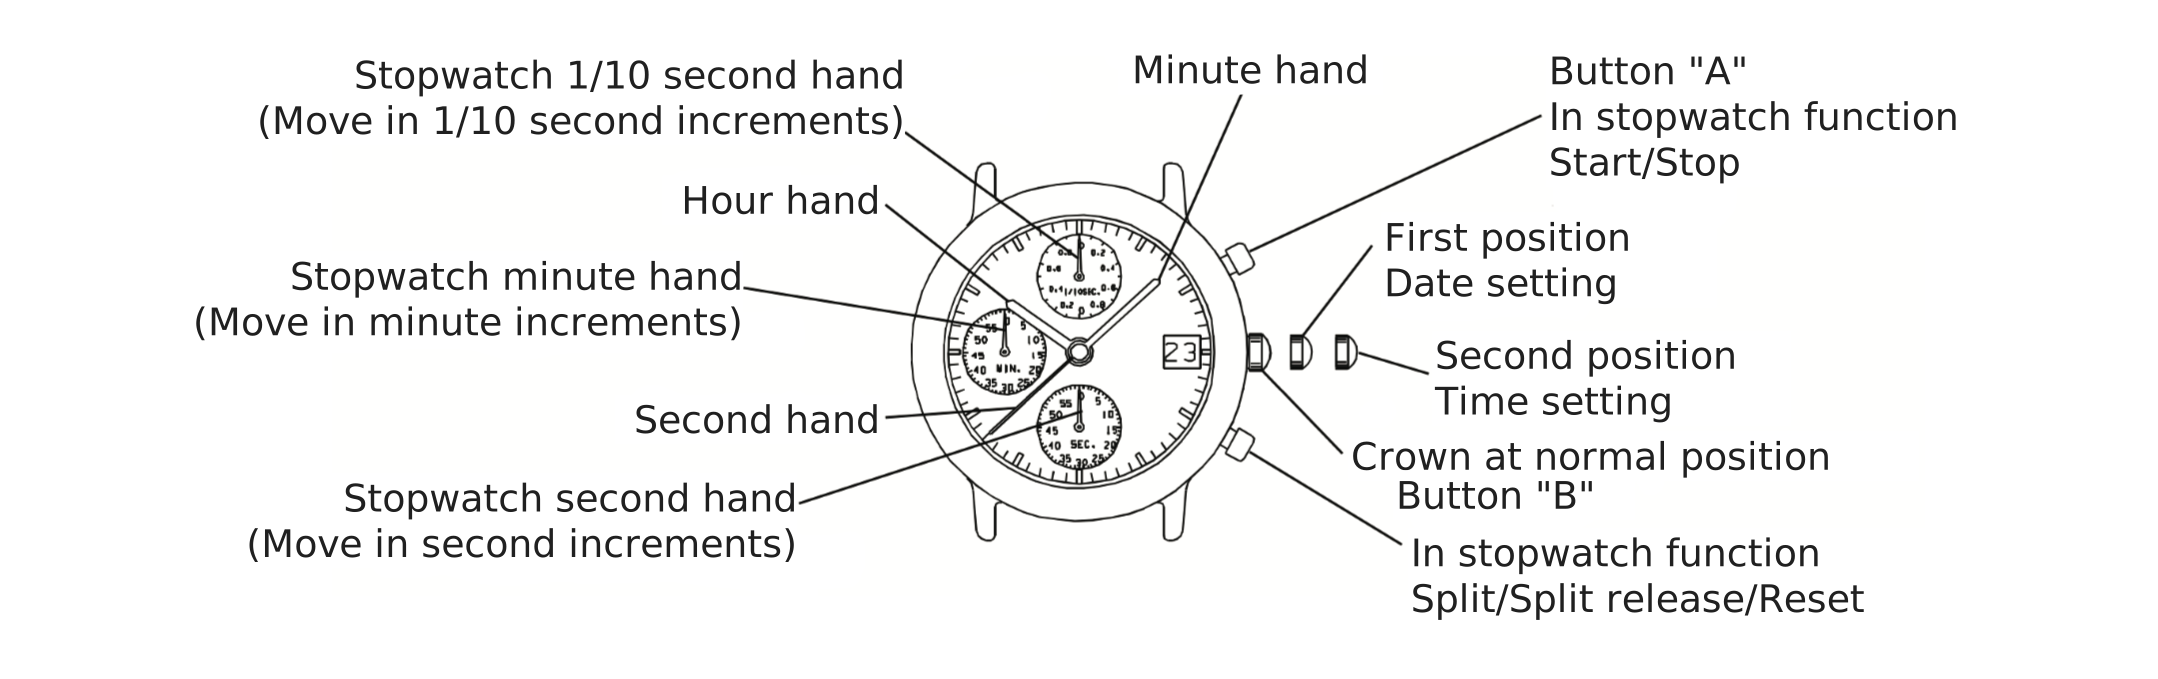
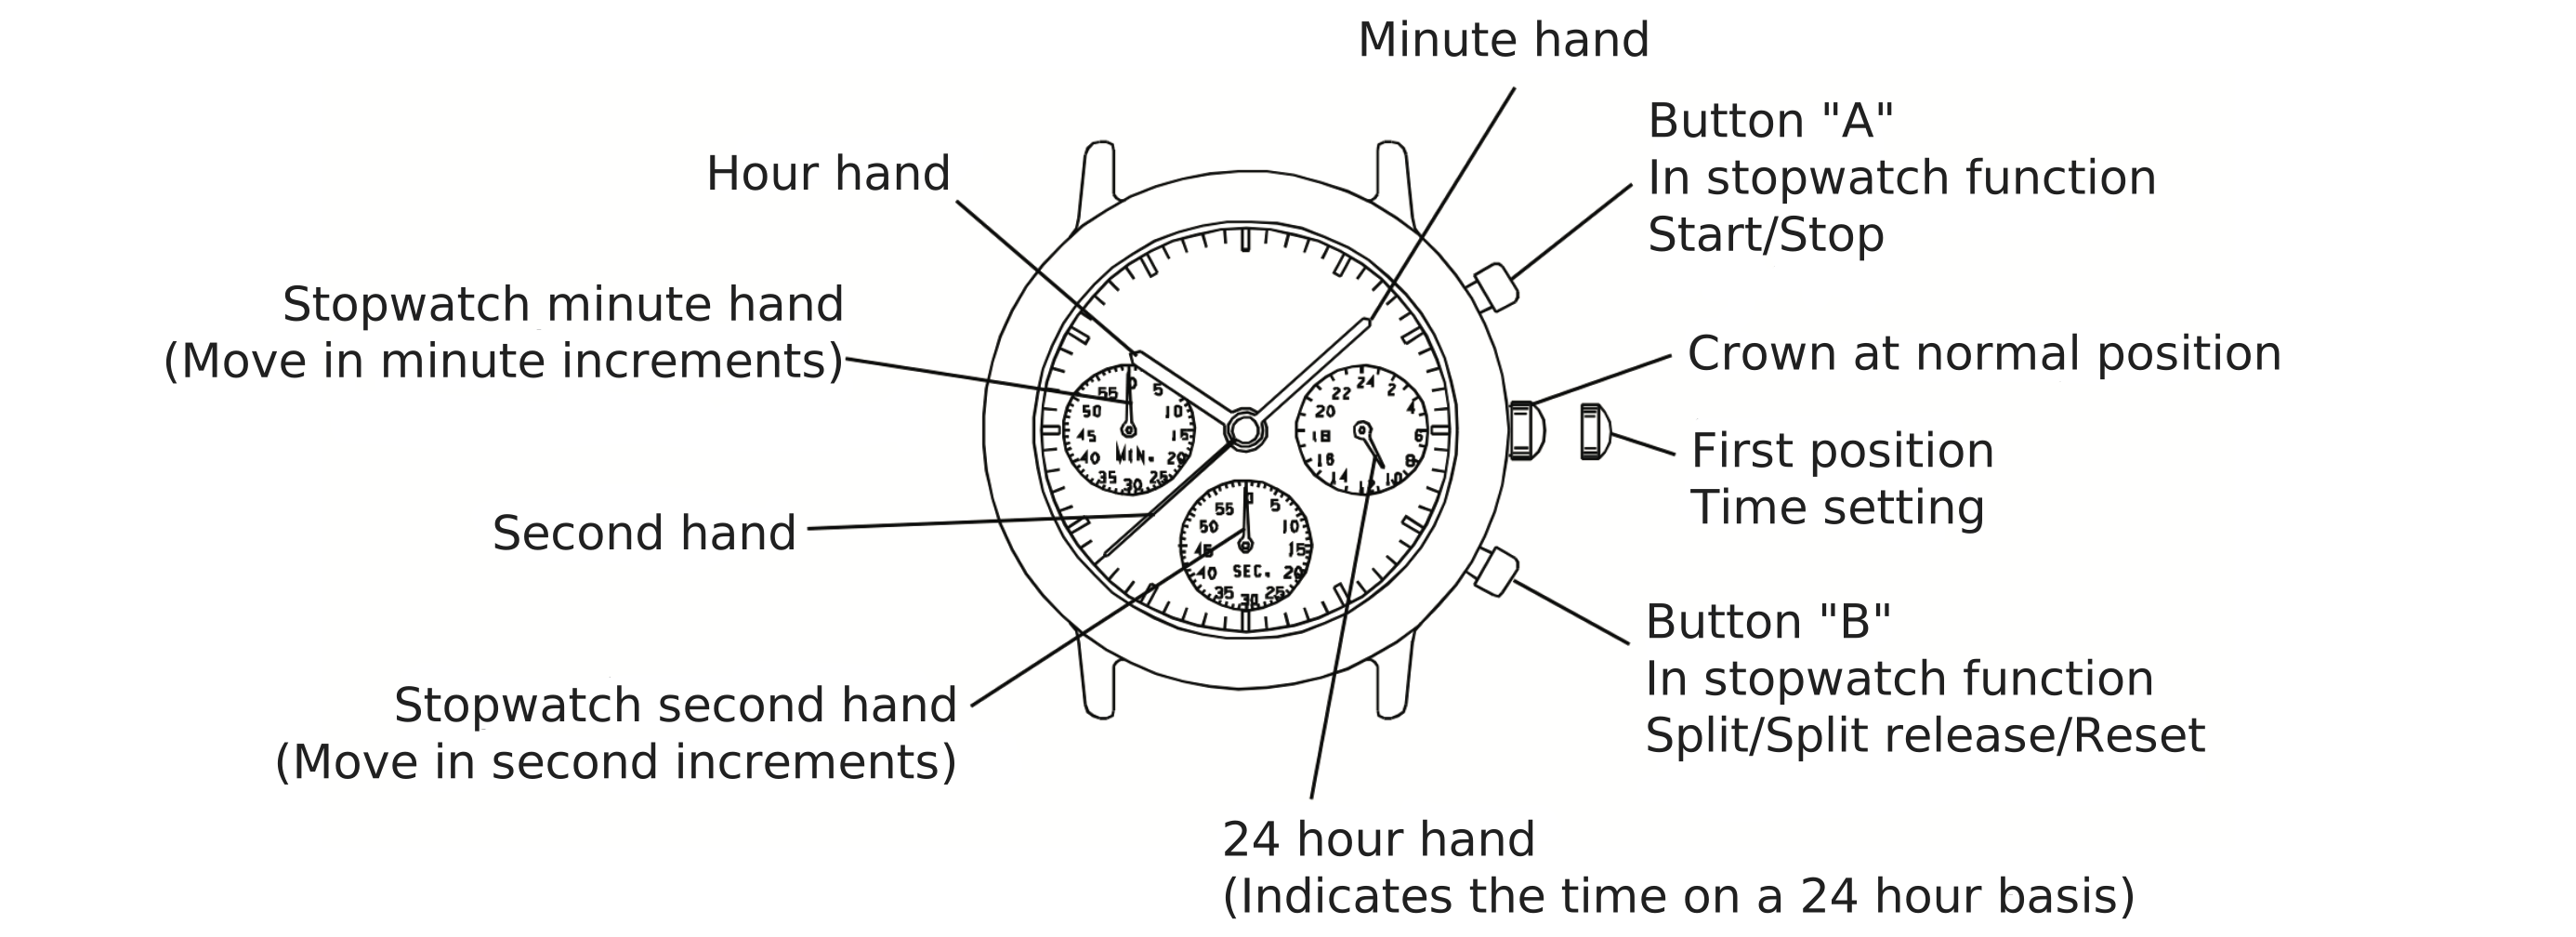
The measurement time is indicated by the stopwatch hands that move independently of center hands.

The stopwatch 1/10 second hand moves in 1/10 second increments during the first minute. After one minute, it indicates the measurement time when stopped.

Adjusting the stopwatch hand position:

Before setting the time, confirm the stopwatch 1/10 second, second, and minute hands are at the "0" (12 o'clock) position.

If the stopwatch is in use, reset it first as follows: if counting press A then B; if stopped press B; if split time displayed press B then A then B.

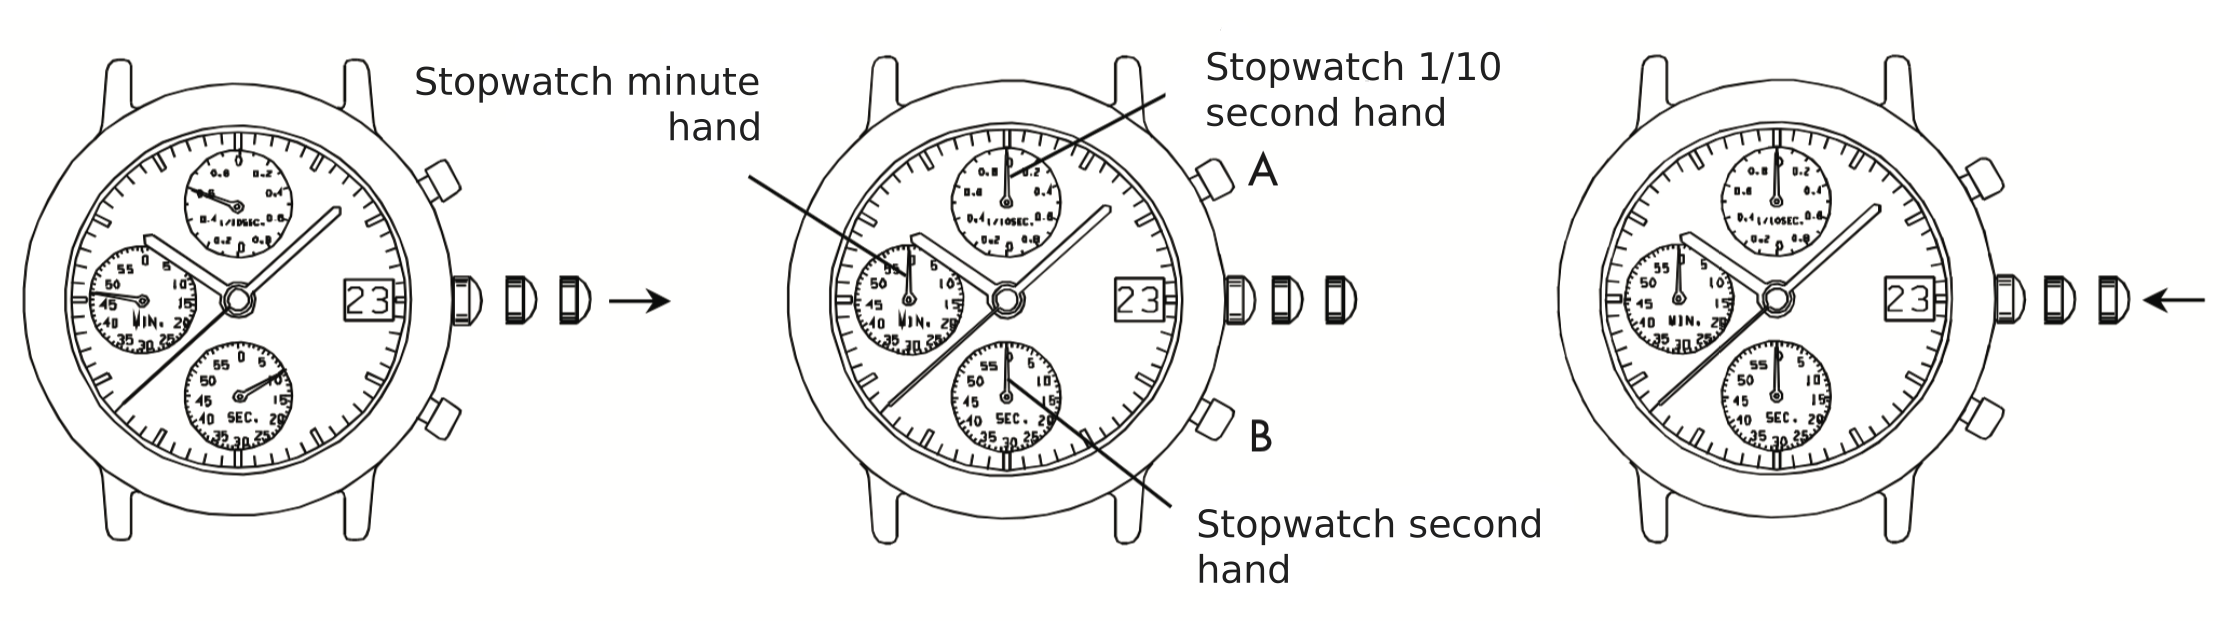
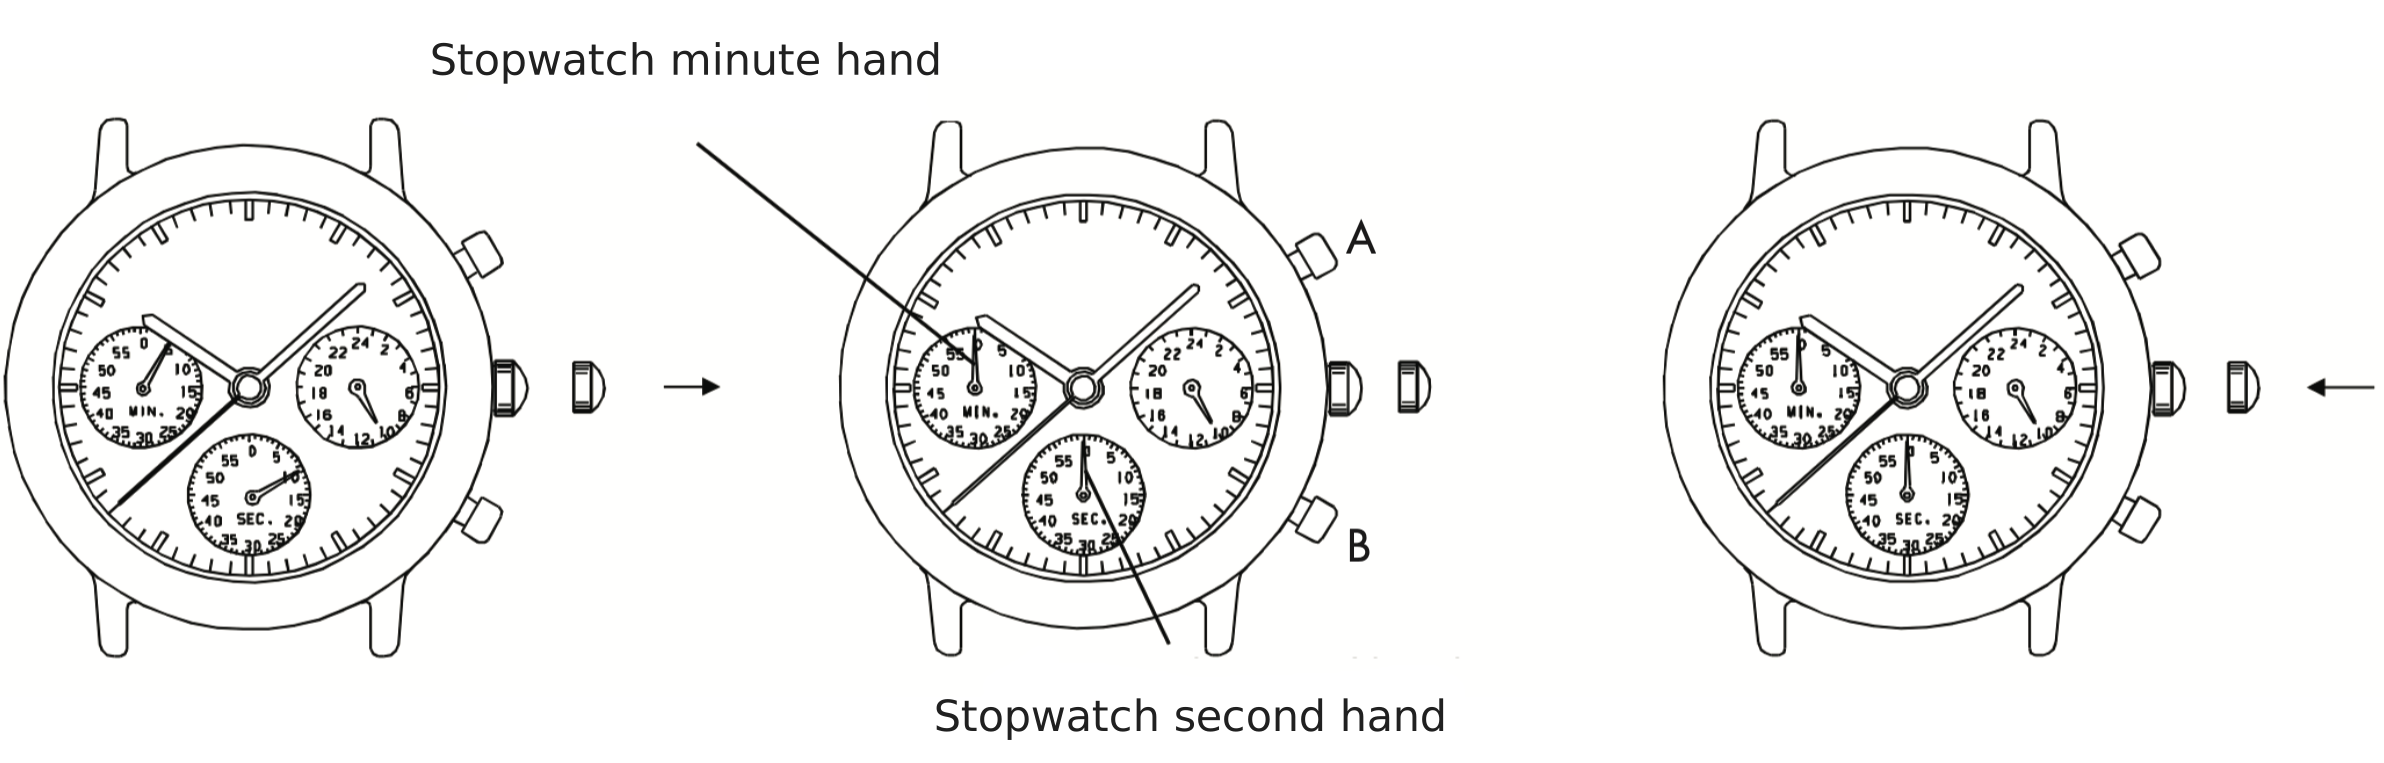
If either of the stopwatch hands are not in the “0” position, reset them by following these steps:

Diagram showing stopwatch minute, 1/10 second, and second hand positions for reset
Stopwatch hand position adjustment
  1. Pull the crown out to the 2nd click.
  2. Press Button A to set the stopwatch 1/10 second hand. Press Button B to set the stopwatch second and minute hands. The stopwatch minute hand moves correspondingly with the stopwatch second hand. Hold the button to move hands quickly.
  3. Push the crown back to the normal position.

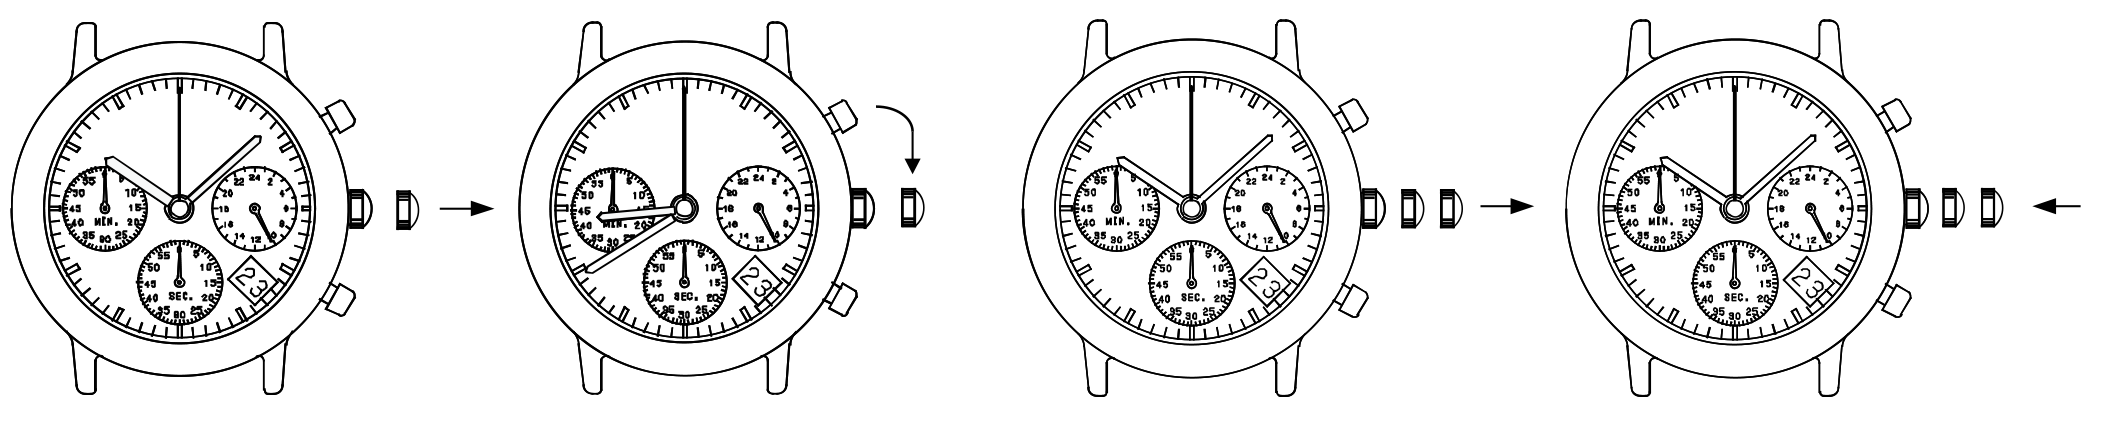
To set time:

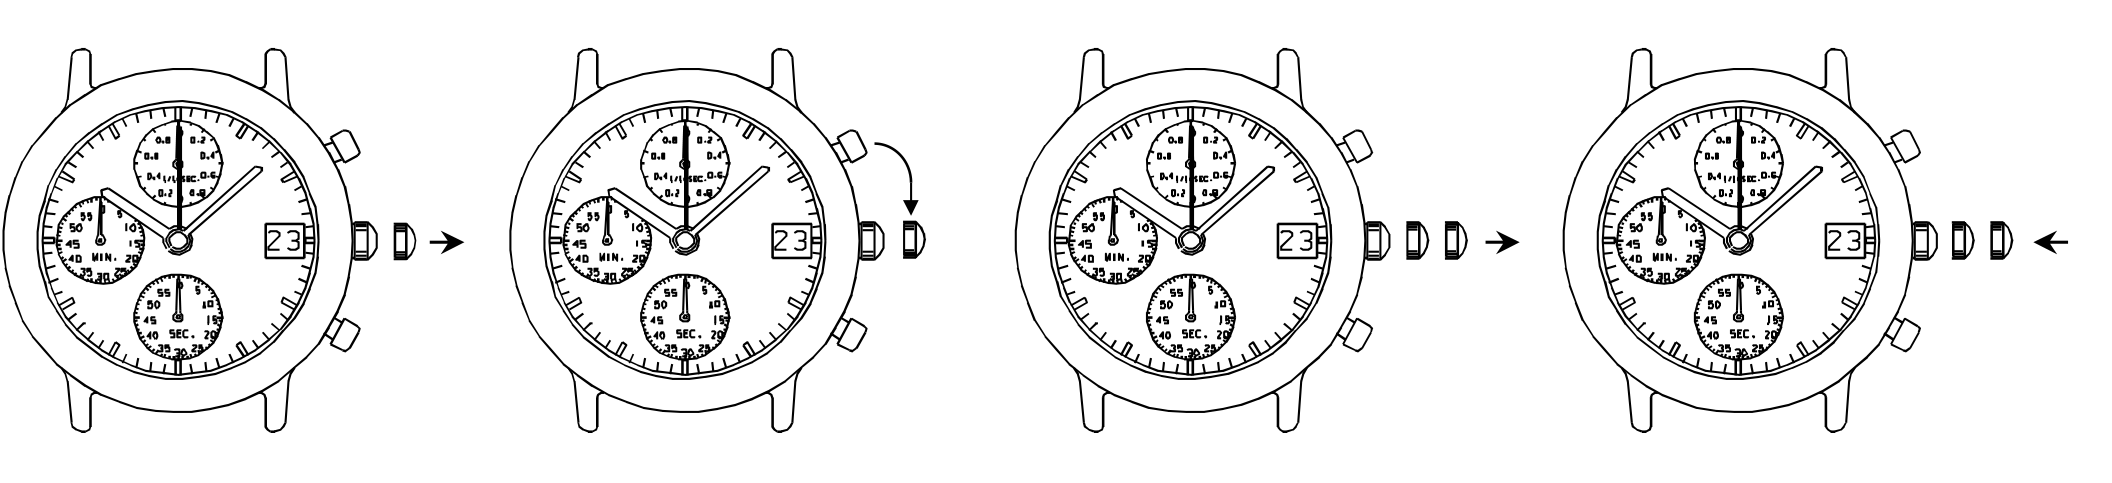
4-step illustrated diagram for setting time on the 6 (date) 9 (24hr) 12 (day) movement
Time setting — 6 (date) 9 (24hr) 12 (day)
  1. Pull the crown out to the 1st click.
  2. Turn the crown clockwise until the previous day's date appears.
  3. Pull the crown out to the 2nd click when the second hand is at the 12 o'clock position. The second hand stops. Do not press any button at this position — the chronograph hands will move if you do. Advance the hour and minute hands by turning the crown to the desired time. Check that a.m./p.m. is set correctly.
  4. Push the crown back to the normal position in accordance with a time signal.

Using the stopwatch:

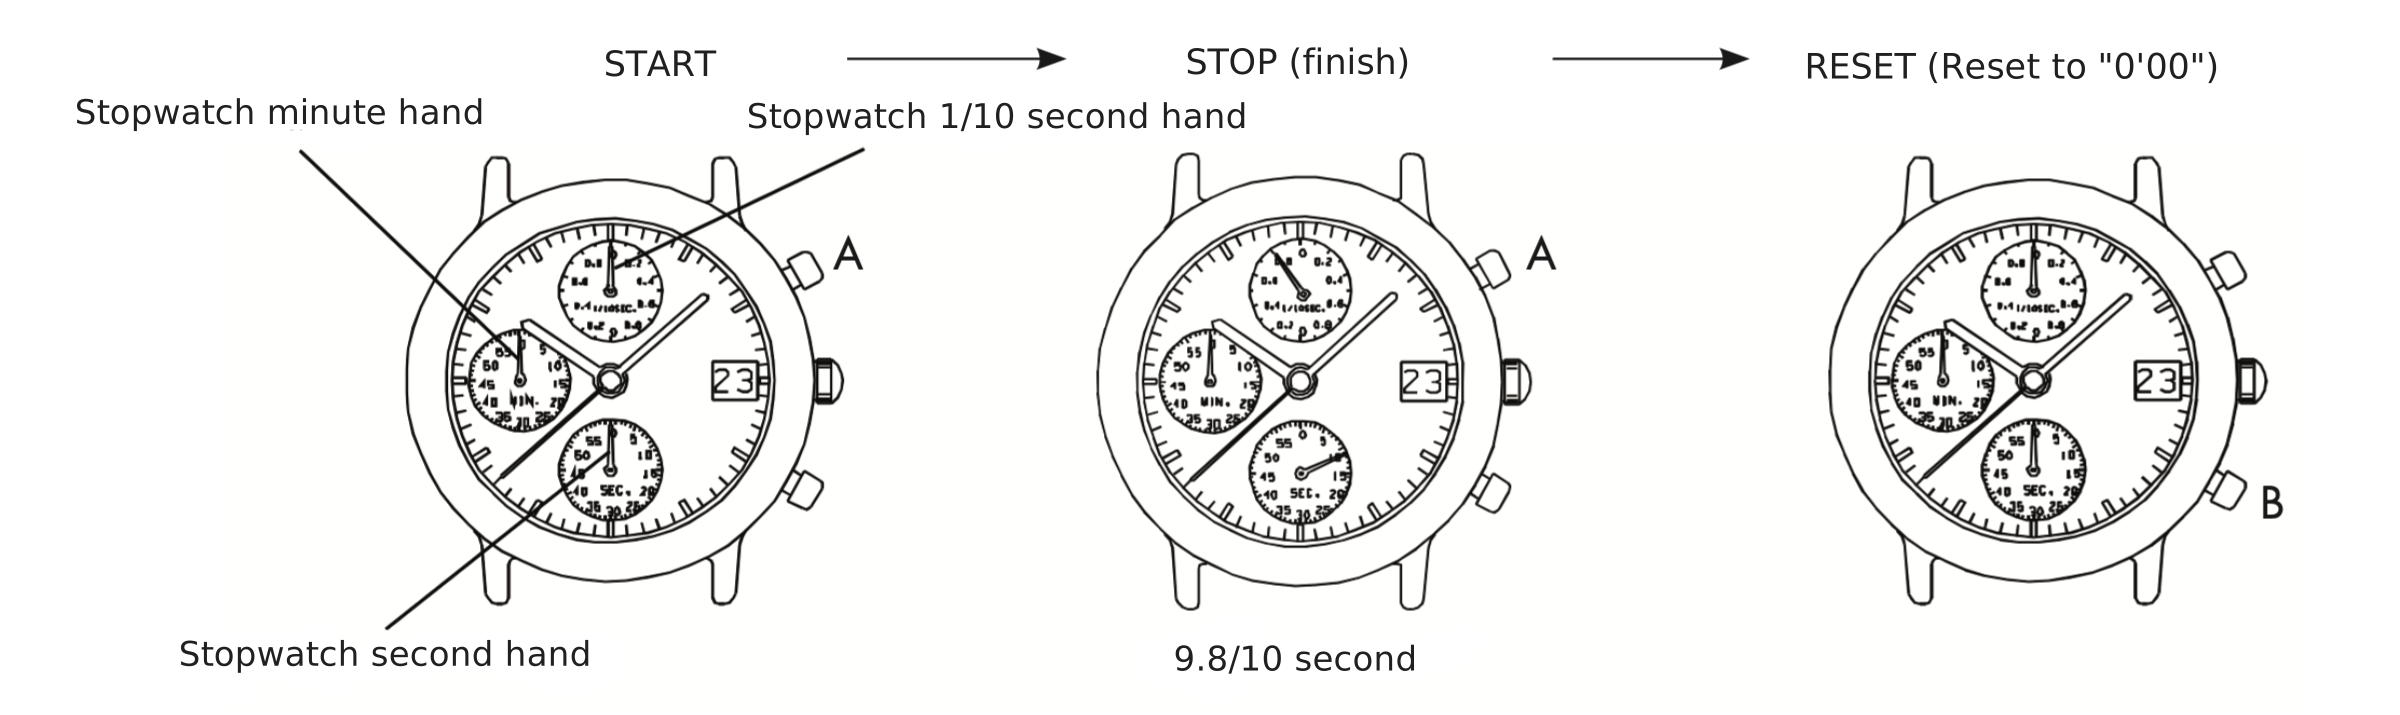
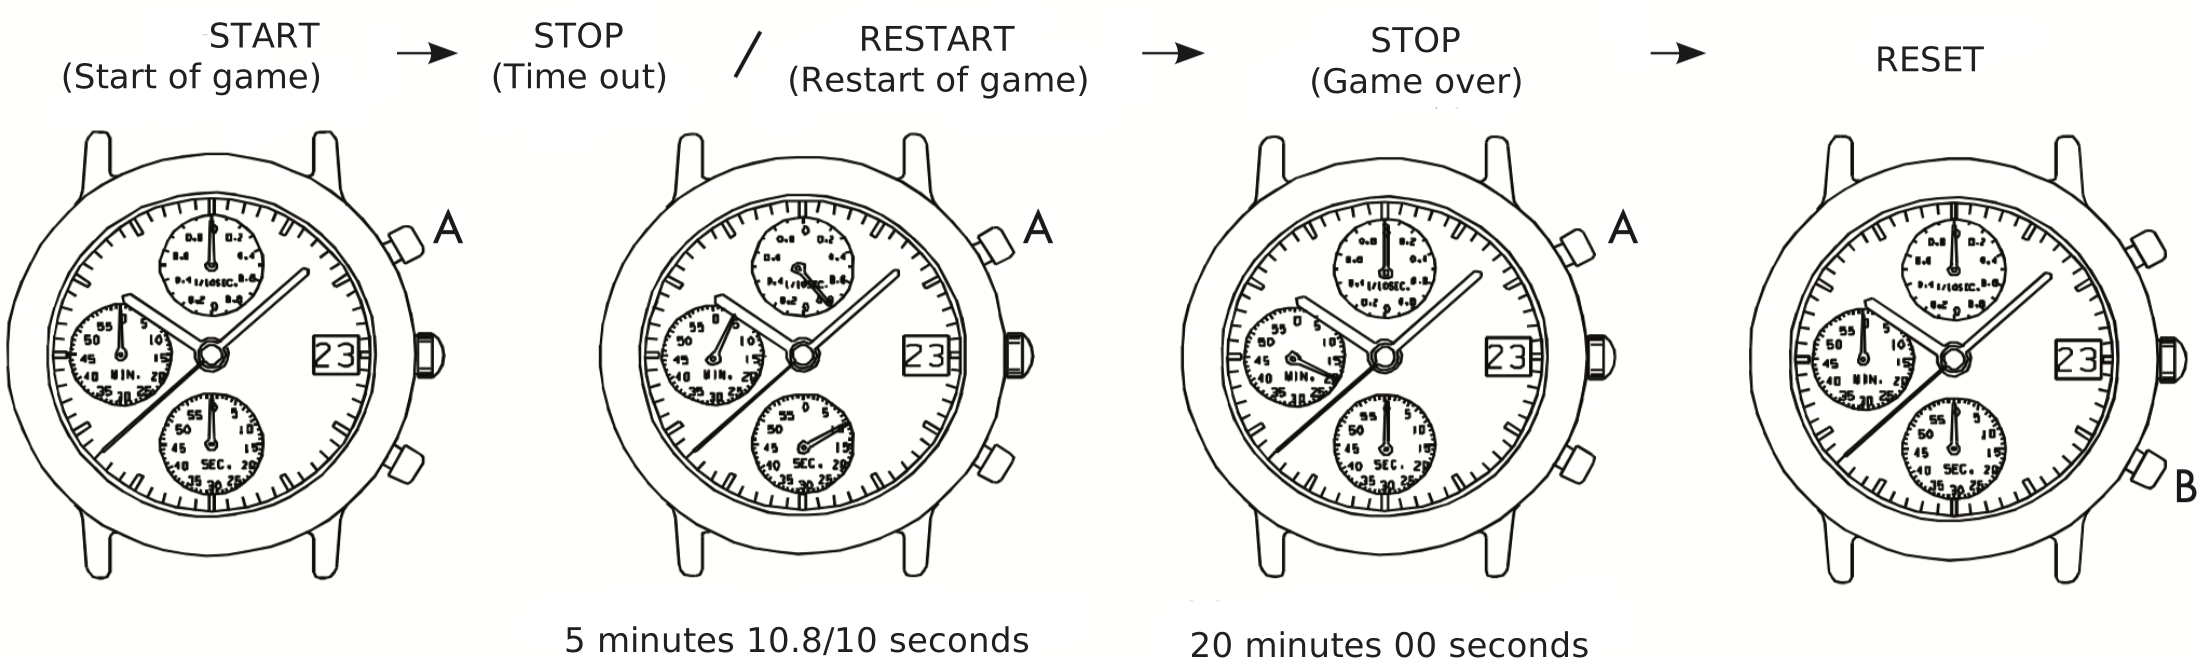
Measurement time is indicated by the stopwatch hands that move independently of the center hands. Measures up to 60 minutes in 1/10 second increments. (The watch indicates the measurement time in second increments by ignoring off the 1/10 seconds obtained.)

Standard measurement

Ex) 100m race — press the buttons in the following order: A (Start) → A (Stop) → B (Reset)

Standard stopwatch measurement diagram: A=Start, A=Stop, B=Reset
Standard measurement
Accumulated elapsed time measurement

Ex) Basketball game — press the buttons in the following order: A (Start) → A / A (Stop / Restart) → A (Stop) → B (Reset)

Accumulated elapsed time measurement diagram: A=Start, A=Stop/Restart, B=Reset
Accumulated elapsed time measurement
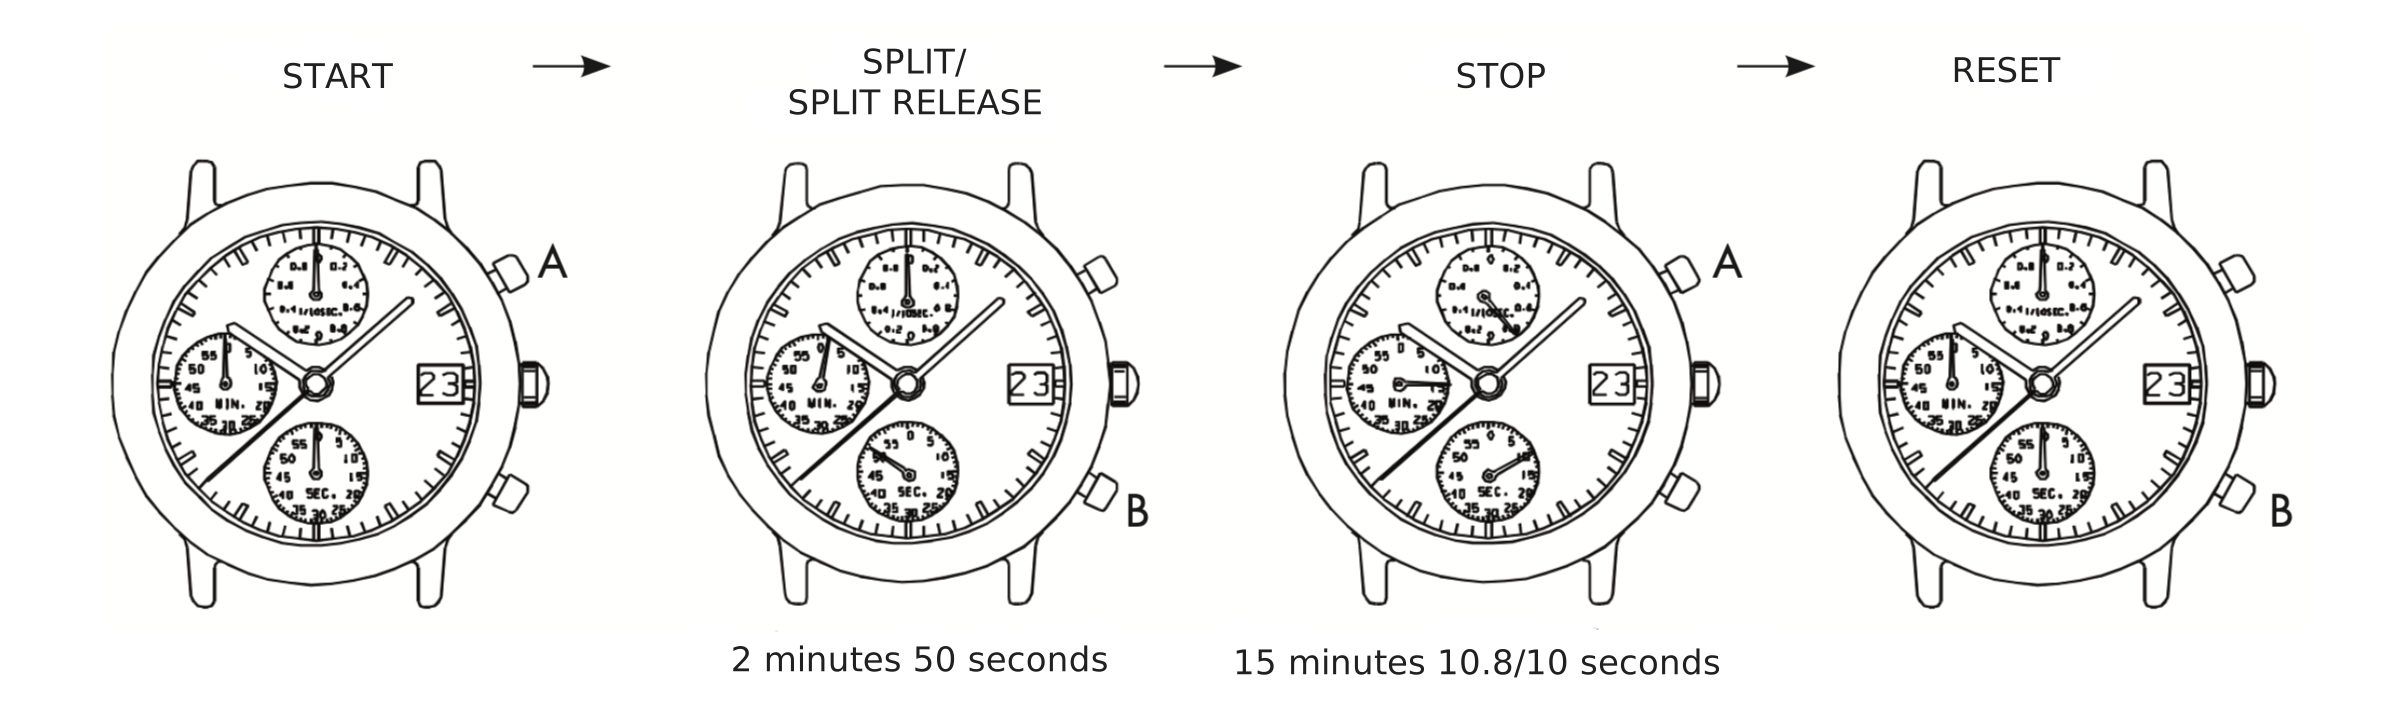
Split time measurement

Ex) 5,000m race — press the buttons in the following order: A (Start) → B / B (Split / Release) → A (Stop) → B (Reset)

Split time measurement diagram: A=Start, B=Split/release, A=Stop, B=Reset
Split time measurement

6 (date) 9 (24hr)

6 (date) 9 (24hr) watch display diagram with labelled hands and buttons
6 (date) 9 (24hr) — display

Adjusting the stopwatch hand position:

Before setting the time, confirm the stopwatch second and minute hands are in the “0” (12 o’clock) position.

If the stopwatch is in use, reset it first as follows: if counting press A then B; if stopped press B; if split time displayed press B then A then B.

If either of the stopwatch hands are not in the “0” position, reset them by following these steps:

Diagram showing stopwatch minute and second hand positions for reset
Stopwatch hand position adjustment
  1. Pull out the crown.
  2. Press Button A to move the stopwatch hands counter-clockwise; press Button B to move them clockwise. Reset to the "0" position.
  3. Push the crown back to the normal position.

To set time:

Time setting diagram showing 24 hour hand alignment
Time setting — 24 hour hand
  1. Pull out the crown when the second hand is at the 12 o'clock position. The second hand stops. Do not press any button at this position.
  2. Turn the crown to set the hour, minute, and 24 hour hands to the desired time. The 24 hour hand moves correspondingly with the hour hand — check that it is correctly set.
  3. Push the crown back to the normal position in accordance with a time signal.

Using the stopwatch:

Measurement time is indicated by the stopwatch hands that move independently of the center and 24 hour hands. Measures up to 60 minutes in 1 second increments. (The watch indicates the measurement time in second increments by ignoring off the 1/10 seconds obtained.)

Standard measurement

Ex) 100m race — press the buttons in the following order: A (Start) → A (Stop) → B (Reset)

Standard stopwatch measurement diagram: A=Start, A=Stop, B=Reset
Standard measurement
Accumulated elapsed time measurement

Ex) Basketball game — press the buttons in the following order: A (Start) → A / A (Stop / Restart) → A (Stop) → B (Reset)

Accumulated elapsed time measurement diagram
Accumulated elapsed time measurement
Split time measurement

Ex) 5,000m race — press the buttons in the following order: A (Start) → B / B (Split / Release) → A (Stop) → B (Reset)

Split time measurement diagram: A=Start, B=Split/release, A=Stop, B=Reset
Split time measurement

3 (24hr) 6 (Stop Watch Sec) 9 (Stop)

3 (24hr) 6 (Stop Watch Sec) 9 (Stop) watch display diagram with labelled hands and buttons
3 (24hr) 6 (Stop Watch Sec) 9 (Stop) — display

Adjusting the stopwatch hand position:

Before setting the time, confirm the stopwatch second and minute hands are in the “0” (12 o’clock) position.

If the stopwatch is in use, reset it first as follows: if counting press A then B; if stopped press B; if split time displayed press B then A then B.

If either of the stopwatch hands are not in the “0” position, reset them by following these steps:

Diagram showing stopwatch minute hand positions for reset
Stopwatch hand position adjustment
  1. Pull the crown out to the 2nd click.
  2. Press Button A to move the stopwatch hands counter-clockwise; press Button B to move them clockwise. Reset to the "0" position. Hold the button to move hands quickly.
  3. Push the crown back to the normal position.

To set time:

4-step illustrated diagram for setting time on the 3 (24hr) 6 (Stop Watch Sec) 9 (Stop) movement
Time setting — 3 (24hr) 6 (Stop Watch Sec) 9 (Stop)
  1. Pull the crown out to the 1st click. Turn the crown clockwise until the previous day's date appears.
  2. Pull the crown out to the 2nd click when the second hand is at the 12 o'clock position. The second hand stops. Do not press any button at this position — the chronograph hands will move if you do. Check that the 24 hour hand is set correctly.
  3. Advance the hour and minute hands by turning the crown to the desired time. Check that a.m./p.m. is set correctly.
  4. Push the crown back to the normal position in accordance with a time signal.

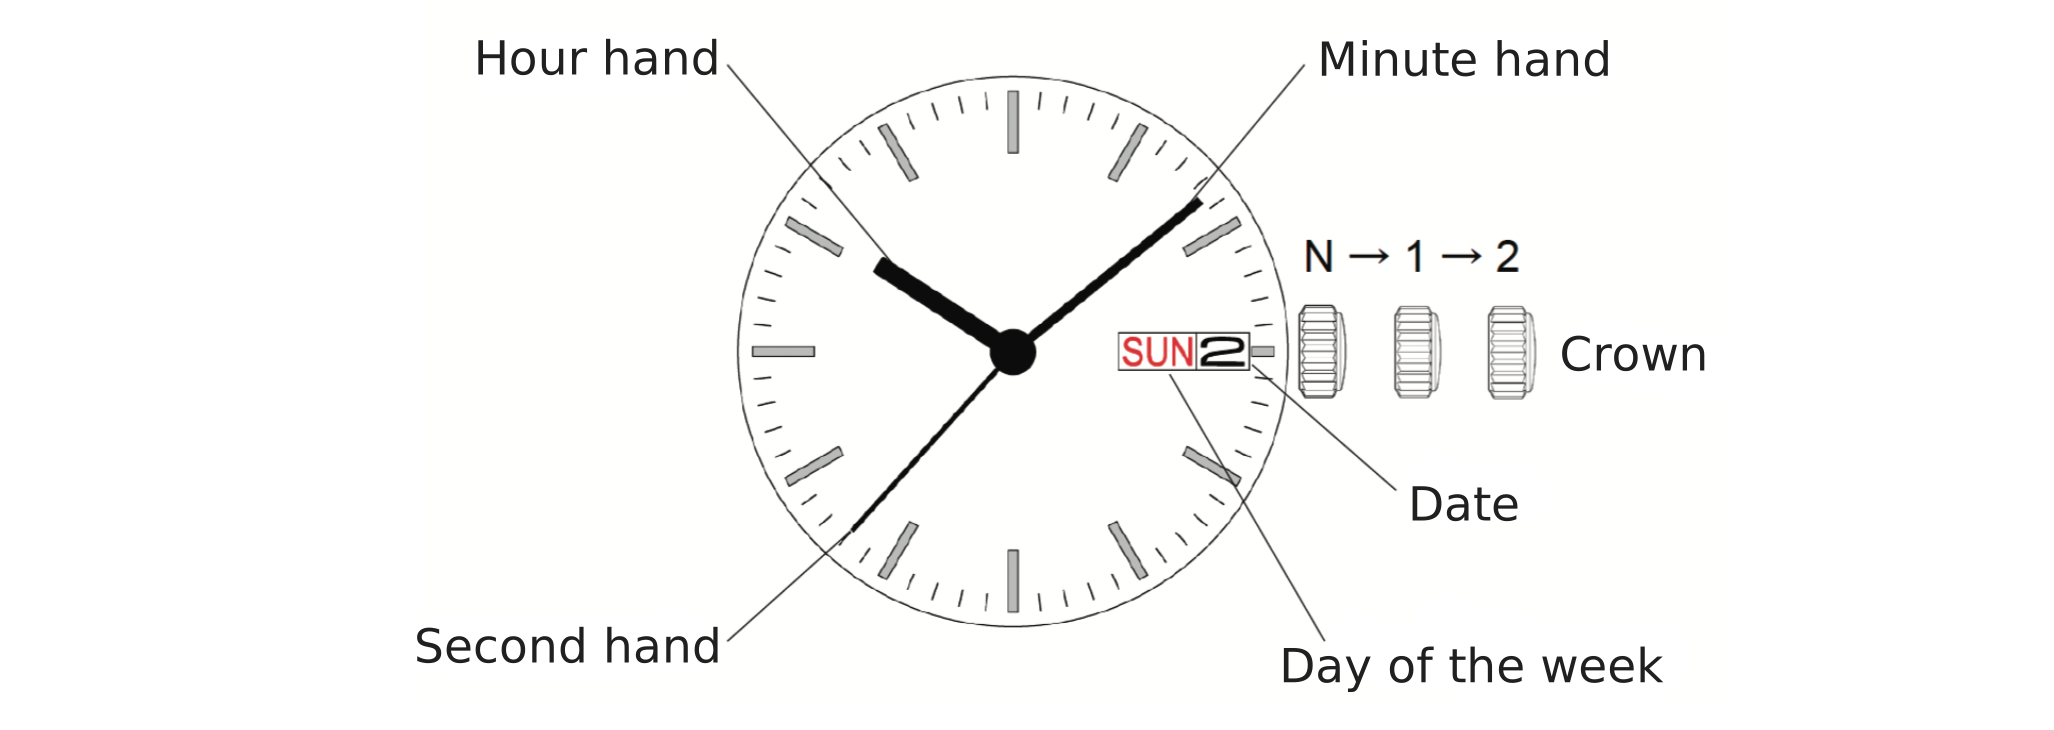
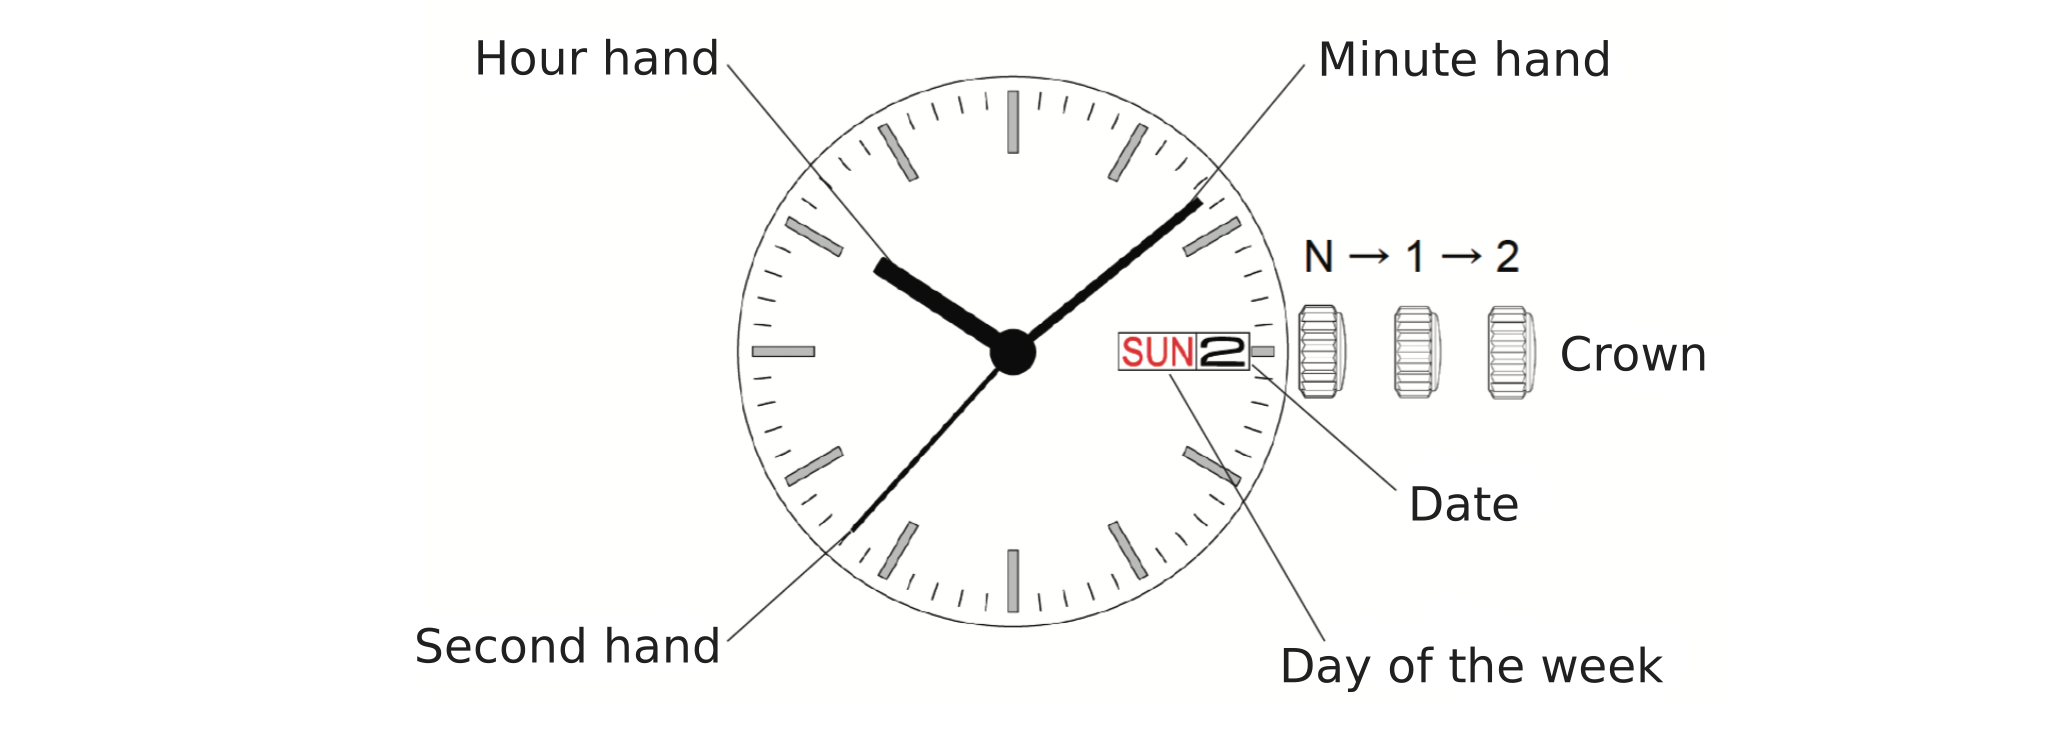
Three Hands / Day / Date

Three Hands / Day / Date watch diagram showing hour, minute, second hands, crown, date, and day of the week
Three Hands / Day / Date — display

Crown operation

Crown position
N — Normal 1 — 1st click 2 — 2nd click
Crown Free (running) Turn counterclockwise for date change.
Turn clockwise for day change
Time setting

To set time:

  1. Pull the crown out to the 2nd click position when the second hand is at the 12 o'clock position.
  2. Turn the crown to set the hour and minute hands. Take a.m./p.m. into consideration. Advance the minute hand 4 to 5 minutes ahead of the desired time and then turn it back to the exact time.
  3. Push the crown back to the normal position.

To set date and day of the week:

  1. Pull the crown out to the 1st click position.
  2. Turn the crown to set the date and the day of the week.
  3. Push the crown back to the normal position.

Power depletion warning:

When the battery nears its end, the second hand moves at 2-second intervals instead of the normal 1-second intervals. Have the battery replaced as soon as possible. The watch remains accurate while the second hand moves at 2-second intervals.

Three Hands / Date

Three Hands / Date watch diagram showing hour, minute, second hands, crown, and date
Three Hands / Date — display

Crown operation

Crown position
N — Normal 1 — 1st click 2 — 2nd click
Crown Free (running) Turn counterclockwise for date change.
Turn clockwise for day change
Time setting

To set time:

  1. Pull the crown out to the 2nd click position when the second hand is at the 12 o'clock position.
  2. Turn the crown to set the hour and minute hands. Take a.m./p.m. into consideration. Advance the minute hand 4 to 5 minutes ahead of the desired time and then turn it back to the exact time.
  3. Push the crown back to the normal position.

To set date:

  1. Pull the crown out to the 1st click position.
  2. Turn the crown to set the date.
  3. Push the crown back to the normal position.

Power depletion warning:

When the battery nears its end, the second hand moves at 2-second intervals. Have the battery replaced as soon as possible. The watch remains accurate while the second hand moves at 2-second intervals.

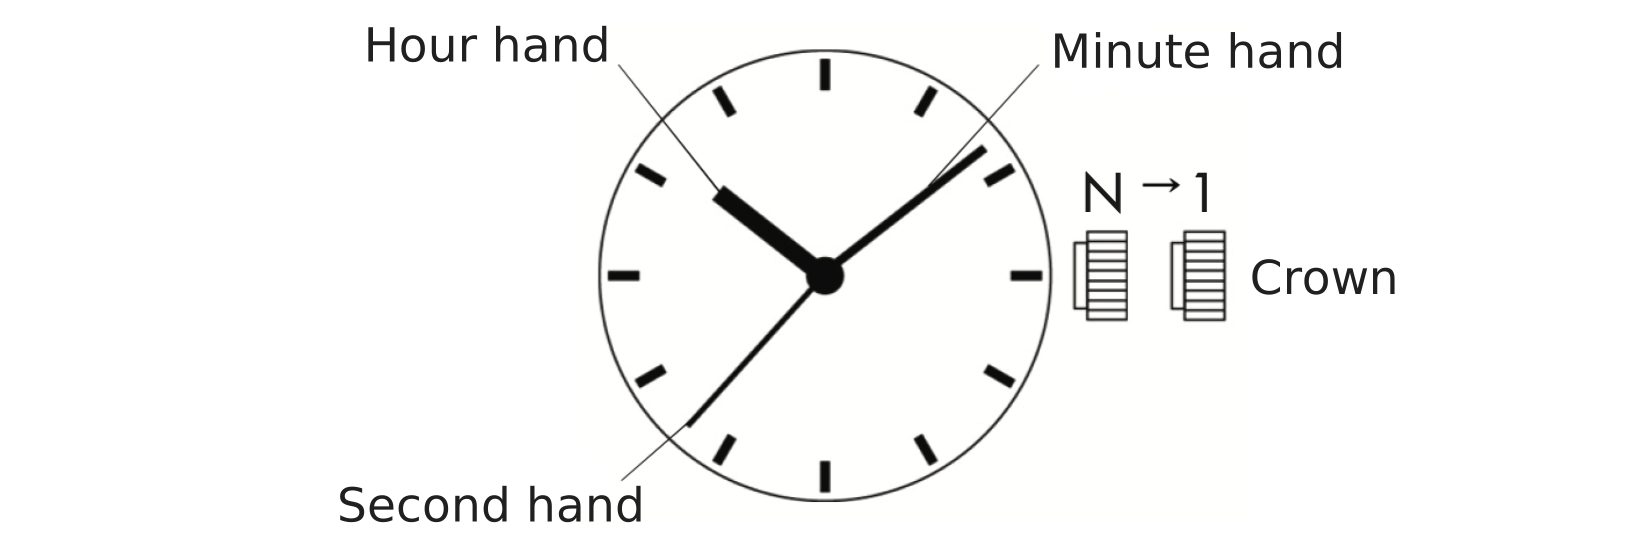
Solar Series 3 Hands

Solar Series 3 Hands watch diagram showing crown positions and hands
Solar Series 3 Hands — display

Crown operation

Crown position
N — Normal 1 — 1st click
Crown Free (running) Time setting

To set time:

  1. Pull the crown out to the 1st click position when the second hand is at the 12 o'clock position.
  2. Turn the crown to set the hour and minute hands. Advance the minute hand 4 to 5 minutes ahead of the desired time and then turn it back to the exact time.
  3. Push the crown back to the normal position.

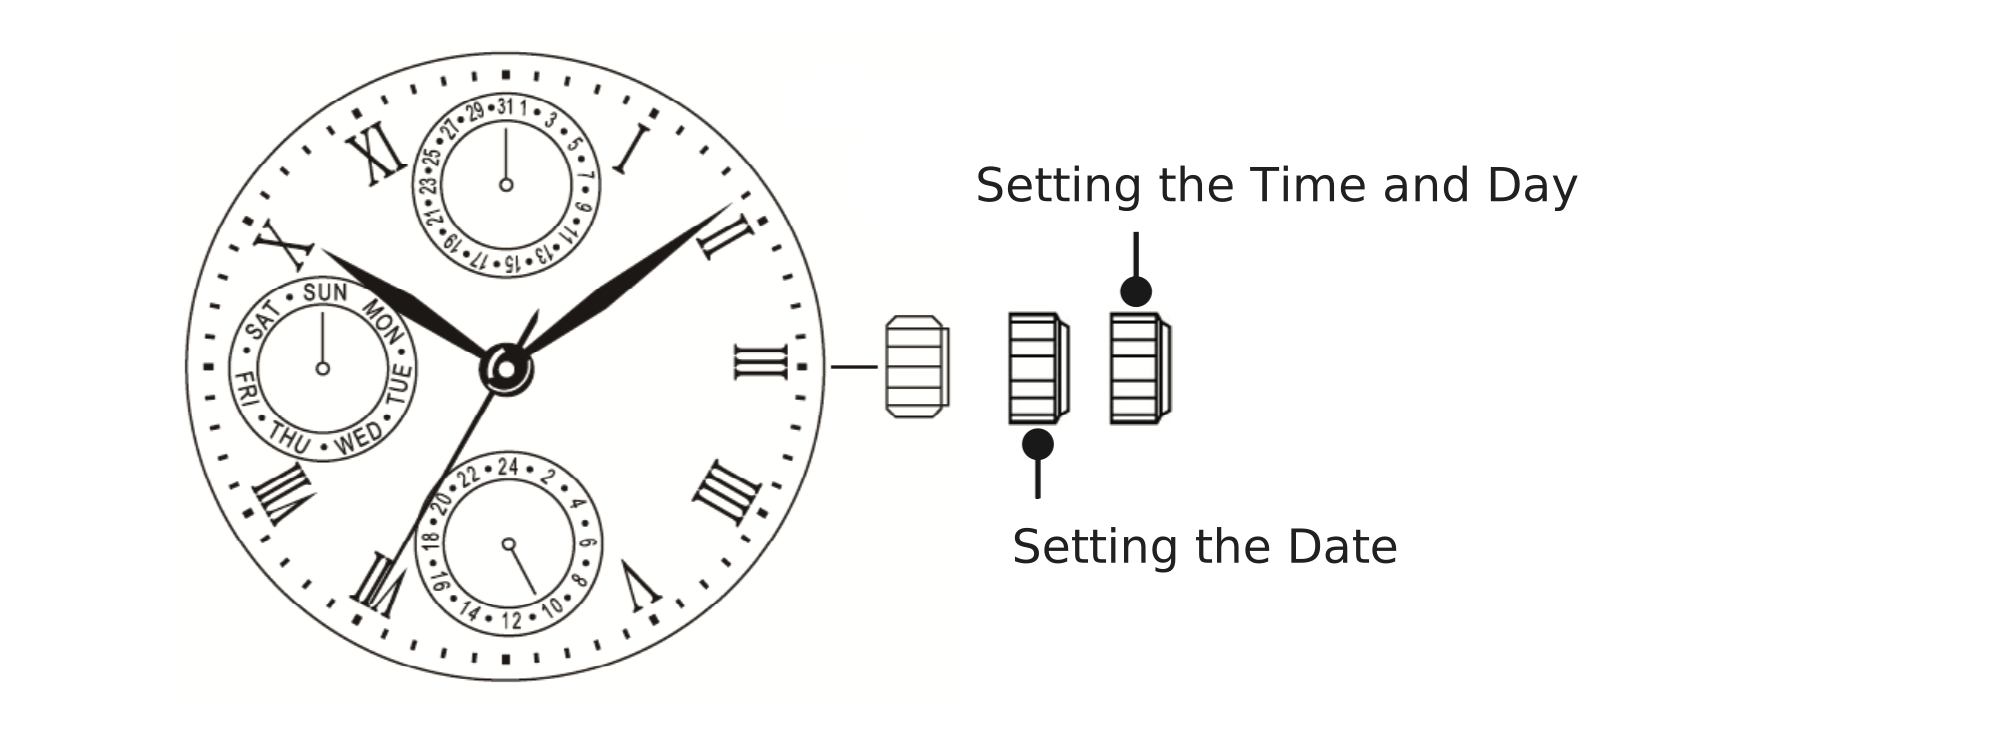
6 (Stop Watch Sec) 9 (Stopwatch Min) / 3 Date

Caliber variants — hand configuration reference

Interchangeables

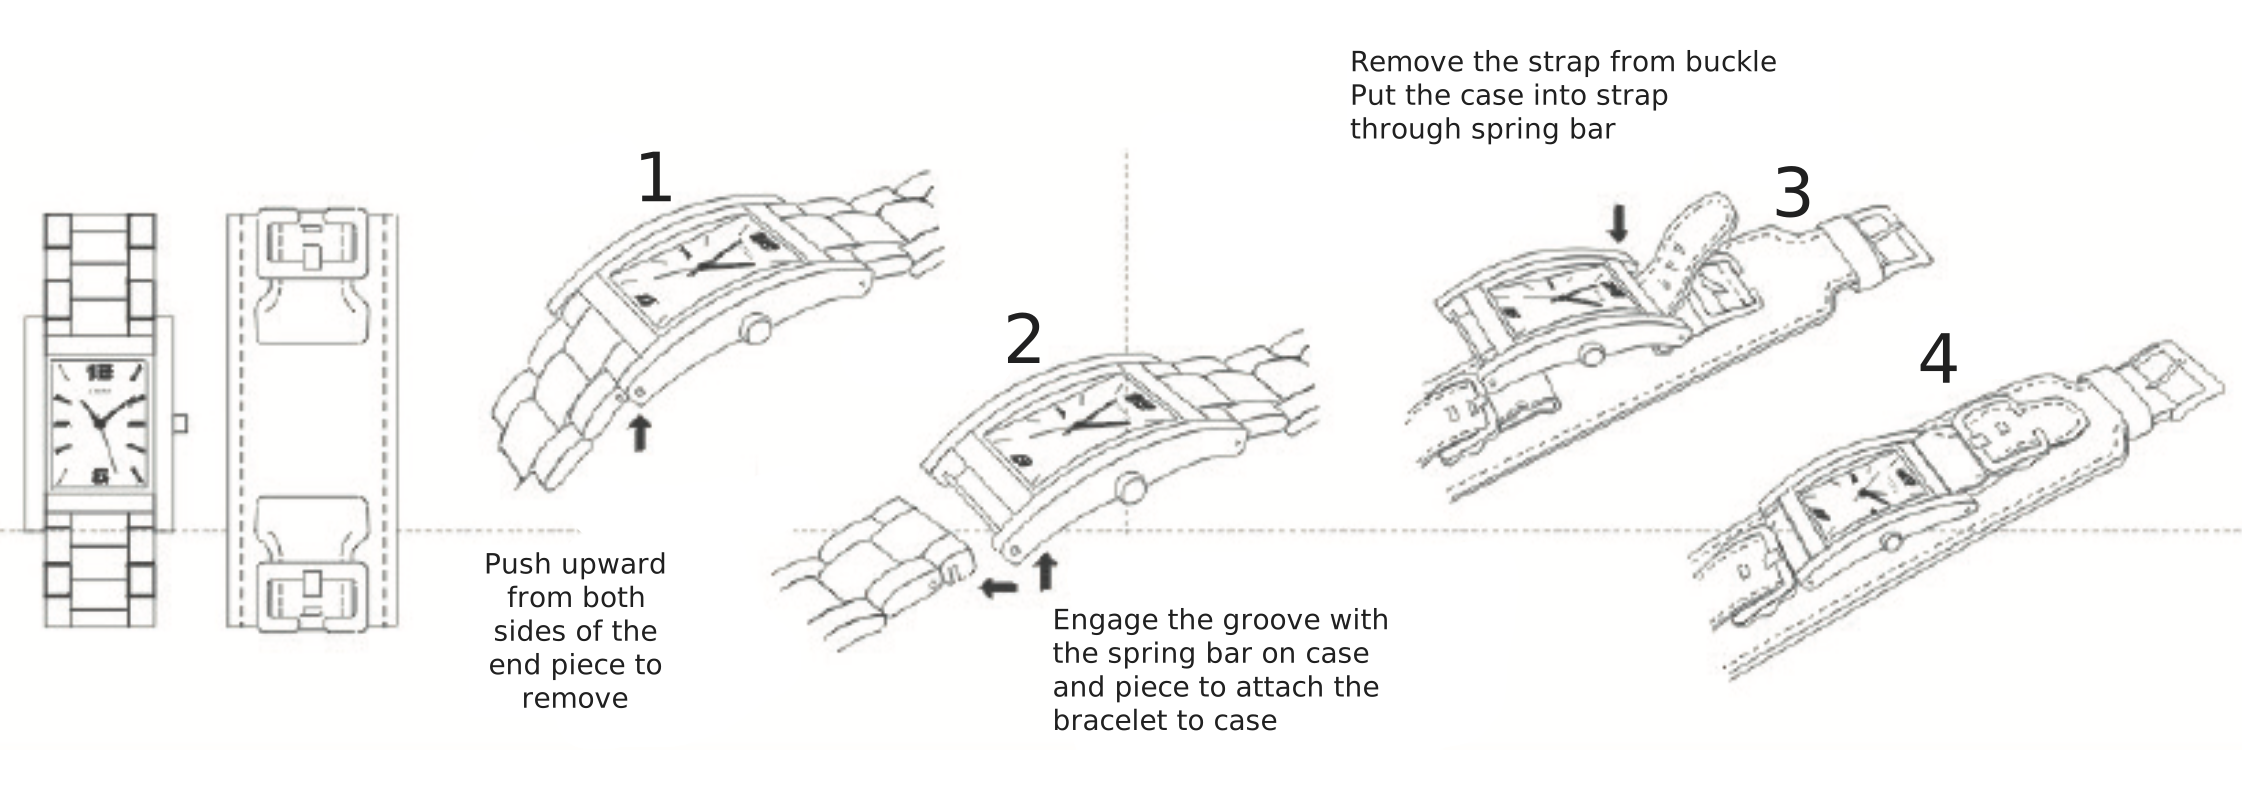
How to remove straps and metal bands

Method 1 — Strap with spring bar:

4-step diagram: (1) Remove from buckle, (2) Push upward to release, (3) Feed through spring bar, (4) Engage groove to secure
Strap with spring bar — steps 1–4

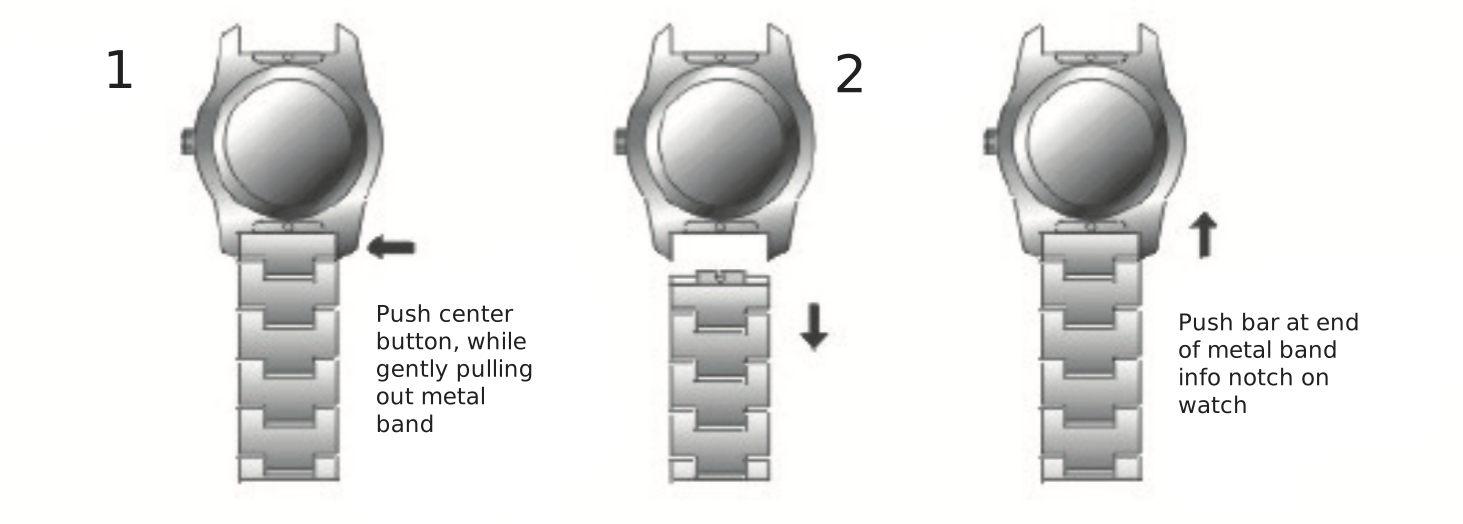
Method 2 — Metal band:

2-step diagram: (1) Push bar into notch, (2) Press center button and pull out
Metal band — steps 1–2

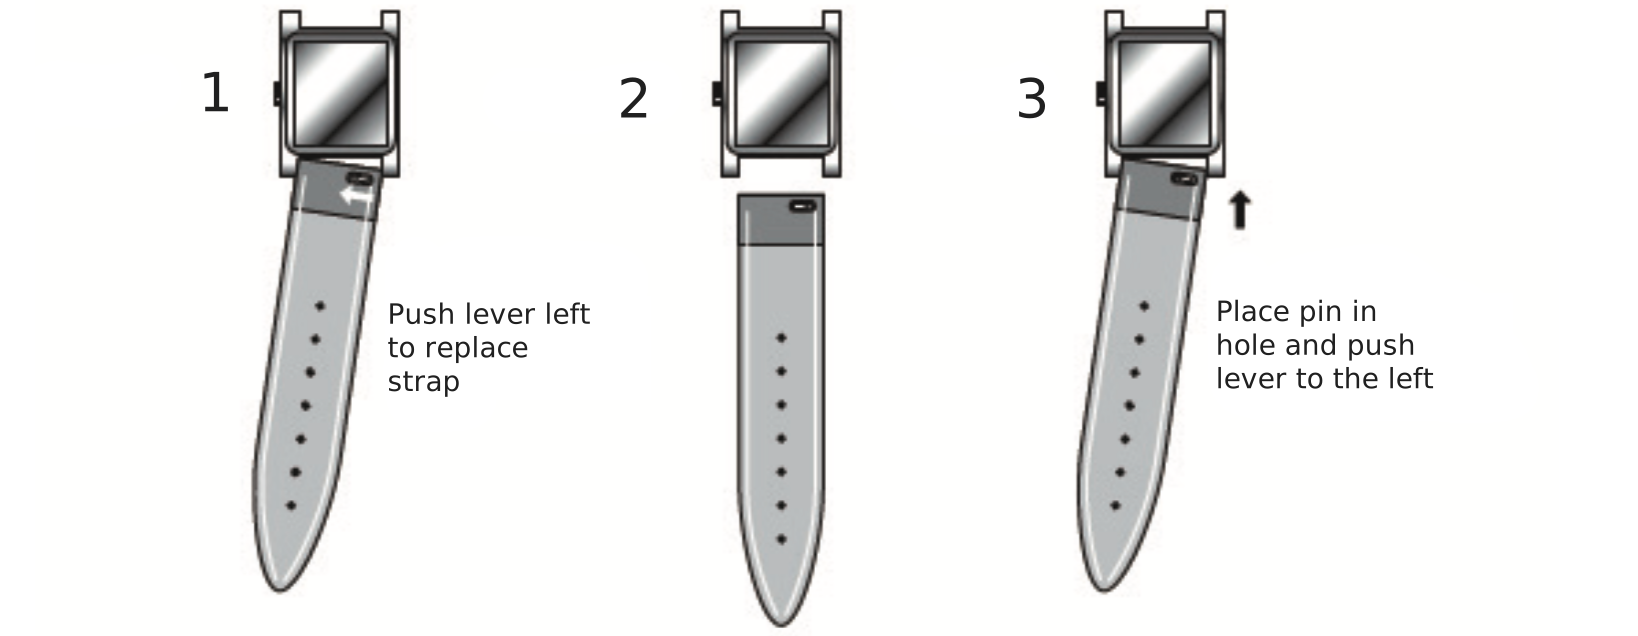
Method 3 — Lever strap:

3-step diagram: (1) Push lever left, (2) Place pin in hole and push lever left
Lever strap — steps 1–3

How to replace top rings

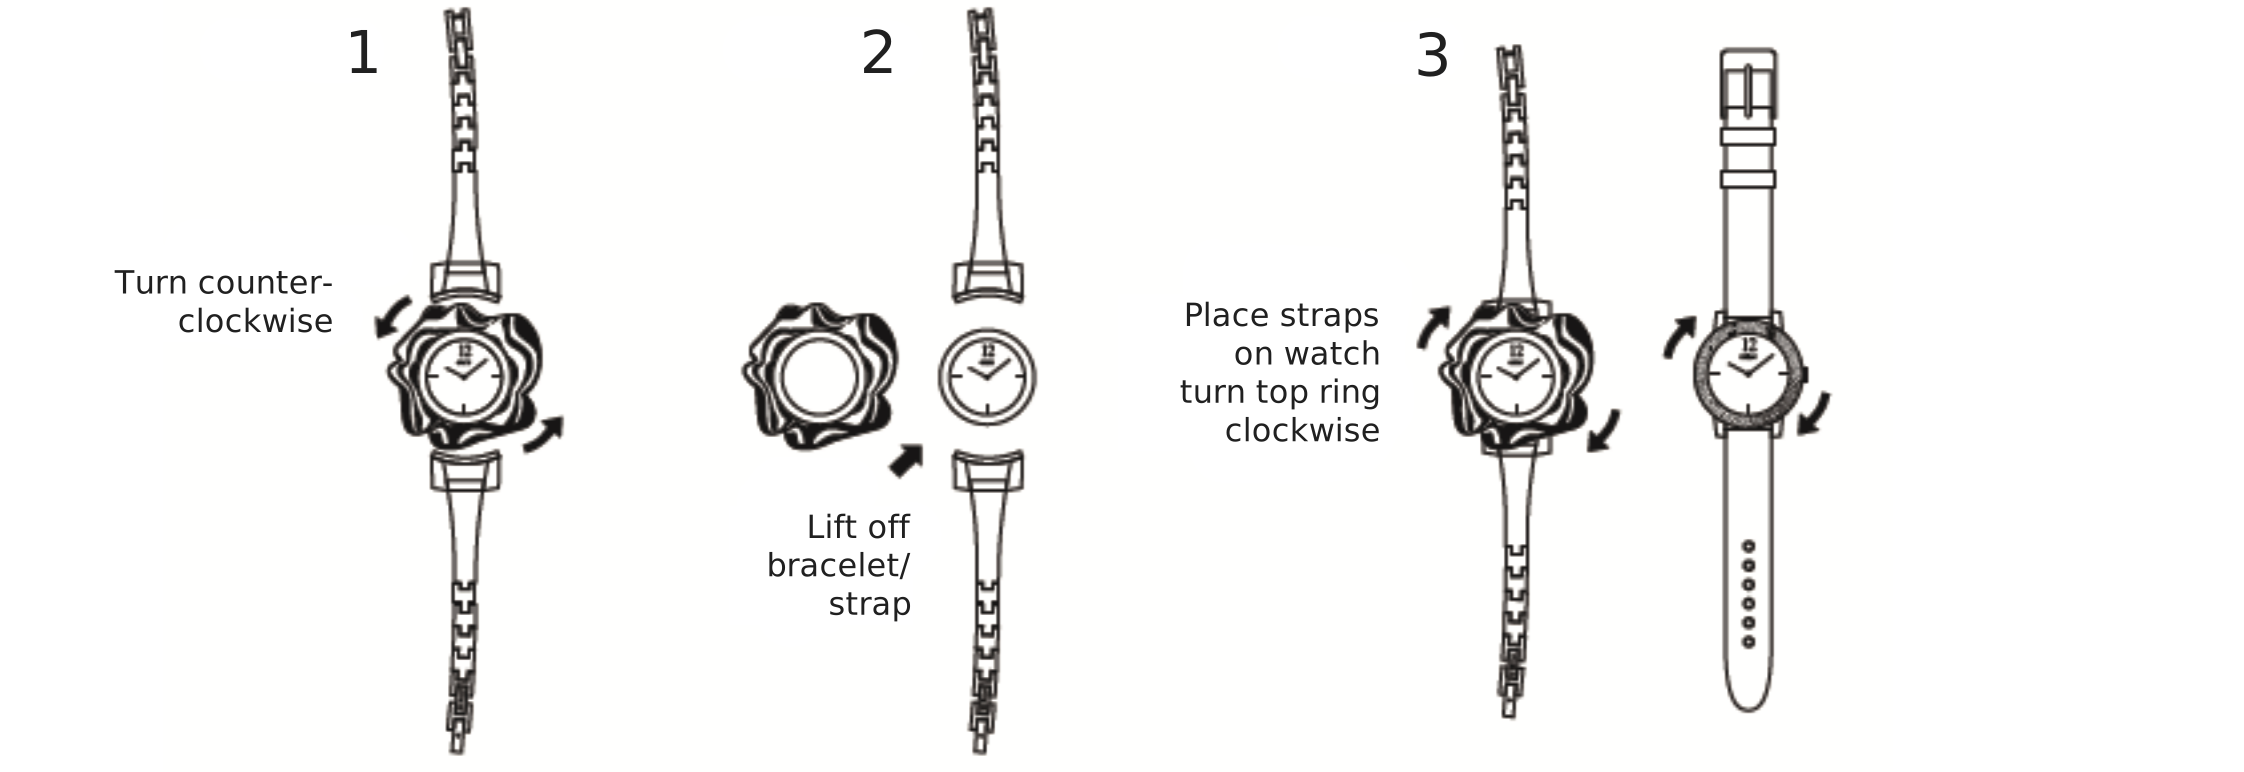
Method 1 — With bracelet or strap:

3-step diagram: (1) Turn counter-clockwise, (2) Lift off strap, (3) Reattach and turn clockwise
Top ring with bracelet/strap — steps 1–3

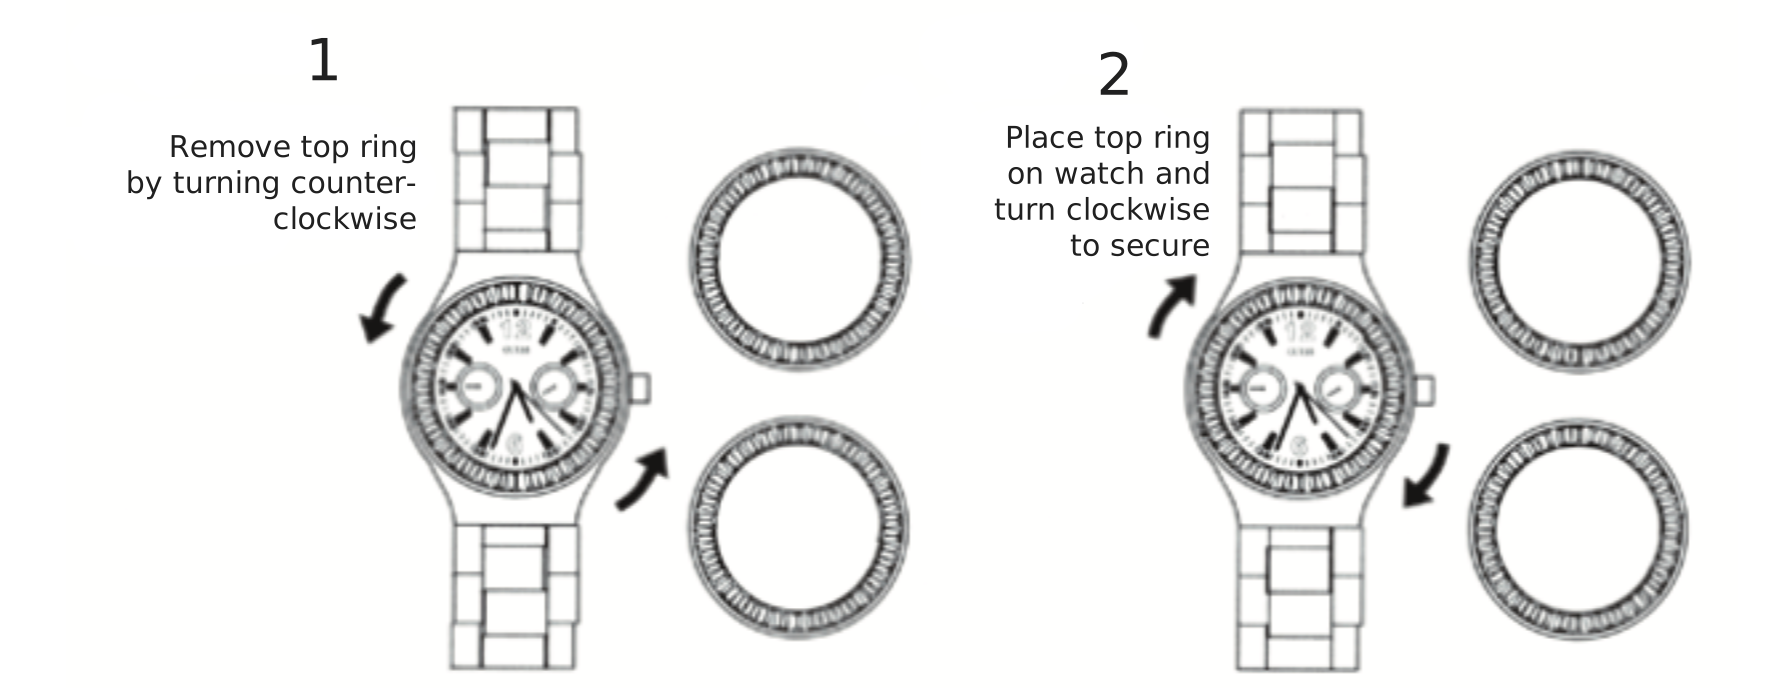
Method 2 — Top ring only:

2-step diagram: (1) Remove by turning counter-clockwise, (2) Place and turn clockwise to secure
Top ring only — steps 1–2

Automatic Movement

Automatic movement front view skeleton diagram showing displays and buttons
Automatic Movement — displays and buttons

Winding the mainspring

This automatic winding watch can also be hand-wound by turning the crown clockwise in the Normal position. Wind several times clockwise. The movement will start naturally.

Setting the time

  1. Pull the crown out to the 1st click position.
  2. Turn the crown to set the hour and minute hands.
  3. After the time has been set, push the crown back to the Normal position.

Watch Repair

Customer Service