991-096573-01

Higher-Function Analog

About Your Watch

Congratulations on purchasing your TIMEX® watch. Please read these instructions carefully to understand how to operate your Timex timepiece. Your watch may not have all of the features described in this booklet.

For more information, and to register your product, please visit Timex.com.

How to Start Your Watch

To start your watch, remove the plastic guard from under the crown, then press the crown in against the case. The second hand will begin advancing in one-second intervals.

Some deep-depth water-resistant watches require the setting crown to be screwed in to secure water-resistance. If your watch case has a protrusion with screw threads, the crown must be screwed in after setting the watch.

To screw in, push the crown firmly against the threaded protrusion and hold in while turning the crown clockwise. Continue to screw in the crown until it is tight. You will need to unscrew the crown (counter-clockwise) before pulling it out the next time you want to set your watch.

Water and Shock Resistance

If your watch is water-resistant, meter marking (Water resistance wave mark) is indicated.

Water-Resistance Depth p.s.i.a.* Water Pressure Below Surface
30m/98ft60
50m/164ft86
100m/328ft160
200m/656ft284

*pounds per square inch absolute

Indiglo® Night-Light

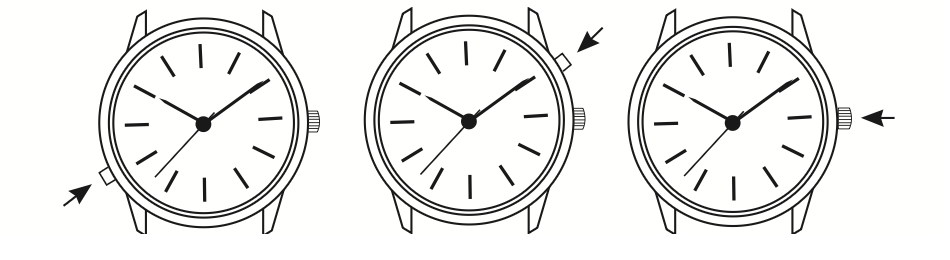
Press button or crown to activate light. Electroluminescent technology used in the INDIGLO® night-light illuminates entire watch face at night and in low light conditions.

Three analog watch faces with an arrow pointing to the button or crown used to activate the Indiglo night-light

Analog/Digital Models

4-Pusher Analog/Digital Model with Indiglo® Night-Light and Night-Mode® Feature

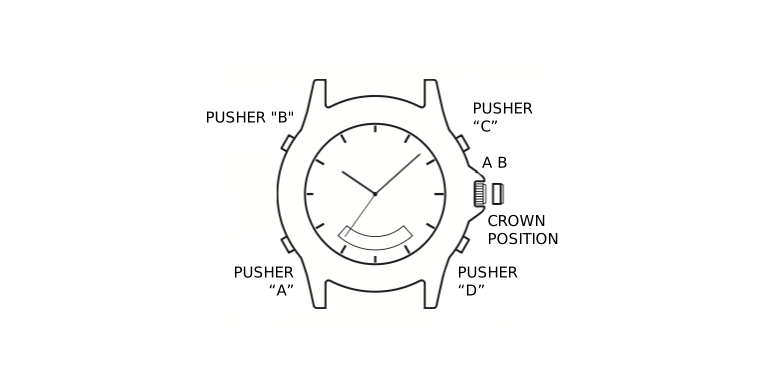
Watch case diagram labeled Pusher A, B, C, D and Crown Position, analog dial only

To Use Indiglo® Night-Light

  1. PRESS pusher “B” to illuminate the entire dial (Both analog and digital).

To Use Night-Mode® Feature

  1. PRESS and HOLD pusher “B” for 3 seconds until you hear a beep.
  2. Pressing any pusher will cause the INDIGLO® night-light to illuminate and stay on for 3 seconds.
  3. NIGHT-MODE® feature will last for 3 hours.
  4. To deactivate NIGHT-MODE® feature PRESS and HOLD pusher “B” for 3 seconds.

Analog Time

To Set Analog Time

  1. PULL the crown out to the “B” position.
  2. TURN the crown either way to the correct time.
  3. PUSH in the crown to the “A” position.
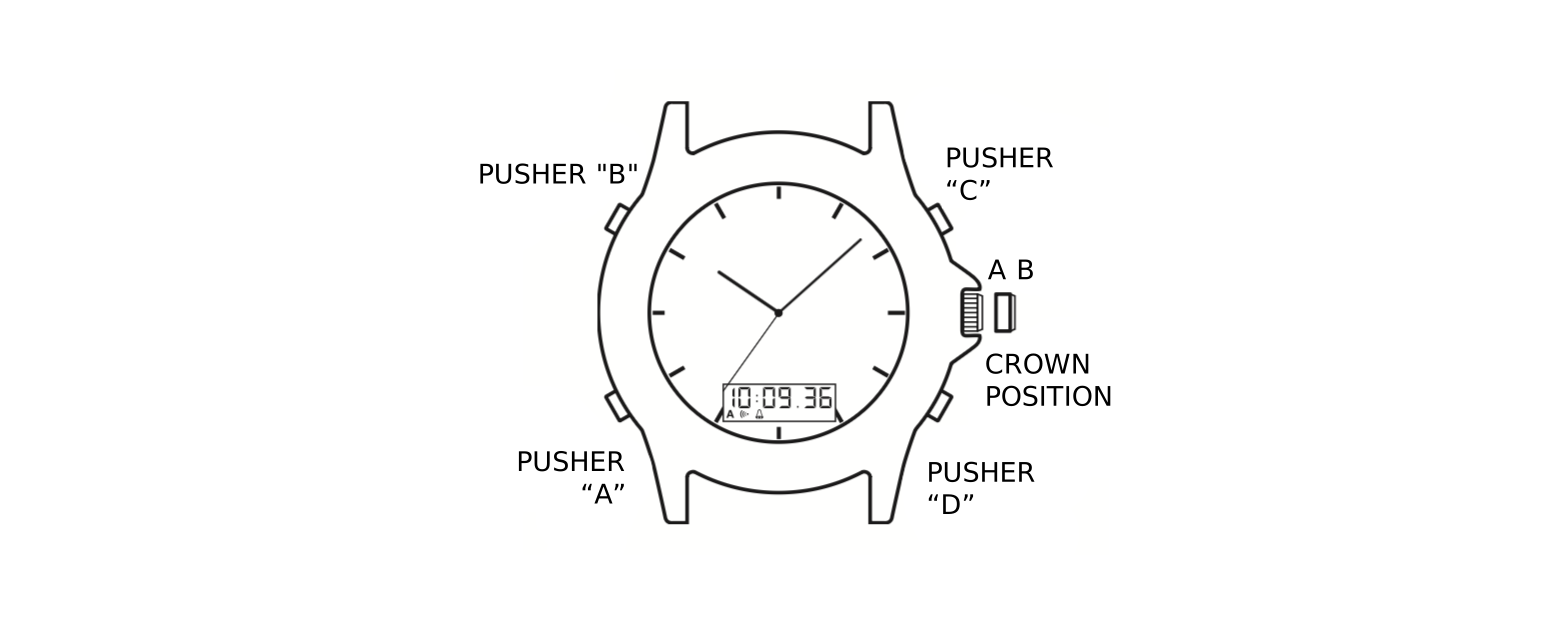
Watch case diagram labeled Pusher A, B, C, D and Crown Position, with digital display window

Digital Display

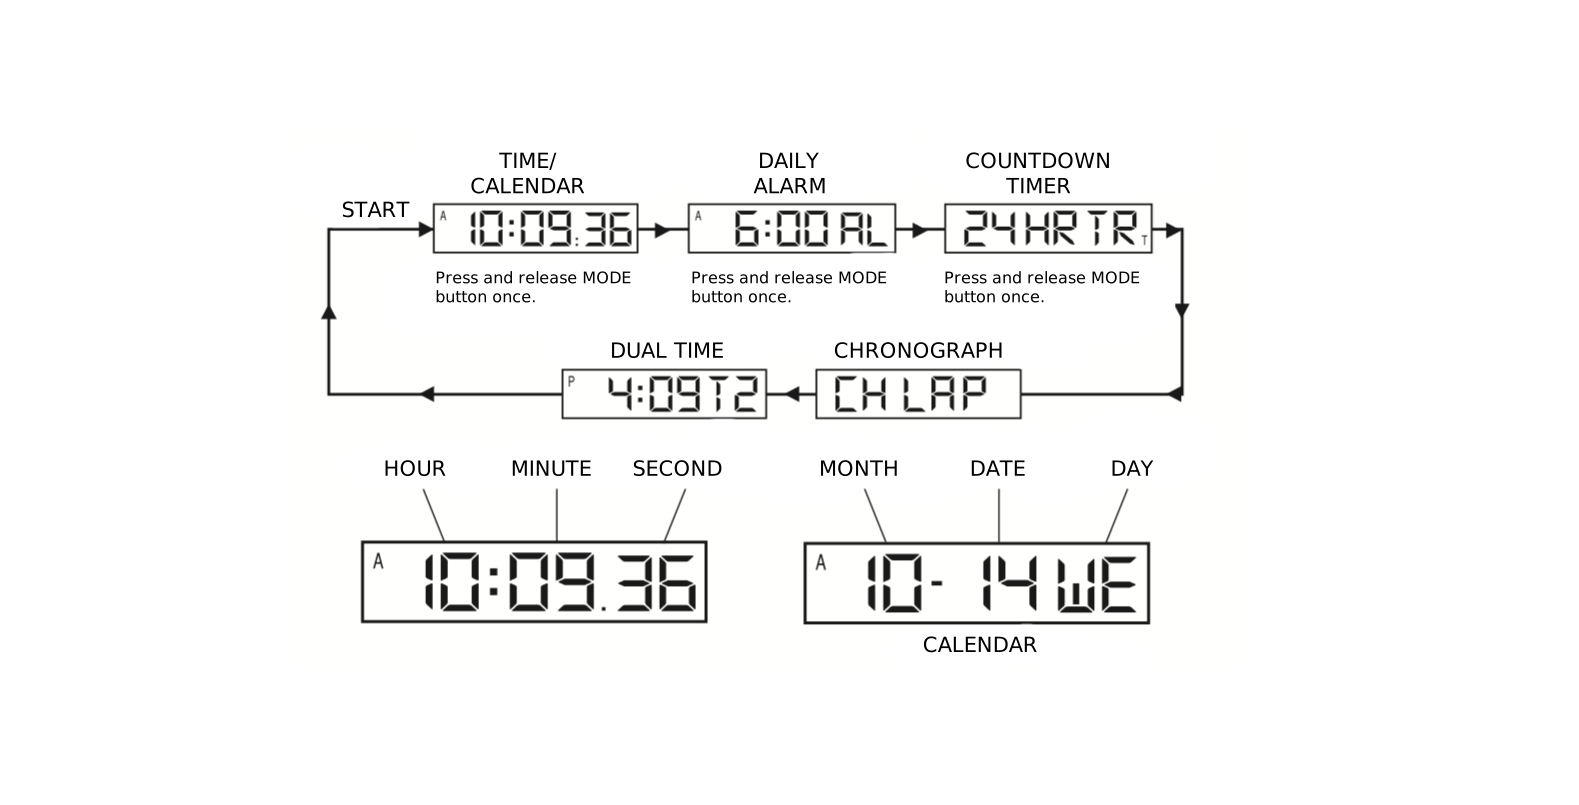
  1. The Digital display changes to each function every time you PRESS pusher “A”. (As illustrated below): TIME / CALENDAR, DAILY ALARM, COUNTDOWN TIMER, CHRONOGRAPH, DUAL TIME
Flow diagram showing the digital display cycling through Time/Calendar, Daily Alarm, and Countdown Timer displays, then Chronograph and Dual Time displays, plus separate Hour/Minute/Second time display and Month/Date/Day calendar display

To Set Time / Calendar

  1. PRESS pusher “A” to bring up TIME / CALENDAR display.
  2. PRESS and HOLD pusher “D”. HOLD will display until second flashes.
  3. PRESS pusher “C” to reset to second to “00”.
  4. PRESS pusher “A” to let hour flash.
  5. PRESS pusher “C” to advance hour.
  6. PRESS pusher “A” and “C” as above to adjust tens of minutes, minute, year, month, date, day and 12/24 hour format.
  7. PRESS pusher “D” to complete setting.
  8. View or select the TIME or CALENDAR to appear in your digital display.
    • PRESS pusher “C” to view the CALENDAR for 2 seconds.
    • PRESS and HOLD pusher “C” for 3 seconds until the watch beeps to change the display to CALENDAR.
    • To view or change the display to TIME, repeat the steps above.
  9. Set this time to coordinate with the Analog time or another time zone.
  10. PRESS and HOLD pusher “C” for 2 seconds in setting mode, to activate fast advance.

To Set Daily Alarm

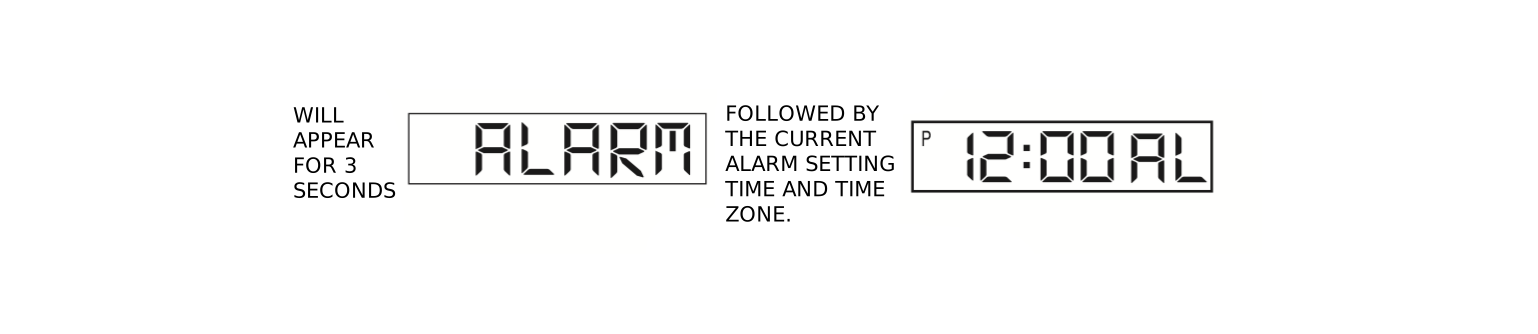
Digital display mockup showing the word ALARM appearing for 3 seconds, followed by the current alarm setting time and time zone
  1. PRESS pusher “A” to bring up DAILY ALARM display: “ALARM” will appear for 3 seconds followed by the current alarm setting time and time zone. The ALARM mode symbol “AL” and the applicable time zone symbol “T1” or “T2” alternate to give complete information.
  2. PRESS pusher “D” to let time zone flash.
  3. PRESS pusher “C” to select time zone.
  4. PRESS pusher “A” to let hour flash.
  5. PRESS pusher “C” to advance hour.
  6. PRESS pusher “A” and “C” as above to adjust tens of minutes and minute.
  7. PRESS pusher “D” to complete setting.
  8. Alarm is automatically activated after setting is displayed.

To Set Daily Alarm or Chime On/Off

  1. PRESS pusher “A” to bring up DAILY ALARM display.
  2. PRESS pusher “C” to activate or deactivate daily alarm and chime accordingly.

To Use Countdown Timer

Digital display mockup showing 24HR TR countdown timer display and its setting mode labeled Hour and Minute
  1. PRESS pusher “A” to bring up COUNTDOWN TIMER display. “24 HR TR” will appear.
  2. PRESS pusher “D” to let hour flash.
  3. PRESS pusher “C” to advance hour.
  4. PRESS pusher “A” to set tens of minutes.
  5. PRESS pusher “C” to advance tens of minutes.
  6. PRESS pusher “A” and “C” as above to adjust minute.
  7. PRESS pusher “D” to complete setting.
  8. PRESS pusher “C” to start the timer.
  9. PRESS pusher “D” to stop the timer.
  10. PRESS pusher “D” again to resume timer to the preset time.

To Use Chronograph for Standard Measurement

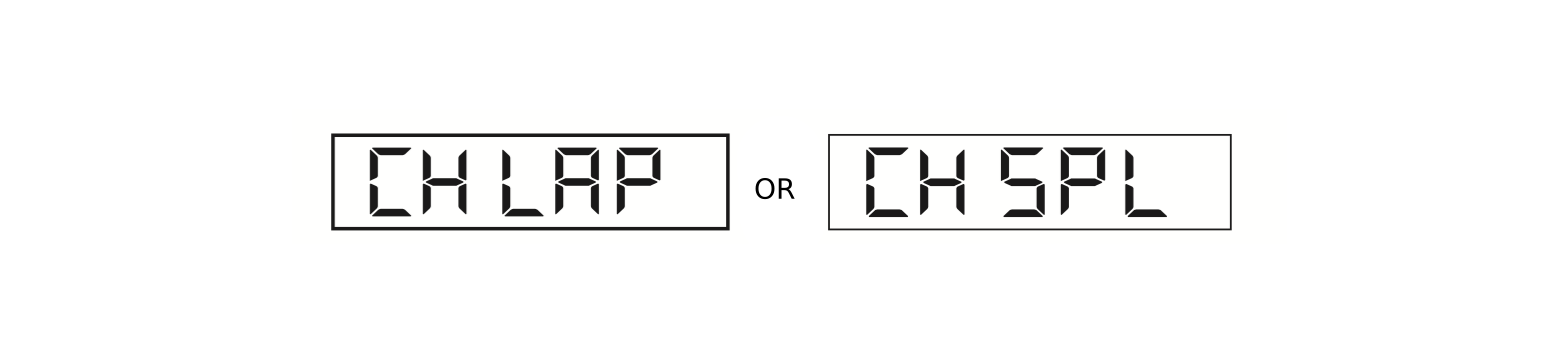
Digital display mockup showing CH LAP or CH SPL chronograph display
  1. PRESS pusher “A” to bring up CHRONOGRAPH display; “CH LAP” or “CH SPL” will appear.
  2. PRESS pusher “C” to start timing.
  3. PRESS pusher “D” to stop timing.
  4. PRESS pusher “D” to reset.

To Use Chronograph for Lap or Split Time Measurement

  1. PRESS pusher “A” to bring up CHRONOGRAPH display; “CH LAP” or “CH SPL” will appear.
  2. PRESS pusher “D” to select LAP or SPLIT.
  3. PRESS pusher “C” to start timing.
  4. PRESS pusher “C” to record the first Lap or Split time; digits will be frozen for 15 seconds; “L” or “S” will flash to indicate that the next Lap or Split time is being recorded in the background.
  5. PRESS pusher “A” to view the running display while the display is frozen.
  6. PRESS pusher “C” to take another Lap or Split.
  7. PRESS pusher “D” to stop.
  8. PRESS pusher “D” again to reset.

To Set Dual Time

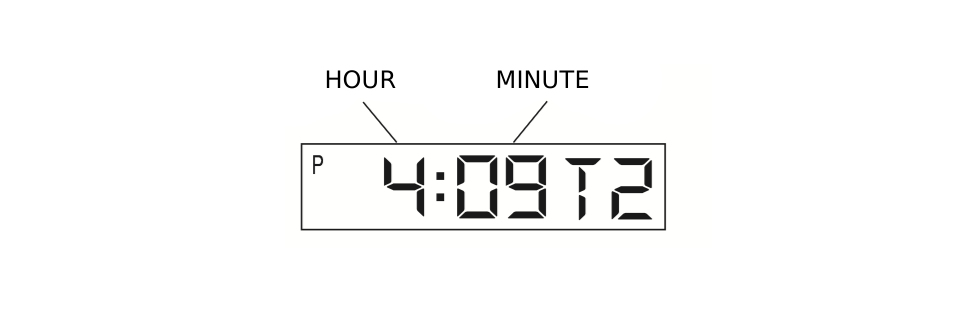
Digital display mockup showing the dual time display labeled Hour and Minute
  1. PRESS pusher “A” to bring up DUAL TIME display. “T2” will appear beside the dual time.
  2. PRESS and HOLD pusher “D”; “Hold” will display until hour flashes.
  3. PRESS pusher “C” to advance hour.
  4. PRESS pusher “A” to let month flash.
  5. PRESS pusher “C” to advance month.
  6. PRESS pusher “A” and “C” as above to adjust date, day, and to set 12 / 24 hour format.
  7. PRESS pusher “D” to complete setting.

Multi-Function Models

Watch case diagram labeled Crown Position A, B, C and Normal Position, with a large face display and three small faces displaying date, day and 24-hour time

Your watch has a normal large face display and three small faces displaying date, day and 24-hour time.

To Set the Day

  1. Pull crown all the way out and turn CLOCKWISE until correct day appears.
  2. Push crown in to restart.

To Set the Time

  1. Pull crown all the way out and turn to correct time.
  2. Push crown in to restart.

To Set the Date

Instant date change:

  1. Pull crown out one stop and turn CLOCKWISE until you reach correct date.
  2. Push crown in to restart.

Day/Date/AM/PM/Sun/Moon Models

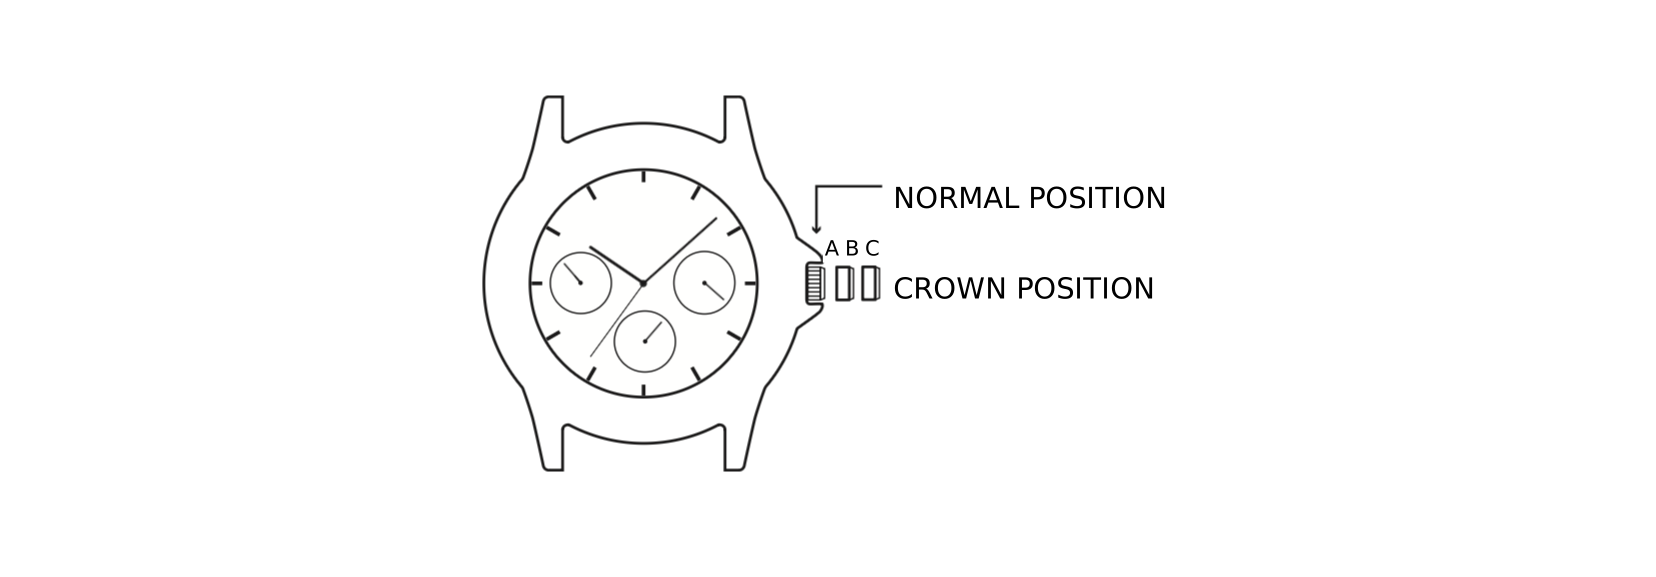
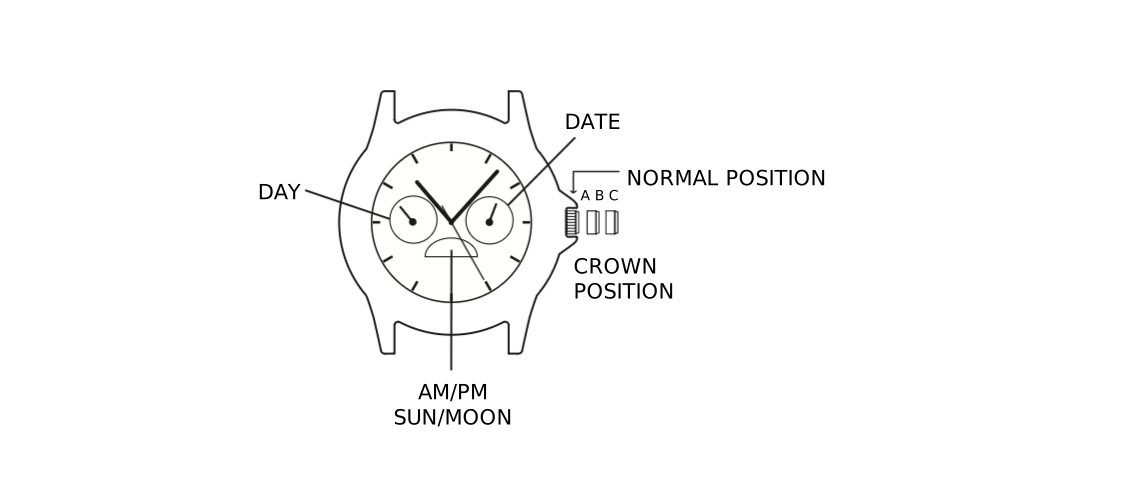
Watch case diagram labeled Day, Date, AM/PM Sun/Moon, Normal Position, and Crown Position A, B, C

To Set Time

  1. PULL out crown to “C” position.
  2. TURN crown clockwise to correct time. Day/am/pm/moon will also change.
  3. Push in crown to “A” position.

To Set Date

  1. PULL out crown to “B” position.
  2. TURN crown clockwise to correct date.
  3. PUSH in crown to “A” position.

To Set Day

  1. PULL out crown to “C” position.
  2. Advance time 24 hours to change the day.
  3. PUSH in crown to “A” position.

Chronograph Models

Review all chronographs to determine your watch type.

Type 1

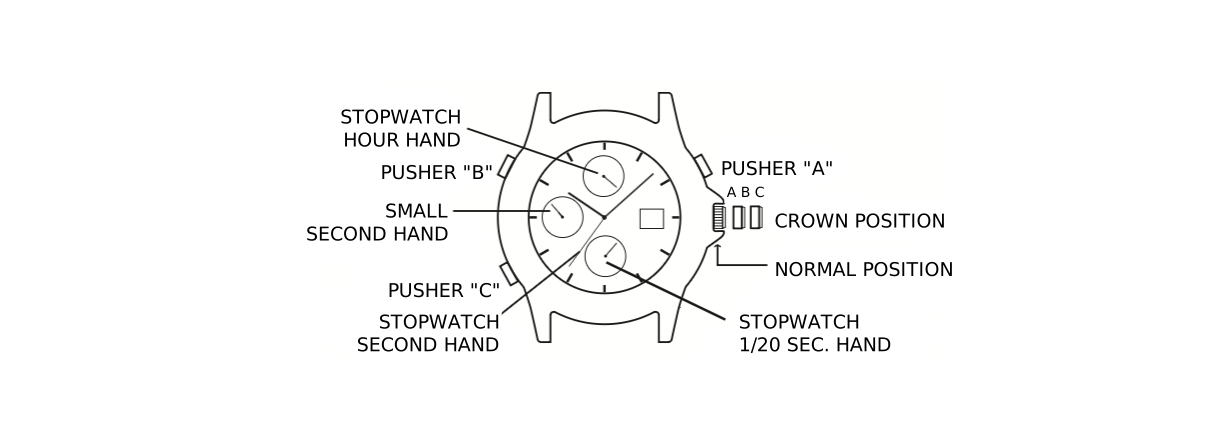
Chronograph Type 1 watch case diagram labeled Pusher A, B, C, Crown Position, Stopwatch Hour Hand, Small Second Hand, Stopwatch Second Hand and Stopwatch 1/20 Sec. Hand
  • Crown position “A”, “B” & “C”
  • Pusher “A” (right) & “B” (left)
  • Hour, minute and small second hands (6 o’clock eye) show time
  • 12 o’clock eye shows “minutes elapsed” for chronograph
  • 9 o’clock eye shows “hours elapsed” for chronograph
  • The seconds sweep hand shows “seconds elapsed” for chronograph

Time, Calendar, Chronograph

This chronograph watch has three functions:

Time

To Set the Time
  1. PULL out Crown to “C” position.
  2. TURN Crown either way to correct time.
  3. PUSH in Crown to “A” position.

Calendar

To Set the Calendar
  1. PULL out Crown to “B” position.
  2. TURN Crown clockwise to correct position.
  3. PUSH in Crown to “A” position.

Chronograph

The Chronograph is capable of measuring:

  • Minutes elapsed up to 1 hour (12 o’clock eye)
  • Hour elapsed up to 12 hours (9 o’clock eye)
  • Seconds elapsed up to 1 minute (seconds sweep hand)
Before Using the Chronograph

Adjust all the chronograph hands to the “0” or 12 hr. position.

To Adjust the Chronograph Hands
  1. PULL out CROWN to “C” position.
  2. PRESS pusher “A” intermittently until the seconds sweep hand resets to “0” or 12-hr. position.
  3. PRESS pusher “B” intermittently until the hands in the 12 o’clock eye reset to “0” or 12-hr position.
  4. PUSH in Crown to “A” position.
Standard Chronograph Measurement
  1. PRESS pusher “A” to start timing.
  2. PRESS pusher “A” to stop timing.
  3. PRESS pusher “B” to reset.

Type 2

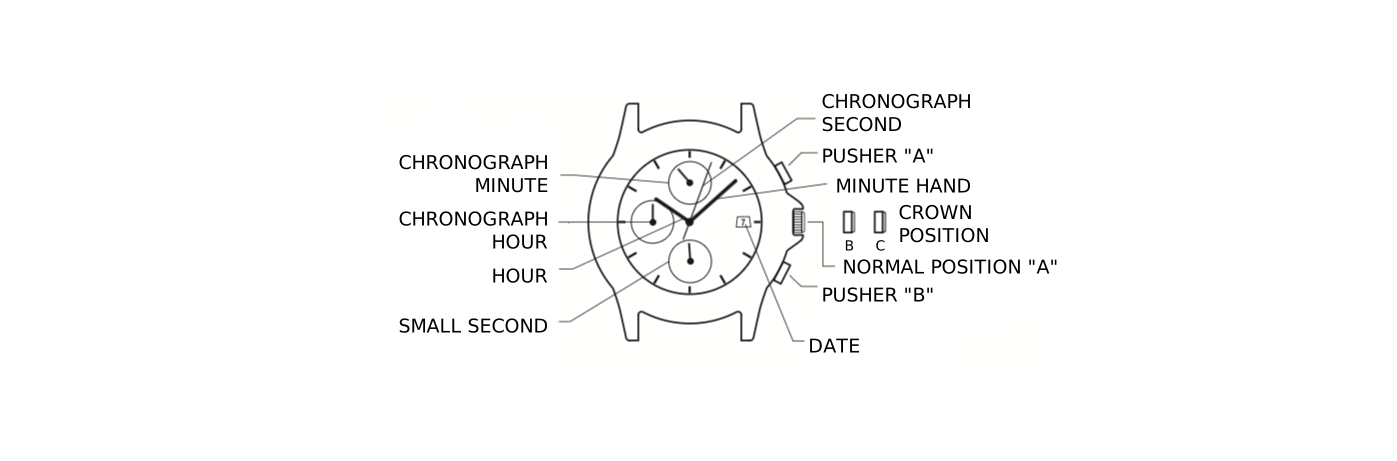
Chronograph Type 2 watch case diagram labeled Pusher A, B, Crown Position, Date, Small Second, Chronograph Hour, Chronograph Minute, Chronograph Second and Hour Minute Hand

Setting the Time

  1. PULL the crown out to the 2nd position “C”.
  2. Turn the crown to set hour and minute hands.
  3. When the crown is pushed back to the normal position “A”, small second hand begins to run.

Setting the Date

  1. PULL the crown out to the 1st position “B”.
  2. Turn the crown counter-clockwise to set the date. *If the date is set between the hours of around 9:00 PM and 1:00 AM, the date may not change on the following day.
  3. After the date has been set, push the crown back to the normal position “A”.

Using the Chronograph

This chronograph is able to measure and display time in 1/2 second up to maximum of 11 hours 59 minutes 59 seconds. The chronograph second hand keeps continuously for 11 hours 59 minutes 59 seconds after starting.

Measuring Time with the Chronograph
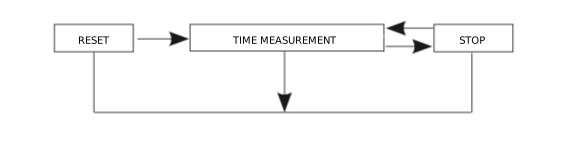
Flow diagram showing Reset leading to Time Measurement, which leads to Stop, and back to Reset
  1. The chronograph can be started and stopped each time pusher “A” is pressed.
  2. Pressing pusher “B” resets the chronograph and the chronograph second hand, chronograph minute hand, and chronograph hour hand return to zero position.
Chronograph Reset (incl. after replacing battery)

This procedure should be performed when the chronograph second hand does not return to zero position after the chronograph has been reset, including after the battery has been replaced.

  1. Pull the crown out to the 2nd position “C”.
  2. Press pusher “A” to set the chronograph second hand to the zero position. The chronograph hand can be advanced rapidly by continuously pressing pusher “A”.
  3. Once the hand returns to zero position, return the crown to the normal position.

Type 3

Chronograph Type 3 watch case diagram labeled Pusher A, B, Crown Position, Date, Minute, Hour, Second, Chronograph Minute, Chronograph Second and Chronograph 1/20 Second

Basic Operations

  • 6 o’clock eye shows seconds.
  • 10 o’clock eye shows “minutes elapsed” for chronograph.
  • 2 o’clock eye shows “1/20 seconds elapsed” for chronograph.
  • Chronograph second hand shows “seconds elapsed” for chronograph.

Time

To Set the Time
  1. PULL crown out to “C” position.
  2. TURN crown either way to correct time.
  3. PUSH crown in to “A” position.
To Adjust to a New Time Zone
  1. PULL crown out to “B” position.
  2. TURN crown either way to move the hour hand in hour increments.

Calendar

To Set the Calendar
  1. PULL crown out to “B” position.
  2. TURN crown either way to move hour hand. Two complete revolutions relative to the 12 o’clock position will move the date forward or backward. This will correct both date and 24-hour time.
  3. PUSH crown in to “A” position.

Chronograph

The chronograph is capable of measuring:

  • 1/20 seconds elapsed up to 1 second (2 o’clock eye).
  • Seconds elapsed up to 1 minute (chronograph second hand).
  • Minutes elapsed up to 30 minutes (10 o’clock eye).

Before using the chronograph, adjust all the chronograph hands to the “0” or 12-hour positions.

To Adjust Chronograph Hands
  1. PULL crown out to “B” position.
  2. PRESS pusher “B” until the hand at the 10 o’clock eye resets to the “30” position.
  3. PULL crown out to “C” position.
  4. PRESS pusher “A” until the chronograph second hand resets to the “0” or “60” or 12-hour position.
  5. PRESS pusher “B” until the hand at the 2 o’clock eye resets to the “0” position.
  6. PUSH in Crown to “A” position.
Standard Chronograph Measurement
  1. PRESS pusher “A” to start timing.
  2. PRESS pusher “A” to stop timing.
  3. PRESS pusher “B” to reset.
Split Time Measurement
  1. PRESS pusher “A” to start timing.
  2. PRESS pusher “B” to split.
  3. PRESS pusher “B” to resume timing.
  4. PRESS pusher “A” to stop timing.
  5. PRESS pusher “B” to reset.

Indiglo® Night-Light

With the crown in the “A” position, PUSH crown to the “D” position. Entire dial will be illuminated. Electroluminescent technology used in INDIGLO® night-light illuminates entire watch face at night and in low light conditions.

Night-Mode® Feature
  1. PUSH and HOLD Crown to “D” position for 4 seconds to activate NIGHT-MODE® feature. PRESSING any pusher will cause the INDIGLO® night-light to stay on for 3 seconds.
  2. NIGHT-MODE® feature will stay activated for 8 hours.
  3. Or PUSH and HOLD Crown to “D” position for 4 seconds to deactivate.
If Stopwatch Hands Do Not Return to “0 Position” When the Stopwatch Is Reset
  1. PULL crown out to “B” position.
  2. PRESS pushers “A” or “B” repeatedly to move hands to “0” position.
  3. PUSH in crown to “A” position.

Type 4

Chronograph Type 4 watch case diagram labeled Pusher A, B, Crown Position, Normal Position 1, Hour Hand, Minute Hand, Second Hand, 24-Hour Hand, Stopwatch Minute Hand and Stopwatch Second Hand

Basic Operations

  • 6 o’clock eye displays “seconds elapsed” for the chronograph
  • 9 o’clock eye displays “minutes elapsed” for the chronograph
  • 3 o’clock eye displays the current time in a 24 hour format

Time

To Set the Time
  1. Pull the crown out to position B.
  2. Rotate the crown either direction until the 24-hour, hour, and minute hands display the correct time.
  3. Push Crown in to position A.
To Adjust the Stopwatch Hands to the Zero Position
  1. Pull the crown out to position B.
  2. Press pusher “A” to move the stopwatch minute and second hands counter clockwise to the zero position. Press pusher “B” to move the stopwatch minute and second hands clockwise to the zero position.
  3. Push Crown in to position A.

Chronograph

The chronograph is capable of measuring:

  • Seconds elapsed up to one minute (6 o’clock eye)
  • Minutes elapsed up to one hour (9 o’clock eye)
Standard Chronograph Measurement
  • Press pusher “A” to start timing
  • Press pusher “A” to stop timing
  • Press pusher “B” to reset the chronograph to the zero position
Split Time Measurement
  • Press pusher “A” to start timing
  • Press pusher “B” to split
  • Press pusher “B” to resume timing
  • Press pusher “A” to stop timing
  • Press pusher “B” to reset the chronograph to the zero position

Type 5

Chronograph Type 5 watch case diagram labeled Pusher A, B, Crown Position, Date, 24-Hour Time, Hour, Second Hand, Minute Hand, Chronograph Minutes and Chronograph Seconds

Setting the Time

  1. PULL the crown out to the 2nd position “C”.
  2. Turn the crown to set hour and minute hands. Make sure that the 24-hour time is correct.
  3. When the crown is pushed back to the normal position “A”, second hand begins to run.

Setting the Date

  1. PULL the crown out to the 1st position “B”.
  2. Turn the crown counter-clockwise to set the date. *If the date is set between the hours of around 9:00 PM and 1:00 AM, the date may not change on the following day.
  3. After the date has been set, push the crown back to the normal position “A”.

Using the Chronograph

This chronograph is able to measure and display time in 1-second increments up to maximum of 29 minutes 59 seconds. The chronograph second hand moves continuously for 30 minutes after starting.

Standard Chronograph Measurement
  1. PRESS pusher “A” to start timing.
  2. PRESS pusher “A” to stop timing.
  3. PRESS pusher “B” to reset.
Split Time Measurement
  1. PRESS pusher “A” to start timing.
  2. PRESS pusher “B” to split.
  3. PRESS pusher “B” to resume timing.
  4. PRESS pusher “A” to stop timing.
  5. PRESS pusher “B” to reset.
Chronograph Reset (incl. after replacing battery)

This procedure should be performed when the chronograph minute hand or second hand do not return to zero position after the chronograph has been reset, including after the battery has been replaced.

  1. Pull the crown out to the 2nd position “C”.
  2. Press pusher “A” or “B” to set the stopwatch hands to the zero position. The movements of the stopwatch minute hand and the stopwatch second hand are interlocked. To set the stopwatch minute hand to the zero position, continue to move the stopwatch second hand until the stopwatch minute hand reaches the zero position.
  3. Once the hands returns to zero position, return the crown to the normal position.

Type 6

Chronograph Type 6 watch case diagram labeled Pusher A, B, Crown Position, Date, 24-Hour Time, Hour, Minute Hand, Seconds, Chronograph Minutes, Chronograph Seconds and 2nd Hour Hand

Setting the “Home” Time

(Will be displayed on the 24-hour sub-dial at the 12 position and the 4th center hand)

  1. Wait until the second hand is pointing to 60.
  2. PULL the crown out to the 2nd position “C”.
  3. Turn the crown to set the 4th center Hour hand and the hour hand in the 24-hour sub-dial to the correct position to display your “HOME” time (the time at your home location).

Setting the “Local” Time

(Will be displayed on the standard hour and minute hands)

  1. PUSH the crown in to the 1st position “B”.
  2. Turn the crown COUNTER-CLOCKWISE to set the STANDARD Hour hand to the correct position to display the “local” time (the time at the location you are currently located).
  3. PUSH the crown in to the normal position “A”. The second hand in the sub-dial at the 6 position will begin to move.

Setting the Date

  1. PULL the crown out to the 1st position “B”.
  2. Turn the crown clockwise to set the date. *If the date is set between the hours of around 9:00 PM and 1:00 AM, the date may not change on the following day.
  3. After the date has been set, push the crown back to the normal position “A”.

Operating the Chronograph Function (Will Measure Up to 1 Hour)

  1. PRESS pusher “A” to start timing.
  2. PRESS pusher “A” to stop timing.
  3. PRESS pusher “B” to reset.

Recalibrating the Chronograph Second Hand

(If it does not return to the 12 position after reset or after changing the battery)

  1. PULL the crown out to the 2nd position “C”.
  2. PUSH pusher “A” to move the Chronograph second hand one increment forward (holding the pusher in continually will rapidly advance the hand).
  3. Once the Chronograph second hand is in the 12 position, PUSH the crown in to the normal position “A”. The second hand in the sub-dial at the 6 position will begin to move.

Elapsed Time Ring

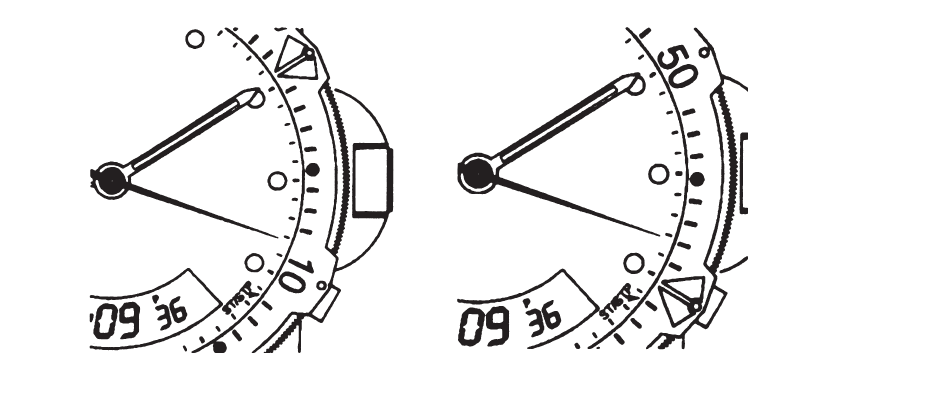
If your watch is equipped with a rotatable outer ring on the face, with numbers corresponding to minutes, you can use this Elapsed Time Ring to time an activity from the start, or to mark the ending time for the duration of an activity.

To Time an Activity from the Start

Set the Start/Stop triangle at the time (hour or minute) when you start the activity (as shown on the left in the illustration shown below). At completion, you can see how long the activity took.

Two watch bezels with a rotating elapsed time ring, showing the Start/Stop triangle set at the start of an activity on the left, and the elapsed position on the right

To Measure the Time Remaining

Set the triangle to the hour or minute position when you wish to complete the activity, and check the watch periodically for progress towards that goal.

In the illustration shown above on the right you can stop when the minute hand reaches the 20 minutes past the hour position.

Tachymeter Ring

The tachymeter feature can be used to measure speed in miles per hour (MPH), nautical miles per hour (knots) or kilometers per hour (KPH) using the sweep second hand and the scale on the wall above the watch face. You need to know the actual distance you are covering in miles or km.

Start the chronograph with the second hand at zero (the twelve o’clock position). Within the first minute, the second hand will point to the rate for a one-mile (or one kilometer) course: if it takes 45 seconds, the hand will point to 80 at that position – 80 MPH or 80 KPH.

If within the first minute, a distance greater than one mile or kilometer is covered, multiply the tachymeter number by the distance to get the actual rate: if you went 1.2 miles in 45 seconds, multiply the 80 by 1.2 – 96 MPH.

Compass Ring

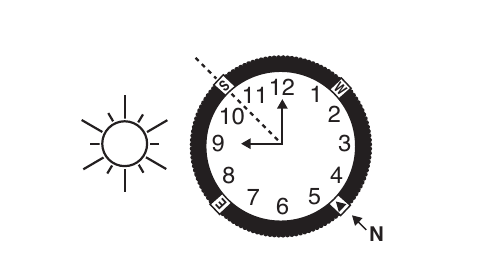
If your watch is equipped with a movable ring around the dial marked at the letters “N”, “E”, “W”, “S” (for the four compass directions) or compass degrees, you can use this feature to find an approximate compass directional reading.

  1. Lay the watch on a flat surface, or hold it so that the face is parallel to the ground.
  2. Locate the sun and point the hour hand at the sun.
  3. In the A.M., rotate the ring until the “S” (south) marker is halfway between the hour hand and 12:00 (after the hour hand or within the shortest distance between the hour hand and 12:00).
  4. In the P.M., rotate the ring until “S” is before the hour hand and halfway between the hour hand and 12:00.
Watch bezel with a rotatable compass ring marked N, E, S, W and hour numbers 1 through 12, with the sun and hour hand pointed toward it

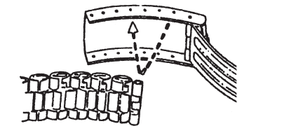
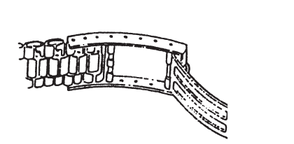
How to Adjust Bracelet

Variations of the following bracelet sections apply to all watch models.

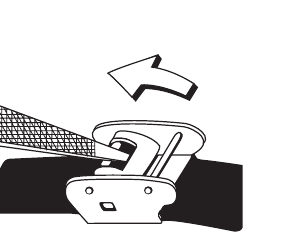
Sliding Clasp Bracelet

Locking plate on sliding clasp bracelet being opened with a pointed tool
  1. Open locking plate.
  2. Move clasp to desired bracelet length.
  3. Exert pressure while holding locking plate and slide clasp back and forth until it engages in grooves on underside of bracelet.
  4. Press locking plate down until it snaps closed. Clasp can be damaged if excessive force is used.

Foldover Clasp Bracelet

Pointed tool pushing in the spring bar to disengage the foldover clasp bracelet
Fig. 1.
Spring bar being aligned with the correct hole in the bracelet band
Fig. 2.
Foldover clasp bracelet fully closed and locked in place after release
Fig. 3.
  1. Find spring bar that connects bracelet to clasp.
  2. Using a pointed tool, push in spring bar and gently twist bracelet to disengage.
  3. Determine wrist size, then insert spring bar in correct bottom hole.
  4. Push down on spring bar, align with top hole and release to lock in place.

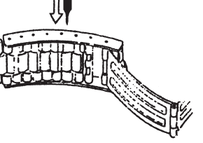
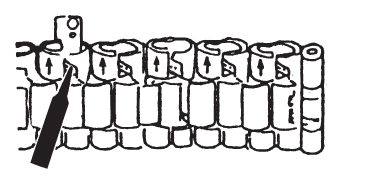
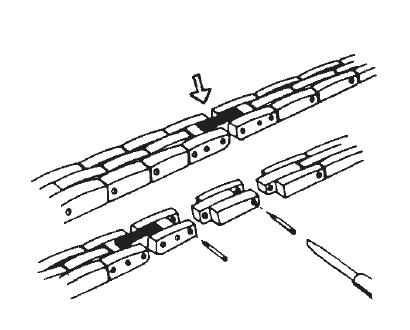
Re-Assembly

Bracelet link pin being pushed back in the opposite direction and pressed flush into the bracelet
  1. Rejoin bracelet parts.
  2. Push pin back into link in opposite direction of arrow.
  3. Press pin down securely into bracelet until it is flush.

Battery

The watch button cell or coin battery is not intended to be replaced by a consumer. Only a jeweler or other professional is to replace the battery.